
Window Screen Deep Clean: Bright Again for Free
Equal parts vinegar and water, a soft brush, and a garden hose — and the hazy light quality you blamed on weather all winter was actually just dirty screens.
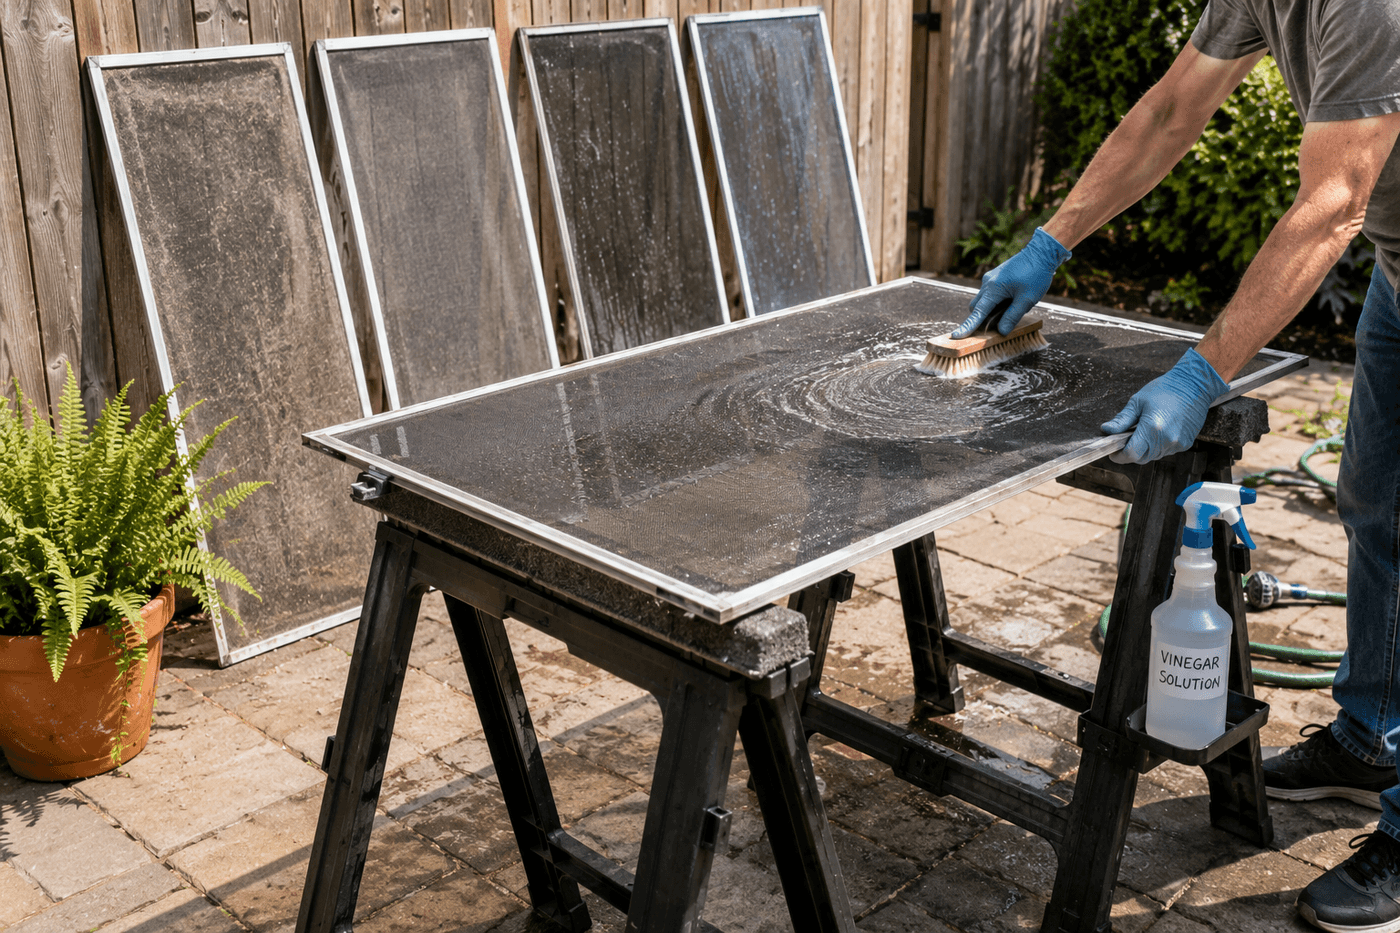
Window screens are one of those household surfaces that accumulate grime so gradually that the degradation in light quality they cause becomes invisible — the rooms simply seem a little dimmer than they used to, the light a little hazier, and neither observation gets connected to the screens that are filtering every photon coming through the window through a layer of pollen, dust, and environmental residue. The moment of connection — when a freshly cleaned screen is reinstalled and the room fills with the kind of clear, bright light it had when the screens were new — is one of the more dramatically satisfying moments available in a simple household cleaning task, and it costs nothing and requires only supplies already present in virtually every kitchen. White vinegar and warm water in equal parts dissolves pollen and dust buildup in the mesh openings that plain water cannot dislodge; a soft brush in small circular motions works the solution through the full mesh depth rather than across the surface only; and a gentle garden hose rinse removes everything cleanly without bending or stretching the mesh that high-pressure washing damages. An hour of outdoor cleaning on a warm morning restores a quality of interior light that most households have not experienced since the screens were installed.
What You'll Need
- White vinegar — standard grocery store white vinegar at 5% acidity; mixed 1:1 with warm water produces a solution acidic enough to dissolve pollen proteins and mineral deposits in screen mesh without corroding aluminum frames or damaging fiberglass mesh; cleaning vinegar at higher acidity is not necessary and may corrode aluminum frames with extended contact
- Warm water — warm rather than cold for the cleaning solution; warm water dissolves the organic compounds in pollen and dust buildup more effectively than cold water and helps the vinegar solution penetrate the full mesh depth rather than beading on the surface
- Spray bottle — for applying the vinegar solution evenly across the full screen mesh; a spray bottle produces the fine, even coverage that saturates the mesh without flooding the frame joints where water can pool and promote rust on steel frame screens
- Soft bristle brush — a dedicated cleaning brush with soft synthetic bristles; stiff bristles bend and distort screen mesh during scrubbing; a soft vegetable brush, soft dish brush, or dedicated screen cleaning brush applies circular scrubbing pressure without deforming the mesh openings
- Microfiber cloths — for wiping the frame surfaces and for the final wipe of the mesh after rinsing to remove any water spots before the screen fully dries; microfiber grabs dust and pollen particles rather than pushing them across the surface as cotton cloths do
- Garden hose with adjustable nozzle — set to a gentle shower or flat spray rather than jet; jet pressure bends and distorts screen mesh permanently and can pop the mesh out of the frame channels; a gentle shower rinse removes the loosened debris without stressing the mesh structure
- Two sawhorses or a patio table — for supporting each screen flat at a comfortable working height during cleaning; cleaning screens flat rather than propped vertically prevents water and cleaning solution from running across already-cleaned sections and producing streaks in the finished clean area
- Old towels or drop cloth — for padding the sawhorses or table surface so the screen frame does not scratch or dent against hard support edges during cleaning pressure
How to Clean Them
- Remove all screens from their windows before cleaning — screens cleaned in place drip cleaning solution down the window glass and onto interior window sills, and the flat working position that produces the most thorough cleaning is only achievable with the screen removed and supported horizontally. Number each screen with a small piece of tape as it comes out if different windows take different screen sizes, which eliminates the reinstallation puzzle that missing this step creates at the end of the session.
- Vacuum both sides of each screen with the brush attachment before any liquid is applied — dry vacuuming removes the loose surface dust and pollen that would otherwise turn into a muddy paste when the vinegar solution is applied, which is harder to rinse cleanly from the mesh than the original dry accumulation. Run the vacuum brush attachment across the mesh surface in one direction, then across it perpendicular to the first pass, which dislodges debris caught in the mesh openings from two directions rather than one.
- Mix the cleaning solution in the spray bottle — equal parts white vinegar and warm water, shaken briefly to combine before use. Mix fresh solution for each cleaning session rather than storing premixed solution, which loses its cleaning effectiveness as the acidity dissipates over time and as the water temperature drops to room temperature or below.
- Spray the vinegar solution generously across the full mesh surface on one side of the screen — saturate the mesh completely rather than applying a light misting, which does not penetrate to the full mesh depth where the most compacted pollen and dust buildup is concentrated. Allow the solution to dwell for 60–90 seconds before scrubbing; the dwell time is when the acidity is actively dissolving the pollen protein and mineral deposit that bonds debris to the mesh filaments, and scrubbing before the dwell time is complete requires significantly more physical effort for a lesser result.
- Scrub with the soft brush in small circular motions — work in overlapping sections across the full mesh surface, applying enough pressure to feel the brush working through the mesh depth without bending the mesh visible from the other side. The circular scrubbing motion loosens debris from the mesh openings in all directions simultaneously, which is more effective than straight linear strokes that push debris from one mesh opening to the adjacent one rather than dislodging it from the mesh entirely.
- Wipe the frame surfaces with a microfiber cloth while the mesh solution is still wet — frame channels and corners accumulate compacted dust and cobweb debris that the spray and scrub process does not address, and cleaning the frame while everything is wet means the frame dirt comes out in the same rinse as the mesh debris rather than requiring a separate frame cleaning pass after the mesh is rinsed clean.
- Rinse the screen with a gentle garden hose spray — hold the nozzle 12–18 inches from the screen surface and use a flat or shower spray pattern that wets the full mesh evenly without concentrating pressure at any single point. Rinse from one end of the screen to the other in a single slow pass, then flip the screen and rinse the second side; rinsing both sides ensures that debris dislodged from the first side and deposited on the second side is removed rather than drying onto the clean mesh.
- Stand each rinsed screen upright against a fence, wall, or other vertical support to drain and air dry completely — 20–30 minutes in warm weather with good air circulation; longer in cool or humid conditions. Confirm complete dryness by feeling the mesh at the screen center, which dries last because it receives the least airflow; any remaining moisture at the center indicates the screen is not ready for reinstallation, where a damp screen reinstalled against a window pane can cause mold growth at the window perimeter where the wet mesh contacts the frame seal.
Window and door installation professionals who service residential screens as part of annual maintenance programs consistently recommend one screen care practice that most homeowners overlook and that doubles the effective lifespan of screen mesh before replacement is needed: apply a light coat of automobile paste wax to clean, dry aluminum screen frames once per year after the annual cleaning. Aluminum screen frames oxidize gradually in outdoor exposure — producing the chalky white oxidation layer that makes frames look aged and that transfers white residue to hands during screen removal and reinstallation. Paste wax applied to clean aluminum frame surfaces fills the microscopic surface pores that oxidation begins in, slows the oxidation process significantly, and makes future cleaning sessions faster and more effective because the waxed frame surface repels the bonding of dirt and pollen rather than allowing them to accumulate in the oxidized surface texture. Window installation professionals who specify this wax treatment for aluminum frames in new installations report frames that remain clean and oxidation-free for three to four years between treatments rather than showing visible oxidation within the first season — which is the difference between frames that look maintained and frames that look aged regardless of how clean the mesh they hold actually is.














