Window AC Gap Fix: Sealed and Efficient for $12
Foam board behind the accordion panels, weatherstripping at every frame edge, rope caulk at the window sash — and the unit that ran constantly without cooling the room finally has a sealed installation to work with.
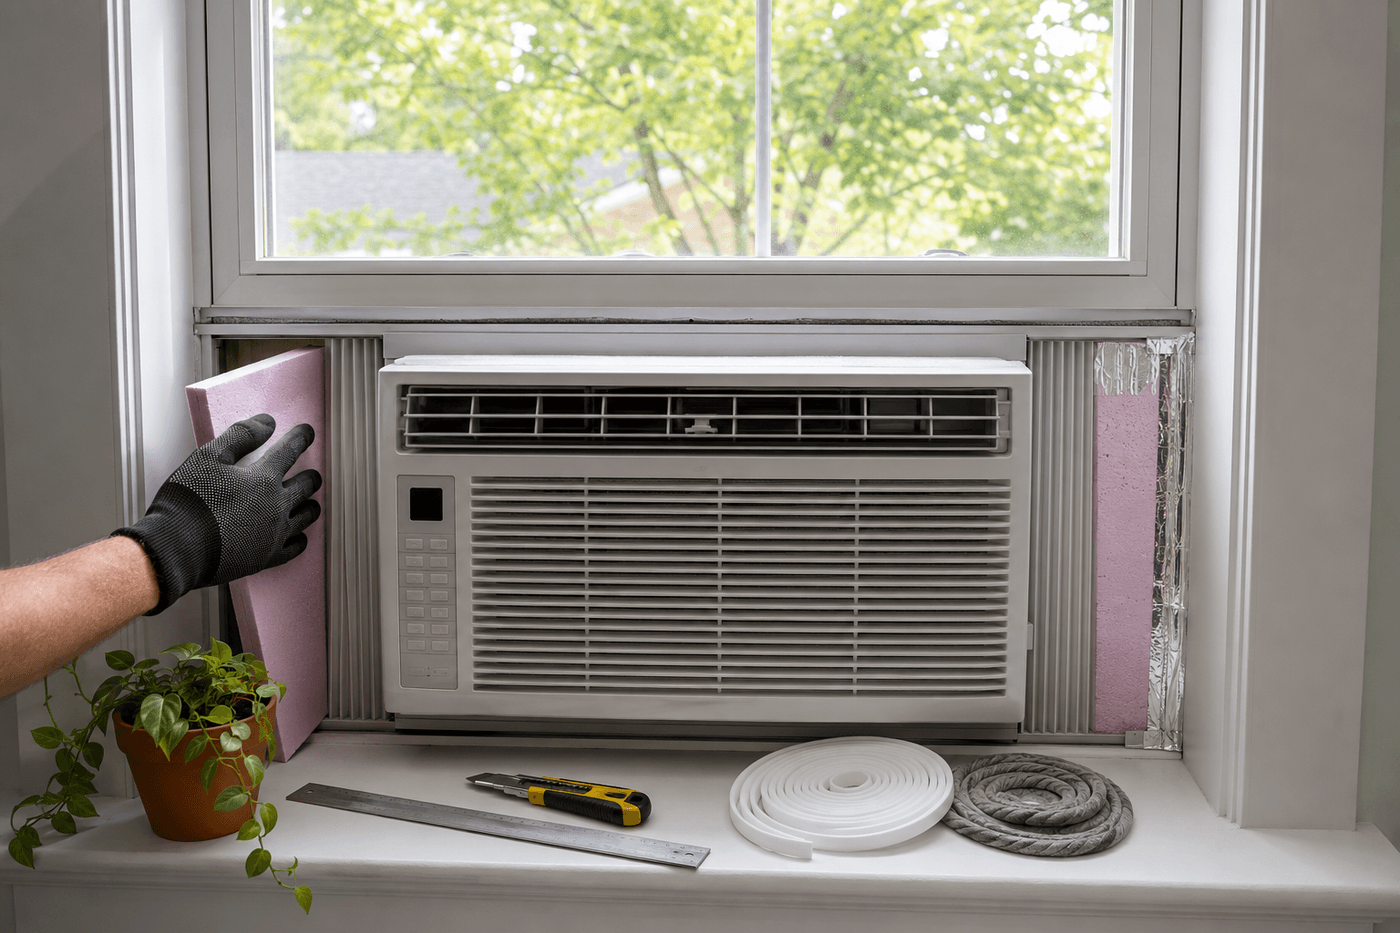
A window air conditioner that runs constantly without achieving its set temperature is almost never a failing unit — it is almost always a leaking installation that is simultaneously trying to cool the room and competing with a continuous exchange of warm outdoor air flooding in through gaps that are invisible from across the room and dramatically visible to a candle held nearby. The accordion side panels that come standard with every window air conditioner are designed for installation convenience rather than insulation performance; they expand to fill the width gap but leave a thin, poorly sealed barrier that warm outdoor air passes through freely while conditioned cool air leaks outward. Cutting rigid foam insulation board to fit the same gap adds the insulation depth and the airtight fit that the accordion panels alone cannot provide. Self-adhesive weatherstripping along every edge where the unit contacts the window frame addresses the perimeter seal. Removable rope caulk at the window sash joint where the lowered upper window meets the raised lower window addresses the third leak point that most installations ignore entirely. The full fix costs $12, takes twenty minutes, and produces an installation that the air conditioner was always capable of performing to — the unit has not changed, only the conditions it is working within.
What You'll Need
- Rigid foam insulation board, ½-inch or 1-inch thickness — pink or blue extruded polystyrene (XPS) rather than white expanded polystyrene beadboard; XPS maintains its shape and insulating value when compressed against the accordion panel; beadboard compresses and crumbles at the cut edges; one 2x2 foot sheet of ½-inch XPS covers the side panel gaps of most standard window AC installations with material to spare (~$5–8 at hardware stores for a small sheet or cut from a larger sheet)
- Self-adhesive foam weatherstripping, ½-inch x ¾-inch — for sealing the perimeter gaps where the AC unit body contacts the window frame on all sides; the closed-cell foam compresses to fill irregular gaps at the unit-to-frame contact points; self-adhesive backing makes installation one-handed without additional adhesive; a 10-foot roll covers the full perimeter of most installations (~$4–6)
- Removable rope caulk — for the window sash joint where the lowered upper window sash presses against the raised lower sash with the AC unit in between; rope caulk is pressed into the gap by hand, seals completely against air movement, and peels away cleanly at the end of the season without leaving residue or damaging the window finish; do not use permanent silicone caulk at this joint (~$3–5 per roll)
- Utility knife and straightedge — for cutting foam insulation board to the precise dimensions of each side panel gap; foam cuts cleanly with a single firm score from a sharp utility knife against a metal straightedge; multiple light passes produce ragged edges that fit poorly; one firm scored cut through the full thickness produces a clean, straight edge
- Tape measure — for measuring each side panel gap precisely before cutting foam; the left and right gaps are often slightly different widths and heights on the same installation and should be measured individually rather than cutting both panels from one measurement
- Candle or incense stick — for the pre-fix leak diagnostic and the post-fix confirmation test; a candle flame held near the installation perimeter reveals air movement that is completely invisible visually; the flame bends toward the outside where warm air is flowing in and toward the inside where cool air is leaking out; the post-fix test with the same candle confirms the seal is complete
- Foil HVAC tape or regular packing tape — for securing the foam panels to the accordion panels and to each other at any joints where two foam pieces meet; tape also seals the small gaps that remain between the foam panel edges and the window frame sides that the weatherstripping does not fully cover (~$3–5)
How to Seal It
- Diagnose all leak points before cutting any foam — light a candle and hold it within 2 inches of the full installation perimeter in a slow, deliberate pass: along the top of the unit where it meets the window sash, along both sides where the accordion panels contact the window frame, along the bottom where the unit rests on the window sill, and at the window sash joint above the unit. Mark every point where the flame bends with a small piece of tape; the tape marks become the specific areas the repair targets rather than a general impression that the whole installation leaks. Most installations have three to five distinct leak points rather than a uniform perimeter gap.
- Measure each side panel gap independently — measure the height of the gap from the window sill to the underside of the lowered upper sash, and the width from the edge of the AC unit body to the window frame side. Write both dimensions on the foam sheet in pencil before cutting; foam that is cut ⅛ inch wider than the gap on each side compresses slightly during installation to produce a friction fit that holds without adhesive and seals more completely than a piece cut to exact dimension that fits loosely.
- Cut the foam panels with a utility knife and metal straightedge — score firmly in a single pass rather than multiple light passes, which produces a clean break rather than a compressed, ragged edge. Cut both the width and height dimensions before test-fitting in the gap; a panel that fits correctly should require light hand pressure to slide into position and should stay in place without being held when pressure is released. A panel that falls out of the gap needs to be recut ¼ inch wider; one that cannot be pressed into position needs to be trimmed ⅛ inch on the binding edge.
- Install the foam panels by pressing them firmly into the side gaps between the accordion panel exterior face and the window frame — the foam sits on the exterior side of the accordion panel, adding insulation depth between the conditioned interior air and the outdoor air. Press the panel into position so all four edges contact the surrounding surfaces; any edge that does not make full contact is a gap that undermines the seal the panel is intended to create. Secure the installed panel with two strips of foil HVAC tape along the top and side edges to prevent the panel from falling out during the season.
- Apply self-adhesive weatherstripping along every perimeter edge where the AC unit body contacts the window frame — peel the backing and press firmly along the full length of each contact surface, including the top of the unit where it meets the lowered upper sash, both sides where the unit body contacts the window frame, and the bottom where the unit sits on the window sill. The weatherstripping compresses under the weight and contact pressure of the installed unit to fill the irregular contact gap that exists at every installation where the machined unit body meets the painted or weathered window frame surface.
- Apply rope caulk to the window sash joint above the AC unit — press a continuous rope of caulk into the gap between the lowered upper sash and the raised lower sash along the full width of the window opening, working from one side to the other in a single continuous application. The rope caulk fills the irregular gap at this joint and creates a seal that neither the accordion panels nor the foam inserts address; this joint is where the window frame was designed to have a gap — to allow the upper sash to be raised — and it is consequently one of the most significant air leak points in any window AC installation.
- Confirm the completed seal with a second candle test — pass the candle along the full perimeter of the installation in the same slow, deliberate sequence as the initial diagnostic, and at each previously identified leak point confirm that the flame now holds steady rather than bending. A flame that still bends at a specific point after the seal fix indicates an incomplete foam panel fit, a gap in the weatherstripping application, or a leak point that was not addressed in the repair; mark it and investigate whether the foam edge needs additional tape, the weatherstripping needs an additional layer, or a second rope caulk application is needed at that specific point.
- Assess the performance improvement over the following 24–48 hours — a sealed installation produces a measurable room temperature improvement and a noticeably reduced compressor cycling frequency within the first day of operation compared to the leaking installation. If the room temperature improves but the compressor still cycles frequently, the remaining inefficiency is in the unit itself rather than the installation — a unit that is undersized for the room volume will cycle frequently regardless of how well sealed the installation is, and the seal fix will have maximized the performance the undersized unit is capable of delivering.
HVAC technicians and home energy auditors who assess window AC installations as part of residential energy efficiency evaluations consistently identify one additional seal point that almost every DIY foam panel repair misses and that accounts for a significant portion of the remaining air infiltration after the side panels and sash joint are addressed: the gap between the bottom of the AC unit and the window sill, where the unit's weight creates a contact point but not an airtight seal against the sill surface and any existing weatherstripping or paint irregularities. This bottom gap is the lowest point of the installation and is also where condensate water from the unit drains outward — which means it cannot be sealed with foam or permanent caulk without blocking drainage. The correct solution is a bead of rope caulk applied along the interior side of the unit-to-sill contact line only, leaving the exterior drainage path open; the interior rope caulk seals the air infiltration path without blocking the condensate drainage that the exterior gap serves. Energy auditors who address this bottom seal point in addition to the standard side panel and sash repairs report completing the full perimeter seal that eliminates the remaining air infiltration that a side-panel-and-sash-only repair leaves in place — typically reducing measured air infiltration at the installation by an additional 15–20% beyond what the visible gap repairs achieve.