Squeaky Door Fix: Silent and Smooth in 20 Minutes
Tap out the hinge pin, wipe it, coat it, tap it back — and the squeak that has been waking everyone up for six months is gone in about four minutes per hinge.
Interior door problems fall into a specific category of household annoyances where the daily friction they create is completely disproportionate to the simplicity of the fix — the squeak that wakes the household when someone uses the bathroom at night, the bedroom door that requires a shoulder shove to close, the latch that has to be lifted and jiggled into the strike plate on every use. Every one of these problems has a cause that is identifiable in under a minute and a fix that takes 15–30 minutes with tools already in the house. A squeaking hinge needs lubrication at the pin — four minutes per hinge. A sagging door that rubs the frame needs its hinge screws tightened or replaced with longer ones — five minutes per hinge. A door that contacts the frame at a specific point needs light sanding or planing at that point — ten minutes. A latch that misses the strike plate needs either the plate filed or repositioned — fifteen minutes. The full diagnostic and repair sequence for a door with all of these problems simultaneously takes less time than the collective irritation the door produced in the two weeks before someone finally addressed it.
What You'll Need
- Petroleum jelly or light machine oil — the correct hinge pin lubricants for a lasting squeak fix; petroleum jelly stays in place through repeated hinge cycling and does not attract dust the way WD-40 does; WD-40 temporarily silences squeaks but evaporates and leaves a residue that makes the squeak return within days
- Hammer and a spare nail — for tapping hinge pins up and out from below; use the nail as a drift punch inserted at the bottom of the hinge pin and tap upward with the hammer; a standard 16d nail works for most residential door hinge pins
- Clean cloth or paper towels — for wiping the hinge pin clean before lubrication; a pin coated in old dried lubricant and metal dust squeaks through fresh lubricant applied on top of the contamination; the cleaning step is what makes the fix last
- Phillips and flathead screwdrivers — for tightening hinge screws and adjusting the strike plate; confirm screw head type on the hinges before starting the repair to have the correct driver on hand
- 3-inch wood screws — for replacing stripped hinge screws; longer screws that reach through the door jamb into the structural framing behind it provide dramatically more holding strength than the original short screws and are the permanent fix for a sagging door caused by loose hinges (~$3–4 per box)
- Toothpicks and wood glue — for stripped screw holes where screws spin without biting; the same toothpick repair that fixes cabinet hardware and door handles works identically for hinge screws in door jamb wood
- Sandpaper, 80- and 120-grit, wrapped around a sanding block — for the specific contact point where the door rubs the frame; sand only the identified contact area rather than the full door edge, which removes the minimum material needed to eliminate the rub without creating a visible gap
- Hand plane or block plane — optional; more efficient than sandpaper for doors that need more than a light touch; a block plane removes material in controlled, consistent shavings that are easier to manage than sanding for larger contact areas
- Flat file or needle file — for enlarging the strike plate opening when the latch consistently hits the plate face rather than entering the opening cleanly; a few file strokes enlarge the opening in the direction the shiny latch mark indicates
- Lipstick or chalk — applied to the latch face to transfer a mark to the strike plate during a slow door close, precisely identifying where the latch contacts the plate before filing or repositioning
How to Fix It
- Diagnose the full door condition before addressing any single problem — open and close the door slowly and completely, listening for squeak location and watching for frame contact points; press on each hinge to feel for any give that indicates loose screws; observe the latch engagement to confirm whether it enters the strike plate cleanly or contacts the plate face. Addressing all problems in a single session is more efficient than fixing the squeak today, the rub next week, and the latch the week after that when the door's full condition is already visible and the tools are already out.
- Tighten all hinge screws before lubricating the pins — loose hinges allow the door to sag out of square, which causes rubbing and latch misalignment that the lubricant repair cannot address. Drive each hinge screw fully with firm hand pressure on the screwdriver; a screw that spins without tightening indicates a stripped hole that needs the toothpick repair or a longer replacement screw before any other repair on the door will be fully effective.
- Replace stripped hinge screws with 3-inch screws driven into the structural framing behind the jamb — remove the stripped screw, insert the 3-inch screw in the same hole, and drive it until the head is flush with the hinge leaf surface. The longer screw bypasses the stripped jamb wood entirely and anchors in the solid framing stud behind it, providing dramatically more holding strength than the original short screw and permanently eliminating the hinge-sag that causes most sticking and rubbing problems in residential interior doors.
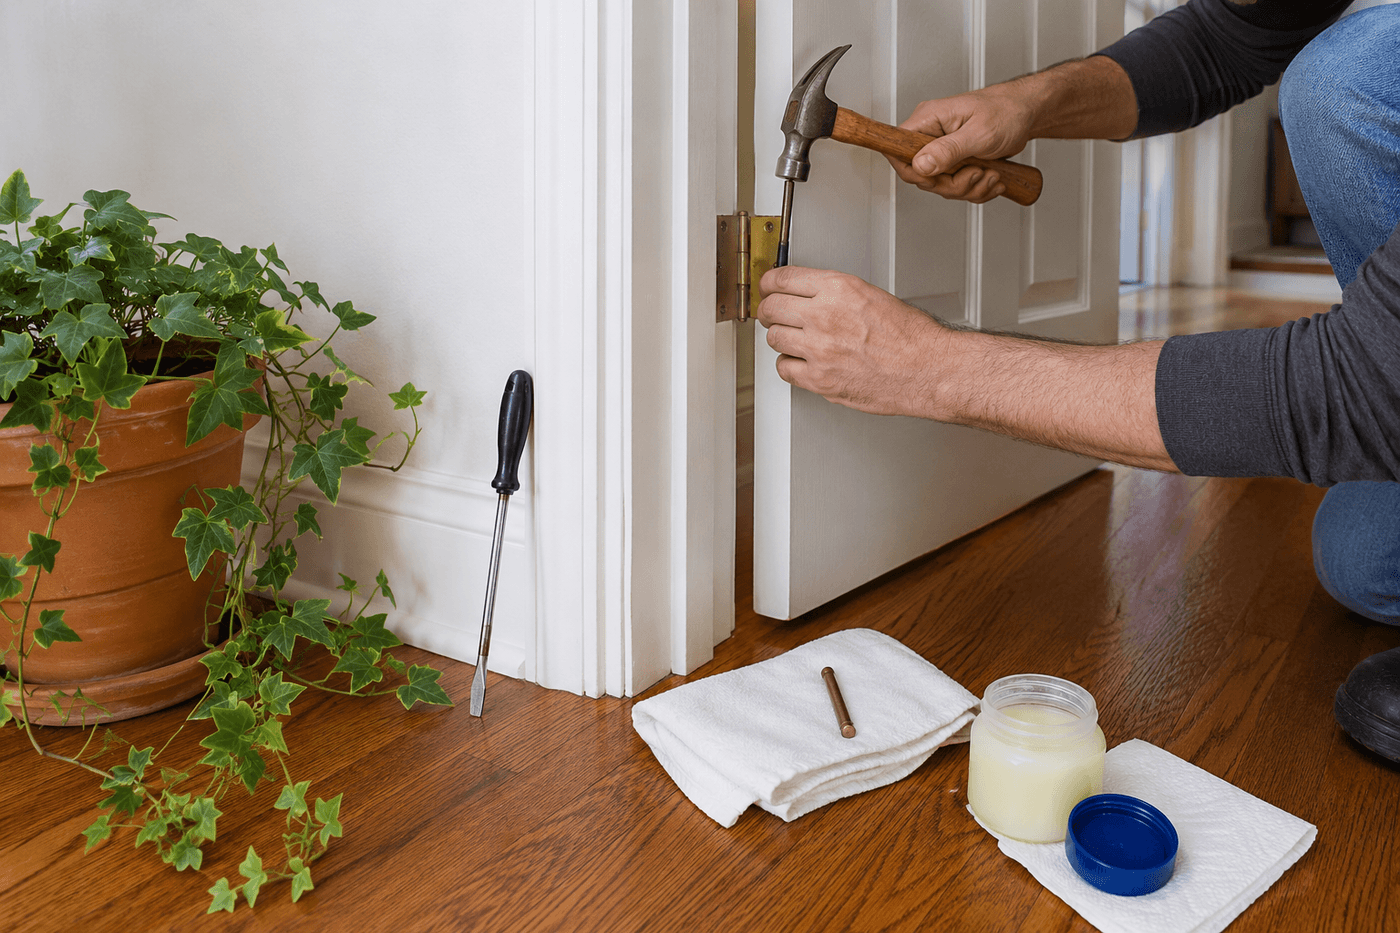
- Lubricate squeaking hinges one at a time — keep the door hanging and supported on the other hinges while each pin is removed; do not remove all pins simultaneously, which would require a second person to support the door during the full process. Insert a nail at the bottom of the hinge pin barrel, tap upward with the hammer until the pin rises enough to grip with fingers or pliers, and pull the pin fully out. Wipe the pin clean with a cloth, coat all surfaces with petroleum jelly or a drop of machine oil, and tap the pin back down until fully seated.
- Work the door through its full range of motion ten to fifteen times after lubricating each pin — the movement distributes the lubricant from the pin into the barrel surfaces where the actual metal-on-metal friction occurs. A pin that is lubricated but not worked through the hinge cycle may squeak on the first few uses after the repair as the fresh lubricant distributes; fully working the door after each pin immediately confirms the squeak is eliminated rather than reduced.
- Identify door frame contact points by closing the door slowly while watching and listening for the specific location where resistance begins — the contact point is almost always visible as a scuff mark or paint transfer on the door edge or frame face. Apply lipstick or chalk to the suspected contact area, close the door firmly once, and open it to read the transfer mark on the frame; the mark precisely identifies the contact geometry and confirms how much material needs to be removed and in which direction.
- Sand the identified contact point with 80-grit wrapped around a sanding block — sand only the contact area rather than the full door edge, remove a small amount of material, close the door to test, and continue in small increments until the rub is eliminated. The goal is removing the minimum material needed to eliminate the contact; aggressive sanding that removes too much material creates a visible gap at the door edge that is permanently visible and cannot be restored without filling and repainting.
- Diagnose latch problems by applying lipstick or chalk to the latch face, closing the door normally, and opening it to read the transfer mark on the strike plate — the mark shows exactly where the latch contacts the plate and in which direction the plate needs to be moved or filed to achieve clean engagement. A mark centered on the plate face but below the opening means the plate needs to be moved down or the opening needs to be filed downward; a mark on the plate face to one side means the plate needs to move in that direction or the opening needs to be filed that way.
- File the strike plate opening in the direction indicated by the latch mark — use a flat file with light, even strokes in the direction of needed adjustment, removing a small amount of material, testing, and continuing in small increments. For misalignment too large to correct by filing alone, remove the strike plate, use a chisel to extend the mortise in the required direction by the needed amount, reposition the plate in the extended mortise, and secure with the original screws; touch up any exposed wood in the mortise extension with matching paint before reinstalling the plate.
Finish carpenters and door installation specialists who hang interior doors in new construction and renovation projects use one preventive technique at initial installation that eliminates hinge squeak and sag permanently rather than requiring periodic maintenance: apply a thin coat of paste wax to every hinge pin and barrel surface before installation, and drive one 3-inch structural screw through each hinge into the framing stud behind the jamb in addition to the standard short jamb screws. The paste wax is a dry lubricant that does not evaporate, does not attract dust, and maintains the smooth, squeak-free hinge action indefinitely without any reapplication — finish carpenters who use this technique report installing doors that remain completely squeak-free for the lifetime of the building without any hinge maintenance. The single structural screw per hinge anchors the hinge directly to the framing stud rather than relying solely on the jamb wood, which is what prevents the gradual hinge sag that causes rubbing, latch misalignment, and the cascading door problems that most homeowners attribute to wood movement or settling when the actual cause is hinge hardware that was never anchored adequately at installation. Apply both techniques during this repair session and the door should require no further attention for years.