Slat's Entertainment: Turn Old Shutters into Tool Storage
A pair of salvaged shutters mounted horizontally on the garage wall — the $20 storage solution that holds every long-handled garden tool and looks intentionally designed
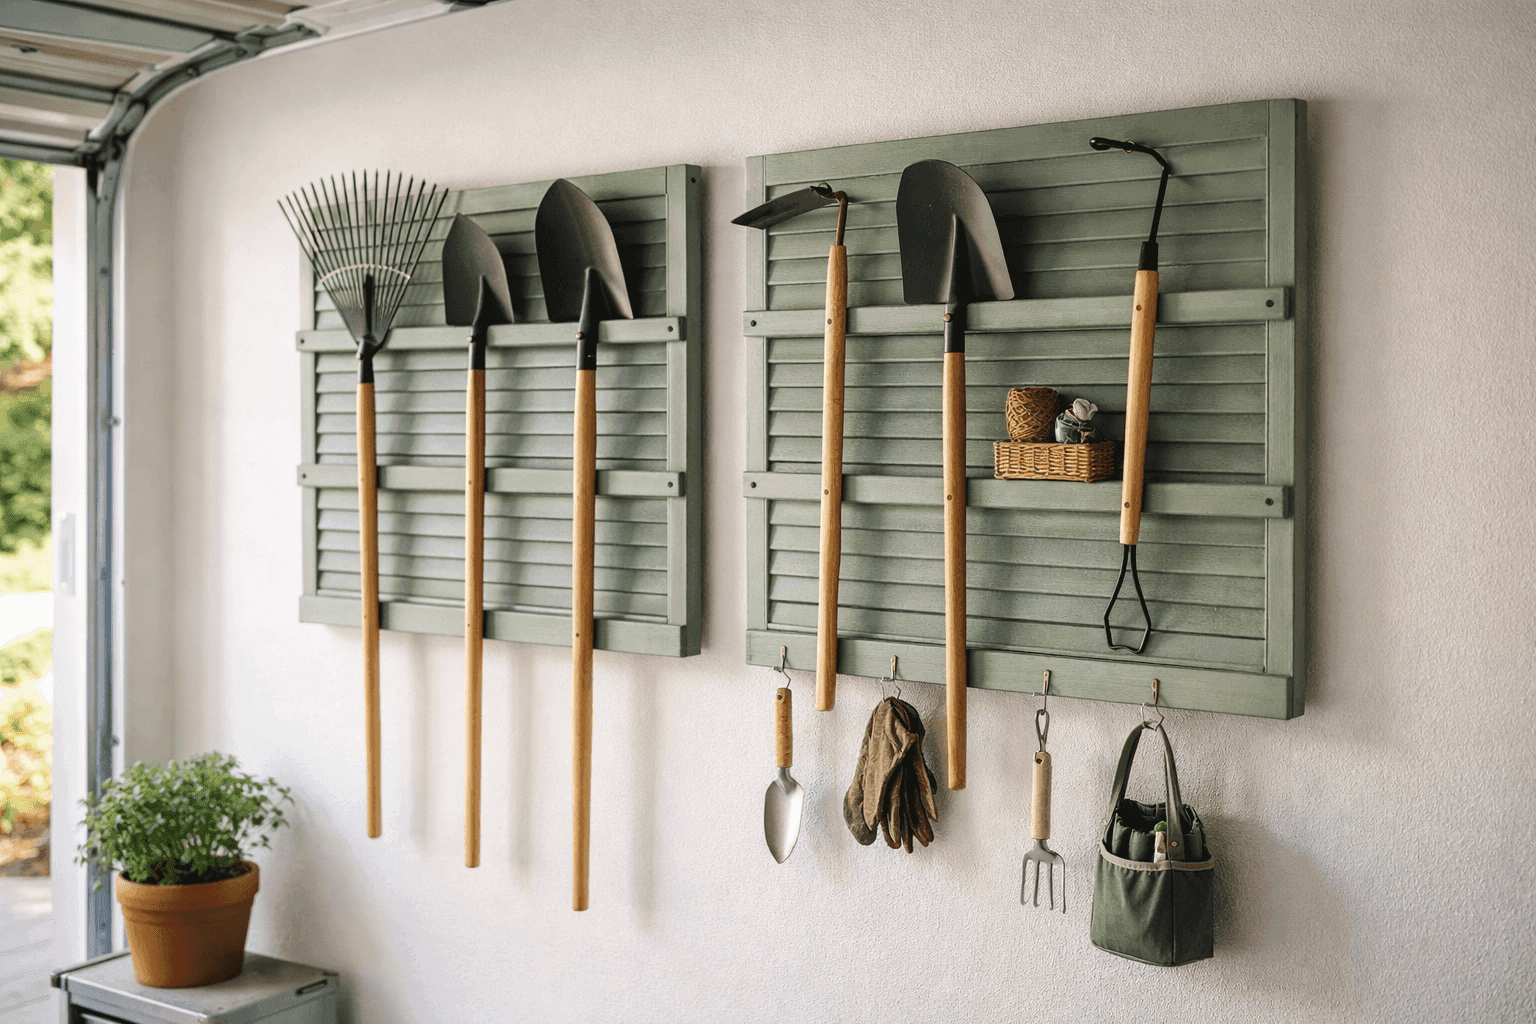
Garden tool storage is one of those problems that most people solve badly for years before they find something that actually works — and the solutions that work best are almost never the ones sold specifically for the purpose. A pair of wide wooden shutters mounted horizontally on a garage or shed wall turns out to be the most functional long-handled tool storage available anywhere at any price: the horizontal slats create natural channels that hold rake, shovel, and hoe handles at exactly the right angle to stay put without slipping, the slat spacing accommodates multiple tool sizes simultaneously, and the whole system works without a single specialized hook or bracket beyond what's needed to mount the shutters to the wall. The look is genuinely beautiful in a way that a row of individual tool hooks or a commercial pegboard system never quite manages — mounted and painted, salvaged shutters read as a deliberate design choice rather than a storage solution. Source them from a salvage shop, Facebook Marketplace, or the curbside where someone else left them behind, paint them in a color that suits the space, and spend $20 in hardware to create the garage wall that makes every person who visits stop and take a picture.
What You'll Need
- The Shutters
- One or two wide wooden louvered shutters — wider is better for tool storage, with 12–18 inch wide shutters providing significantly more usable slat length than narrower decorative shutters. Pair them side by side for a longer storage run or use a single wide shutter as a compact single-wall solution — free to ~$15 at salvage shops, ReStore, Facebook Marketplace, or from the curb
- Louvered shutters specifically — the angled slats that allow air through are exactly what creates the holding channels for tool handles. Solid panel shutters don't have slats and don't work for this application regardless of how attractive they are
- Check the slat condition before committing to a pair — press each slat to confirm it doesn't flex or crack, and check the pivot mechanism if the slats are adjustable. Fixed-slat shutters are actually preferable for this project since there's no risk of the slats rotating out of position under tool handle weight
- Avoid shutters with significant rot in the frame rails — the frame needs to be structurally sound to hold the mounting screws that support the combined weight of multiple full-length garden tools
- Paint & Prep
- 120 and 220-grit sandpaper for surface prep and smoothing between coats
- Exterior primer for bare wood or previously painted shutters — one coat before the color coat ensures even adhesion and prevents old stain bleed-through — ~$10–$15 per can
- Exterior latex paint in your chosen color — semi-gloss finish holds up to the garage environment and wipes clean easily — one quart covers a full shutter pair with coats to spare — ~$18–$25
- A 2-inch angled brush for cutting into the slat edges and a small foam roller for the flat frame surfaces — painting around individual slats with a roller alone leaves the slat edges uncoated and the joints looking unfinished
- Mounting Hardware
- Heavy-duty wall anchors or lag screws for mounting into wall studs — the combined weight of multiple long-handled tools can reach 30–50 lbs, which requires mounting into solid framing rather than just drywall anchors — ~$4–$8 for a pack
- 3-inch exterior screws for driving through the shutter frame rail and into wall studs — two mounting points per shutter minimum, four is better for a pair of shutters holding heavy tools — ~$4–$6 for a small box
- A stud finder for locating framing behind the garage wall surface — mounting into studs is what makes the difference between a storage system that holds tools safely for years and one that slowly pulls away from the wall under load
- A level for confirming the shutters are perfectly horizontal before driving the final screws — a storage system that looks slightly tilted is one that bothers you every time you walk into the garage
- Accessories
- S-hooks in two or three sizes for hanging smaller hand tools, gloves, and garden bags from the bottom frame rail of the shutters — ~$3–$5 for an assorted pack
- A small wire or wicker basket that fits between two slat channels for holding gloves, twine, small hand tools, and garden accessories — free from your existing storage or ~$5–$10 at a thrift store
- Optional: small chalkboard labels or paint pen labels on the wall beside each tool position so every tool has a designated spot that makes putting things away as automatic as taking them out
How to Build It
- Clean and assess the shutters thoroughly before any prep work — scrub both faces and all slat surfaces with a stiff brush and soapy water to remove dirt, cobwebs, and loose paint, then let them dry completely and inspect in good light for any structural problems that would compromise their ability to hold tool weight. A shutter with loose slats, a cracked frame rail, or significant soft spots in the wood needs repair or replacement before painting and mounting — decorating a structurally compromised shutter just makes an unstable storage system look more attractive temporarily.
- Sand and prime the shutters before painting — work the sandpaper along the frame rails and across the slat faces to scuff the existing surface, paying extra attention to any areas with peeling or flaking old paint that would telegraph through the new finish. Apply one coat of exterior primer to all surfaces, working the brush into the angles where each slat meets the frame so no raw wood is left exposed to moisture from the garage environment. Let the primer cure fully before applying color.
- Paint in the mounting orientation — lay the shutters horizontally on sawhorses or a drop cloth in the same position they'll be on the wall, which is how you'll interact with the finished storage system. Painting in the mounted orientation lets you see exactly how the finished surface will look from eye level and ensures the slat faces and angles are painted correctly for the horizontal mounting position rather than the vertical position they were designed for. Two thin coats with a full dry time between coats and a light 220-grit sand between coats produces a smooth, professional finish that holds up to the garage environment.
- Plan the wall position before drilling anything — hold the painted shutters against the wall at your intended mounting height and confirm the slat angle correctly cradles a tool handle when the shutter is horizontal. Louvered slats are designed to angle downward when the shutter is vertical, which means when the shutter is rotated horizontal the slats create a forward-and-upward angle that naturally cradles a tool handle resting through them — test this with an actual rake or shovel handle held through the slats before marking any holes to confirm the angle works with your specific shutter design.
- Locate and mark the studs behind the mounting wall using a stud finder, marking each stud location with a pencil at the height where the shutter frame rail will be mounted. Standard stud spacing of 16 inches means a pair of 36-inch wide shutters will span at least two studs — position the shutters so the frame rail mounting holes align with stud locations rather than the hollow wall cavities between them, which cannot support the tool weight without specialized heavy-duty hollow wall anchors rated for dynamic loads.
- Mount the first shutter by drilling pilot holes through the top frame rail at each stud location, holding the shutter level against the wall, and driving 3-inch screws through the rail and into the studs. Check the level after the first screw is driven and before the second — a single screw pivot allows you to adjust level easily, but two screws lock the position permanently. Pull firmly on the mounted shutter in all directions to confirm it's genuinely secure before loading any tools onto it.
- Mount the second shutter immediately beside the first if using a pair, aligning the frame rails so they sit at exactly the same height and create a continuous unbroken slat run across the full width of the installation. The visual impact of a pair of shutters mounted as a single continuous storage system is significantly greater than two individually mounted shutters with a visible gap between them — tight or just-touching frame rail edges create the magazine-ready look that makes people stop and take pictures.
- Load the tools and add accessories by sliding long-handled tools through the slat channels at varying heights to distribute weight evenly and create a visually varied display — rakes and hoes toward the center where the longest handles display most dramatically, and shorter-handled tools toward the edges. Add S-hooks to the bottom frame rail for hand tools and hanging accessories, tuck the basket between two slat channels at a comfortable reach height, and step back to confirm the overall arrangement looks intentional and balanced before calling it done. Then spend a moment acknowledging that this storage solution cost $20, came from someone's trash, and looks better than anything the hardware store sells for the same purpose.
Interior designers and garage organization specialists who style storage spaces for editorial shoots and home staging consistently make one observation about tool storage walls that most homeowners overlook: the color you paint the shutters relative to the wall behind them determines whether the storage system reads as a beautiful designed feature or just a functional wall of tools. Painting the shutters in a color that contrasts with the wall — sage green shutters against a white garage wall, deep navy against a light gray wall, warm cream against a dark charcoal — creates a visual frame that makes the tool display look like a deliberate installation rather than a utilitarian solution. Painting the shutters the same color as the wall makes them disappear into the background, which draws the eye to the tools themselves rather than the storage system, and a garage wall of random tool handles is never the feature you want to highlight. One additional detail that elevates the whole installation from organized to genuinely styled: hang the tools with the working ends facing in alternating directions rather than all pointing the same way — tines toward the wall on one tool, tines outward on the next — which creates visual rhythm and makes the display look like it was arranged rather than just stored.