Screen Door Fix: Smooth and Closing in 30 Minutes
Tighten the hinges, adjust the closer speed, confirm the latch alignment — and the screen door that has been dragging and slamming all spring is fixed before the afternoon is over.
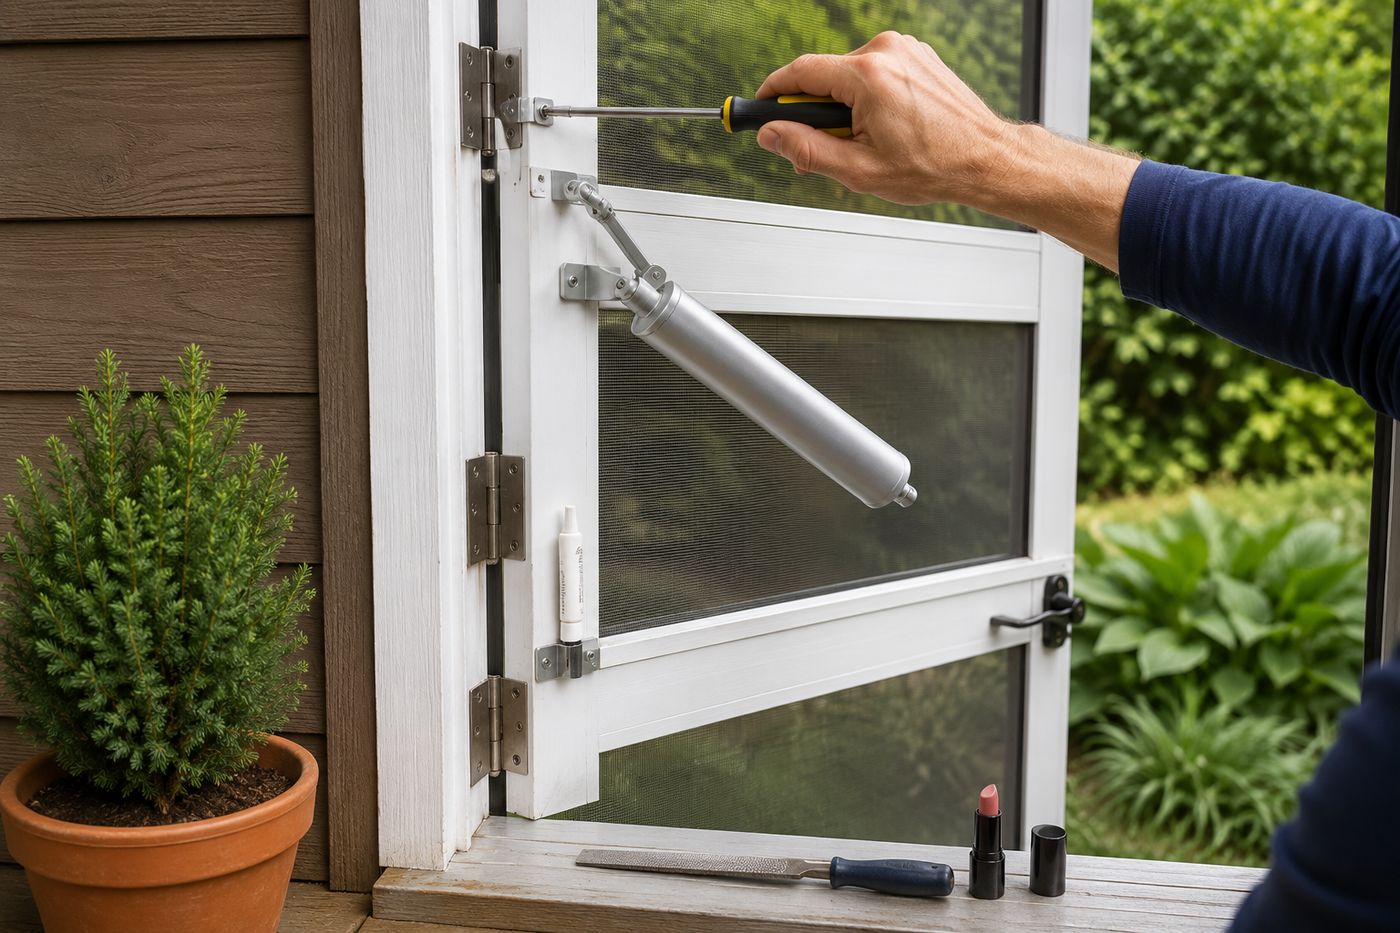
A screen door that drags at the corner, slams shut hard enough to rattle the frame, or bounces back open without latching is a daily source of friction that most households tolerate for an entire season before addressing — partly because the combination of problems makes the diagnosis feel complicated and partly because the fix, once understood, turns out to be a sequence of simple adjustments that anyone can complete in 30 minutes with a screwdriver. The sagging corner that causes dragging is almost always loose hinge screws; the slamming is the closer cylinder speed set too fast; the failure to latch is a misaligned strike plate or a closer that is not completing the full closing stroke. None of these problems requires replacement parts in most cases — they require tightening, adjusting, and aligning the hardware that has drifted from its correct position through a winter of thermal movement and normal use. Addressing all three issues in a single session rather than fixing one and waiting to see if the others resolve themselves is the approach that produces a screen door that operates correctly rather than a door that has been partially improved and still generates daily irritation.
What You'll Need
- Phillips and flathead screwdrivers — for hinge screw tightening and closer speed adjustment; confirm which head type the hinge screws and closer adjustment screw use before starting; most screen door hinges use Phillips head screws and most pneumatic closer adjustment screws use a flathead
- 3-inch exterior wood screws — for replacing stripped hinge screws that spin without tightening; longer screws reach through the door jamb into the structural framing behind it and provide dramatically more holding strength than the short original screws that stripped in the jamb wood; match the screw head type to the existing hinge screw head for a consistent appearance (~$3–4 per box)
- Toothpicks and wood glue — for rebuilding stripped screw holes where the wood fiber has been compressed and no longer grips any screw; insert toothpicks with glue into the stripped hole, allow to cure, snap off flush, and the rebuilt wood fiber grips the original screw length effectively
- Flathead screwdriver or hex key — specifically for the closer cylinder speed adjustment screw at the end cap of the pneumatic closer; this screw controls the air flow rate through the closer and therefore the closing speed; most closers use a slotted flathead adjustment screw; some use a hex set screw that requires the correct hex key size
- Silicone spray or white lithium grease — for lubricating the closer's pivot pin connections at both ends of the cylinder and at the bracket connection point; dry pivot connections cause the closer to bind rather than extend and retract smoothly, which produces the jerky, inconsistent closing behavior that speed adjustment alone cannot correct
- Flat file or chisel — for adjusting the strike plate position when the latch consistently contacts the plate face rather than entering the opening; a few file strokes enlarge the strike plate opening in the direction the latch mark indicates, or a chisel extends the mortise when plate repositioning is needed
- Lipstick or chalk — applied to the latch face to transfer a precise contact mark to the strike plate during a door close, identifying exactly where the latch hits before any filing or repositioning begins
- Replacement pneumatic closer — on hand as a contingency if the existing closer is leaking hydraulic fluid (visible as an oily residue on the cylinder body) or has physically failed rather than simply needing adjustment; a universal replacement screen door closer costs $8–15 at hardware stores and installs in 15 minutes
How to Fix It
- Diagnose the full door condition before touching any hardware — open and close the door slowly several times, watching where the door frame contacts the jamb at the dragging point, listening to the closing speed and whether the latch engages, and observing whether the door bounces back open after appearing to close. A complete picture of all the problems before the first screwdriver is picked up prevents the common situation of fixing one issue and then discovering another that should have been addressed in the same session while the tools were already out.
- Tighten all hinge screws first before any other adjustment — loose hinges are the root cause of most screen door problems including corner dragging, latch misalignment, and closer binding, and tightening them often partially or fully resolves problems that appear to be separate issues. Drive each screw firmly with hand pressure on the screwdriver; a screw that tightens and holds indicates a good wood bite; one that tightens briefly and then continues to turn indicates a stripped hole that needs the toothpick repair or a longer replacement screw.
- Repair stripped hinge screw holes with the toothpick method — remove the stripped screw completely, apply wood glue to three to four toothpicks, press them into the stripped hole until the hole is packed with glue-coated toothpick material, allow to cure for 30 minutes, snap the toothpick ends off flush with the surface, and drive the original screw back in. The rebuilt wood fiber grips the screw thread effectively and holds as well as undamaged wood at the same depth; a longer replacement screw is the more permanent solution but the toothpick repair is faster and entirely reliable for screen door hinge loads.
- Address remaining corner drag after hinge tightening by installing a 3-inch screw in the top hinge — the longer screw reaches the structural framing behind the jamb and pulls the top of the door back toward the frame, which raises the dragging corner by restoring the correct door alignment that the sagging hinge allowed to drift. Install the 3-inch screw in the top screw hole of the top hinge rather than replacing all the top hinge screws; one long screw through the top hinge into the framing stud applies the corrective force precisely where the sag originated.
- Lubricate the closer cylinder pivot connections before adjusting the closing speed — apply silicone spray or white lithium grease to the pivot pin at both the door-mounted bracket end and the frame-mounted bracket end of the closer, working the door through several full open-and-close cycles to distribute the lubricant into the pivot bearing surfaces. A closer with dry pivot connections produces binding and inconsistent closing behavior that mimics incorrect speed adjustment; lubricating first confirms whether the speed adjustment is actually needed or whether the closing problem was binding rather than speed.
- Adjust the closer speed with the adjustment screw at the end cap of the cylinder — small incremental turns rather than full rotations; turning clockwise restricts the air flow and slows the closing speed; counterclockwise increases the flow and speeds the close. Make a quarter-turn adjustment, close the door and observe the full closing stroke, and continue in quarter-turn increments until the door closes firmly enough to engage the latch without slamming. The correct closing speed produces a door that closes smoothly and reaches the latch position without bouncing back, which requires the closer to maintain enough force through the final 10–15 degrees of closing stroke to overcome the latch spring resistance.
- Check the closer for leaking hydraulic fluid if speed adjustment does not improve closing behavior — run a finger along the full length of the cylinder body and at both end connections; an oily or tacky residue indicates the cylinder seal has failed and the closer is losing the hydraulic pressure that controls closing speed. A leaking closer cannot be repaired by adjustment and requires replacement; a universal replacement screen door closer from the hardware store installs in 15 minutes using the existing bracket holes and produces immediately correct closing behavior.
- Diagnose latch alignment by applying lipstick or chalk to the latch face, closing the door at normal speed, and opening it to read the transfer mark on the strike plate — the mark shows exactly where the latch contacts the plate and in which direction adjustment is needed. A mark centered on the plate face above the opening means the plate needs to move up or the opening needs to be filed upward; a mark to one side means lateral repositioning or filing. File the strike plate opening in the indicated direction in small increments, testing after each filing pass, until the latch enters the opening cleanly on every closing cycle without the door needing to be lifted or pushed to engage.
Exterior door and screen door installation specialists who service residential doors as part of seasonal maintenance programs recommend one preventive adjustment that most homeowners never make and that eliminates the annual spring re-adjustment cycle that most screen doors require: set the closer speed two notches slower in fall before the cold season and two notches faster in spring before the warm season, because pneumatic closer cylinders change closing speed significantly with temperature — they close faster in heat and slower in cold. A closer adjusted to close correctly at 75°F in summer will slam in August and fail to fully close in October without any mechanical failure occurring; the hydraulic fluid inside the cylinder thins in heat and thickens in cold, changing the flow rate through the adjustment valve independent of the screw position. Door specialists who make this seasonal adjustment for maintenance clients report eliminating the recurring complaint of a closer that "stopped working over winter" — which is almost always thermal behavior rather than mechanical failure, correctable with a single quarter-turn of the adjustment screw rather than the closer replacement that the symptom suggests.