Running Toilet Fix: Quiet It in 20 Minutes
Remove the tank lid, watch one flush, and the cause of 90% of constantly running toilets becomes immediately obvious — and costs $5 to fix.
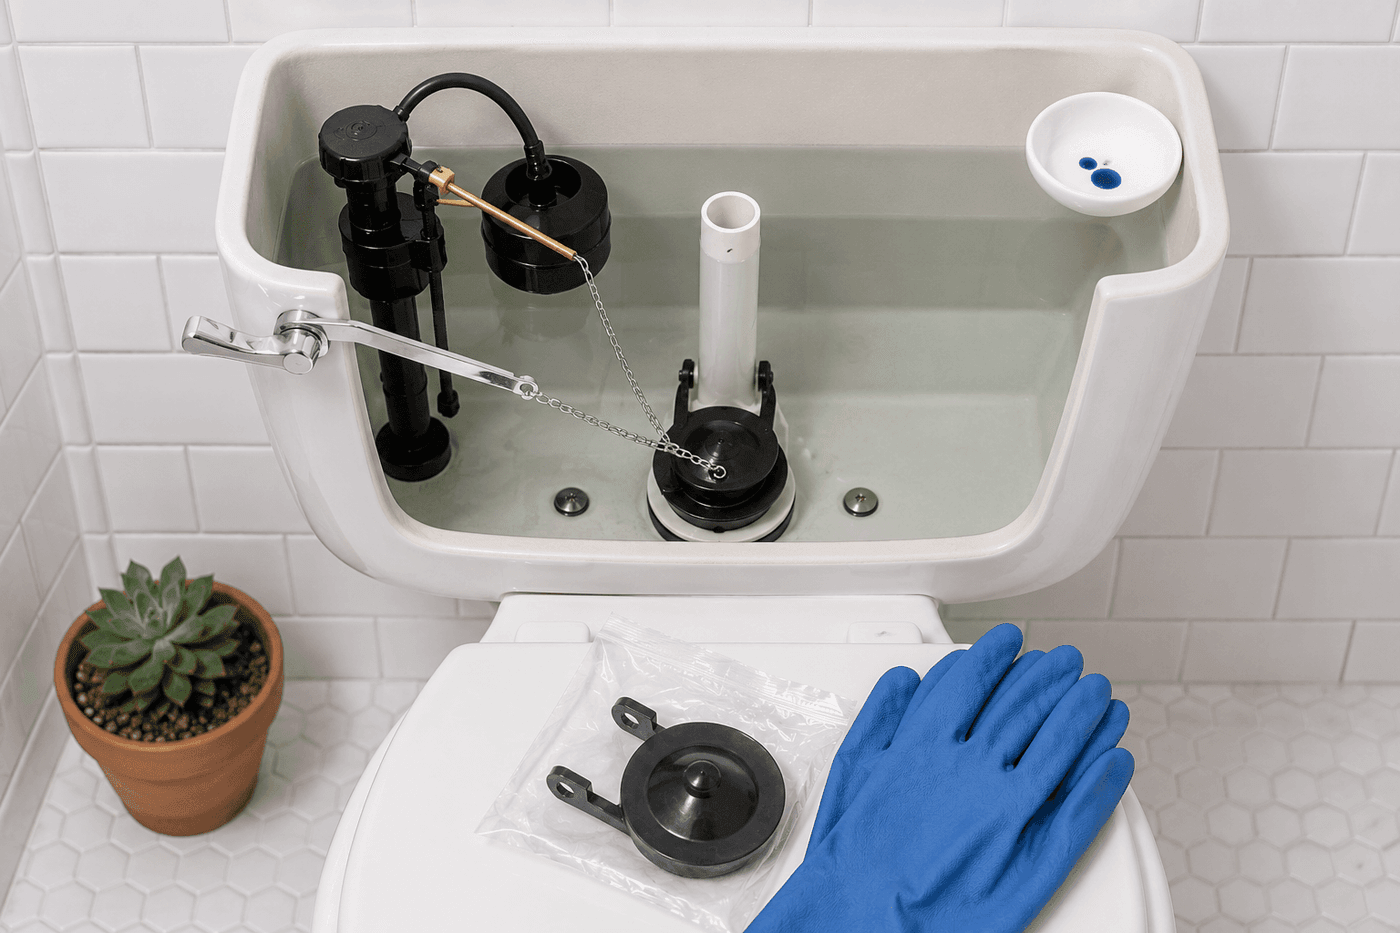
A constantly running toilet is one of those household problems that is easy to tune out — the sound becomes background noise, the water bill increases by a number that seems explainable by some other cause, and the fix stays on the to-do list because the toilet technically still flushes so it does not feel urgent. It should feel urgent: a running toilet wastes between 200 and 700 gallons of water per day depending on the severity of the leak, which adds $50–100 or more to an annual water bill from a single toilet that nobody has gotten around to fixing. The cause in the vast majority of cases is one of three things that are visible the moment the tank lid comes off: a worn flapper that no longer seals against the flush valve seat, a chain that is the wrong length and interfering with the flapper seal, or a float set too high so water continuously spills into the overflow tube. All three fixes require no plumbing knowledge, no specialized tools, and between $0 and $8 in parts. The running toilet that has been annoying the household for months is almost always a 20-minute fix, and diagnosing the exact cause takes about 30 seconds of watching after one flush.
What You'll Need
- Universal replacement flapper — Fluidmaster 502 or Korky 100BP are the two most widely compatible universal flappers; bring the old flapper to the hardware store in a zip-lock bag to confirm the replacement matches if uncertain; most residential toilets use a standard 2-inch flapper (~$5–8)
- Rubber gloves — tank water is clean but handling the flapper and the interior tank components without gloves results in hands that smell of rubber and mineral deposits for the rest of the day; a minor inconvenience easily avoided
- Sponge and small bucket — for removing the last inch of water from the tank after the supply valve is closed and the flush has emptied most of the tank; working in a dry tank is significantly cleaner than working in one with standing water
- Adjustable pliers — for tightening the fill valve locknut if the fill valve needs replacement; not needed for flapper replacement or float adjustment, which are hand-tool-only repairs
- Replacement fill valve — Fluidmaster 400A is the universal fill valve that fits virtually every residential toilet and is the specific product plumbers stock and specify; needed only if the fill valve diagnosis below indicates fill valve failure rather than flapper or float issues (~$10–15)
- Food coloring — the definitive flapper leak test; add several drops to the tank water without flushing and wait 15 minutes; color appearing in the bowl without flushing confirms a flapper leak even before any visual inspection
- Towels — for the floor around the toilet base during the repair; working inside the tank occasionally drips water over the side during component inspection and replacement
How to Fix It
- Diagnose before touching anything by removing the tank lid and watching the full flush cycle from flush initiation to complete refill — observe the flapper seating after the flush, the chain behavior as the flapper drops, and the water level relative to the overflow tube at the end of the fill cycle. A 30-second observation identifies the cause of 90% of running toilets without any disassembly: flapper that does not seat fully, chain that holds the flapper slightly open, or water level that reaches or exceeds the overflow tube top before the fill valve shuts off.
- Test the flapper seal by pressing down on the flapper with one finger while the toilet is running — if the running stops immediately when the flapper is pressed down, the flapper is not sealing against the flush valve seat and needs replacement. This single-finger press test is the most reliable flapper diagnosis available and takes three seconds; a flapper that passes this test but the toilet still runs indicates the water level or fill valve is the cause rather than the flapper.
- Replace the flapper if the press test confirms it as the cause — turn off the water supply valve at the wall behind the toilet base, flush once to empty most of the tank, and sponge out the remaining inch of water. Unhook the old flapper by unclipping the two ears from the overflow tube pegs on both sides, then disconnect the chain from the flush handle arm. Snap the new flapper ears onto the same pegs, reconnect the chain with approximately ½ inch of slack — enough that the flapper seats fully after each flush without the chain pulling it open, but not so much chain that it can loop under the flapper and prevent sealing.
- Adjust the chain length if the chain rather than the flapper condition is the cause — unhook the chain from the flush handle arm and move the connection point to a higher or lower hole on the arm to increase or decrease chain slack. The correct chain length allows the flapper to drop fully and seat against the valve seat immediately after each flush, with no chain tension holding the flapper up and no excess chain that can wrap under the flapper during the seating motion. Test by flushing three to four times and watching the flapper seat each time before considering the adjustment complete.
- Check the water level if neither flapper nor chain is the confirmed cause — the correct water level sits approximately one inch below the top of the overflow tube, which is the vertical tube rising from the center of the flush valve assembly. Water at or above the overflow tube top continuously spills into the bowl through the tube, producing the running sound and continuous water flow without any flapper involvement.
- Adjust the float to lower the water level if it is too high — on older ball-float systems, bend the float arm gently downward, which signals the fill valve to shut off at a lower water level; on modern cup-float fill valves (the tall vertical assembly with a float riding up and down the side), find the adjustment clip or screw on the float body and slide or turn it downward, which lowers the point at which the fill valve shuts off. After any float adjustment, flush once and allow the tank to refill fully before assessing the new water level — the fill cycle takes 60–90 seconds and the final level must be confirmed after the valve shuts off, not during filling.
- Diagnose the fill valve as the cause if water level is correct and the fill valve continues running — press down on the top of the fill valve cap while the toilet is running; if the running stops, the fill valve diaphragm seal has failed and the fill valve needs replacement. A fill valve that runs regardless of float position and does not respond to cap pressure has an internal seal failure that adjustment cannot correct.
- Replace the fill valve if diagnosis confirms its failure — turn off the supply valve and flush to empty the tank, sponge dry, then disconnect the supply line from the fill valve shank beneath the tank and unscrew the fill valve locknut counterclockwise with adjustable pliers. Lift the old fill valve out, lower the new Fluidmaster 400A into the fill valve opening, tighten the locknut hand-tight plus one quarter turn with pliers, reconnect the supply line, and turn the water back on. Adjust the water level to one inch below the overflow tube using the adjustment clip on the new fill valve and confirm by flushing once and allowing full refill before declaring the repair complete.
- Confirm the repair by performing the food coloring test after all adjustments — add several drops of food coloring to the full tank without flushing, wait 15 minutes, and check the bowl for any color. Clear bowl water at 15 minutes confirms a complete seal with no ongoing flapper leak; colored bowl water indicates a remaining flapper leak that requires either reseating the new flapper ears more firmly on the overflow tube pegs or confirming that the chain is not preventing full flapper closure.
Licensed plumbers who service residential toilets consistently recommend one preventive practice that extends flapper life significantly beyond the two to five year interval that most rubber flappers achieve before requiring replacement: if your municipality chlorinates the water supply heavily — which is verifiable by the smell of chlorine in tap water or a simple water test kit — install a chlorine-resistant flapper such as the Fluidmaster 5403 PerforMAX rather than a standard rubber flapper. Standard rubber flappers degrade in chlorinated water at the molecular level — the chlorine oxidizes the rubber and causes it to warp, crack, and lose flexibility far faster than the same flapper in lower-chlorine water. Chlorine-resistant flappers use a different elastomer compound that maintains its sealing properties through sustained chlorine exposure and typically lasts two to three times longer than standard rubber in the same water conditions. Plumbers who specify these in high-chlorine service areas report eliminating the recurring running toilet callback that standard flappers produce every two to three years — which means one flapper replacement that lasts a decade rather than the four or five replacements that same decade would require with a standard rubber flapper, from a part that costs $2–3 more than the standard version.