
Ribbon Wind Spinners: Dollar Store Color for $4
An embroidery hoop, ribbons in three textures, a few jingle bells, and twenty minutes — and your porch gets a shimmering curtain of movement that costs $4 and never stops being satisfying to watch.
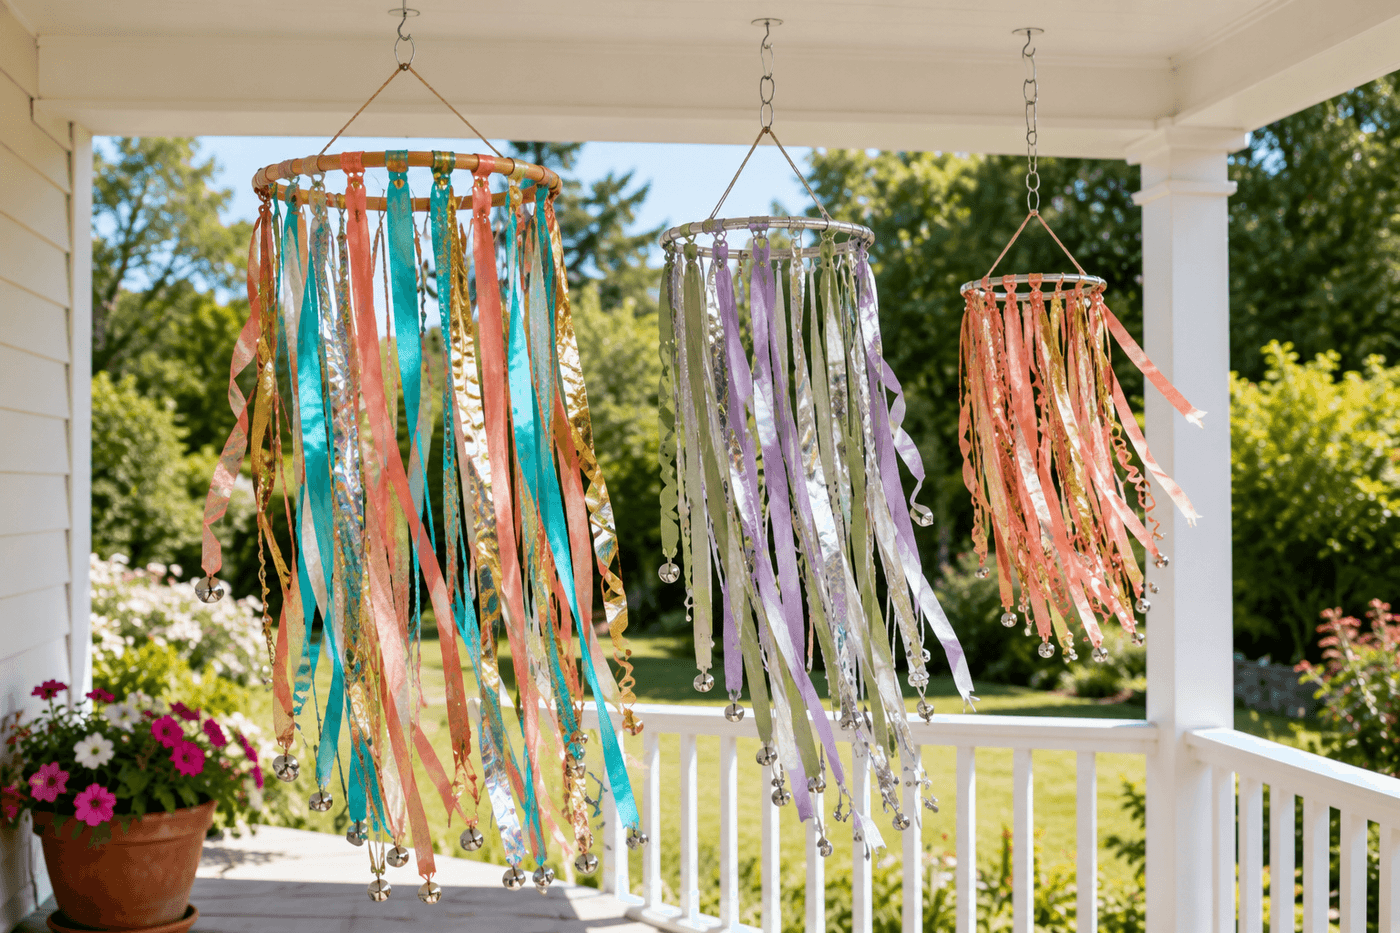
A ribbon wind spinner is one of those outdoor decorations that earns its place not by looking beautiful when everything is still — though it does — but by what it does the moment any air movement reaches it: the ribbons lift, separate, shimmer, and settle in a continuous flowing motion that is as hypnotic to watch as a candle flame and considerably more durable in outdoor conditions. The dollar store version made from an embroidery hoop and ribbon in three coordinating textures costs $3–5, takes twenty minutes to assemble, and produces the flowing, light-catching, sound-making display that store-bought spinners sell for $15–25 in a size and color combination you chose yourself. The texture combination is the key design decision: iridescent ribbon that catches and breaks light in every direction, bold satin ribbon that reads as solid color from across the yard, and metallic mylar that flashes in direct sun — all in a coordinating palette of two or three colors — produces a visual depth and movement quality that a single-texture spinner cannot achieve. Hang three at different heights from the porch ceiling on a breezy afternoon and the combined effect is genuinely spectacular for a $12 total investment.
What You'll Need
- Hoop or ring base — choose one:
- Wooden embroidery hoop, outer ring, 8–12 inch — the most widely available base; remove the inner ring and use only the outer; paint or wrap with ribbon before attaching the spinner ribbons for a finished look; found at dollar stores and craft stores (~$1–2)
- Metal macramé ring, 8–10 inch — the cleanest base option; no painting required; ribbon ties directly to the metal; more weather-resistant than wood for a spinner that will be outdoors in rain (~$1–2)
- Plastic bangle bracelet, large diameter — free from the jewelry drawer; lightweight and fully weather-resistant; works best for smaller, lighter ribbon loads
- Ribbon in three textures, coordinating colors — per spinner:
- Iridescent or holographic ribbon — ⅜-inch or ½-inch width; breaks light into rainbow shimmer in any direction; the most visually dynamic texture in the spinner
- Satin ribbon in a bold solid color — ½-inch or ¾-inch width; provides the color statement that reads clearly from across the yard; the visual anchor of the palette
- Metallic mylar or curling ribbon — the flashiest element; curling ribbon can be pulled over scissor blades to produce spiraling curls that add dimensional movement; mylar flashes in direct sun
- Dollar store ribbon rolls typically contain 9–18 yards; one roll per texture covers one to two spinners (~$1 per roll)
- Color palette guidance:
- Coastal: turquoise, coral, and gold metallic
- Garden: sage green, lavender, and silver iridescent
- Sunset: hot pink, orange, and copper metallic
- Monochromatic: three values of the same color in different textures — the most sophisticated palette for a single spinner
- Small jingle bells or lightweight beads — for the ribbon ends; bells add gentle sound when ribbons strike each other in the breeze; beads add weight that keeps ribbons hanging straight in light air rather than clumping against each other (~$1 for a pack)
- Scissors — for cutting ribbon to graduated lengths; cut at a 45-degree angle rather than straight across, which prevents ribbon ends from fraying and produces the pointed tip that moves most elegantly in a breeze
- Swivel hook or swivel clip — attached between the hanging cord and the hanging point; a swivel allows the spinner to rotate freely in the wind rather than twisting the hanging cord until it resists further rotation; the swivel is the difference between a spinner that spins freely and one that winds up and reverses (~$1–2 for a pack of small swivel clips from the fishing or hardware section)
How to Make Them
- Plan the ribbon palette and length sequence before cutting any ribbon — lay the three ribbon rolls beside each other and confirm the colors work together at the scale of the spinner; colors that seem coordinated on narrow spools sometimes read as clashing at the full ribbon width and length. Decide on the length range — 18 inches for the shortest ribbons and 36 inches for the longest — and plan whether to graduate the lengths evenly across the hoop or to mix lengths randomly for a more organic, uneven hem line at the bottom of the spinner.
- Cut all ribbons before attaching any to the hoop — cut each ribbon at a 45-degree angle on both ends to prevent fraying and produce the pointed tip that moves most elegantly in a breeze. For a graduated length effect, cut a series of ribbons at ½-inch length increments from 18 to 36 inches; for a random organic effect, cut batches at 18, 24, 30, and 36 inches and mix them during attachment. Cut approximately three to four ribbons per inch of hoop circumference — a 10-inch hoop has approximately 31 inches of circumference and needs 90–120 ribbon strips for a full, lush ribbon curtain.
- Attach ribbons to the bottom half of the hoop using a lark's head knot — fold each ribbon in half, loop the folded end over the hoop, and pull the two ribbon ends through the loop and tighten. The lark's head knot is the fastest and most secure attachment method for ribbon on a round hoop; it allows the knot to be pushed tightly against adjacent knots for maximum ribbon density without the bulk that bow or double-knot attachment produces. Work around the full bottom half of the hoop — from the three-o'clock position around the bottom to the nine-o'clock position — spacing knots as tightly together as the ribbon widths allow.
- Vary the texture distribution across the hoop rather than grouping all ribbons of the same texture together — alternate iridescent, satin, and metallic in a repeating sequence as each knot is tied, which distributes the light-catching and color qualities evenly across the full width of the spinner rather than concentrating the shimmer on one side and the solid color on the other. Step back and assess the texture distribution from 6 feet every 15 knots or so to confirm the mix is reading as balanced rather than accidentally grouped.
- Add bells or beads to the ribbon ends at irregular intervals before attaching the hanging cord — thread a jingle bell onto every fourth or fifth ribbon by folding the ribbon end through the bell loop and tying a small overhand knot below the bell to hold it at the tip. The irregular distribution of bells means multiple bells strike each other and adjacent ribbons at different moments during wind movement, producing the overlapping gentle chime rather than the single simultaneous jingle that uniform distribution would create.
- Curl any metallic or curling ribbon strips by pulling them firmly over the closed blade of a scissor held against a thumb — a single steady pull the full length of the ribbon produces a consistent spiral curl that adds three-dimensional movement to the spinner; the curled strips move in a different pattern from the flat ribbons and catch light from different angles simultaneously, which is the specific quality that makes a multi-texture spinner more visually dynamic than a single-texture one.
- Attach the hanging cord by tying three equal lengths of strong ribbon or thin cord to the top half of the hoop at evenly spaced points — at the ten, twelve, and two o'clock positions for a balanced three-point hang that keeps the hoop level. Gather all three cord ends at a central point above the hoop, confirm the hoop hangs level by holding the gathered point and releasing, adjust any cord length that causes tilting before knotting the three cords together permanently at the gathering point. Thread the gathered knot through a swivel clip and attach to the hanging hook or ceiling eye.
- Test the spinner by hanging from a temporary hook and observing both the hang and the ribbon movement — the hoop should hang level without tilting, the ribbon curtain should hang as a full, even distribution without gaps or clumping, and any bells should be positioned to contact neighboring ribbons during gentle movement. Adjust any ribbon attachment that is pulling the hoop out of level by sliding it to a slightly different position on the hoop before the lark's head knot is fully tightened; lark's head knots are repositionable with gentle sliding pressure before the knot is cinched tightly against the adjacent knots.
Event designers and outdoor installation artists who create large-scale ribbon installations for festivals, weddings, and garden events consistently recommend one hanging detail that most home crafters omit and that makes the single largest difference in spinner performance: use a barrel swivel — the small double-ended rotating connector from the fishing supply section — between the hanging cord and the ceiling hook rather than tying the cord directly to the hook. A spinner tied directly to a fixed hook winds its hanging cord tighter with every rotation in one direction until the cord tension reverses the spinning direction, producing the back-and-forth wind-up behavior that prevents continuous free rotation. A barrel swivel allows the spinner to rotate continuously in either direction without transferring any torque to the hanging cord, which means the spinner follows the wind direction freely rather than fighting its own hanging point. Event designers who specify barrel swivels for all hanging fabric and ribbon installations describe the difference in movement quality as the distinction between a decoration that moves in the wind and one that dances in it — and the barrel swivel costs approximately fifty cents in a pack of ten at any fishing or hardware store.














