
DIY Projects

Recent Content

Shoe Bench Build: The Cubby Depth That Keeps Pairs Upright

Shoe Bench Build: The Cubby Depth That Keeps Pairs Upright

Build a wooden entryway shoe bench for $35—the cubby depth is what keeps boots standing instead of toppling into a pile every morning.

Style a Layered Nightstand Vignette in 1 Hour for $35

Style a Layered Nightstand Vignette in 1 Hour for $35

Turn a cluttered nightstand into a cozy styled vignette with the height-rule trick—1 hour, $35, instant bedroom upgrade.

The Cafe Rod Trick for a Fake Built-In Vanity

The Cafe Rod Trick for a Fake Built-In Vanity

Fake a built-in bathroom vanity shelf with a tiny cafe rod and basket—zero drilling, zero suction cups, full deposit intact.

Tension Rod Shelf: The Rod Width That Won't Slip

Tension Rod Shelf: The Rod Width That Won't Slip

Build a hidden double-decker shelf under your sink for $6—the rod tension width is what keeps it from crashing down on cleaning day.

Mulch Perennial Beds for Winter in 1 Hour for $25

Mulch Perennial Beds for Winter in 1 Hour for $25

Tuck your perennials in right! A 3-inch mulch blanket now saves roots from winter heave for about $25.

logo
  • Home Improvement
  • DIY Projects
  • Interior Design
  • Gardening & Outdoor
  • Real Estate
  • Home Improvement
  • DIY Projects
  • Interior Design
  • Gardening & Outdoor
  • Real Estate
  • ​

Green Thumbs Start Early: Build Your Own Mini Greenhouse

Create a perfect environment for seedlings and extend your growing season
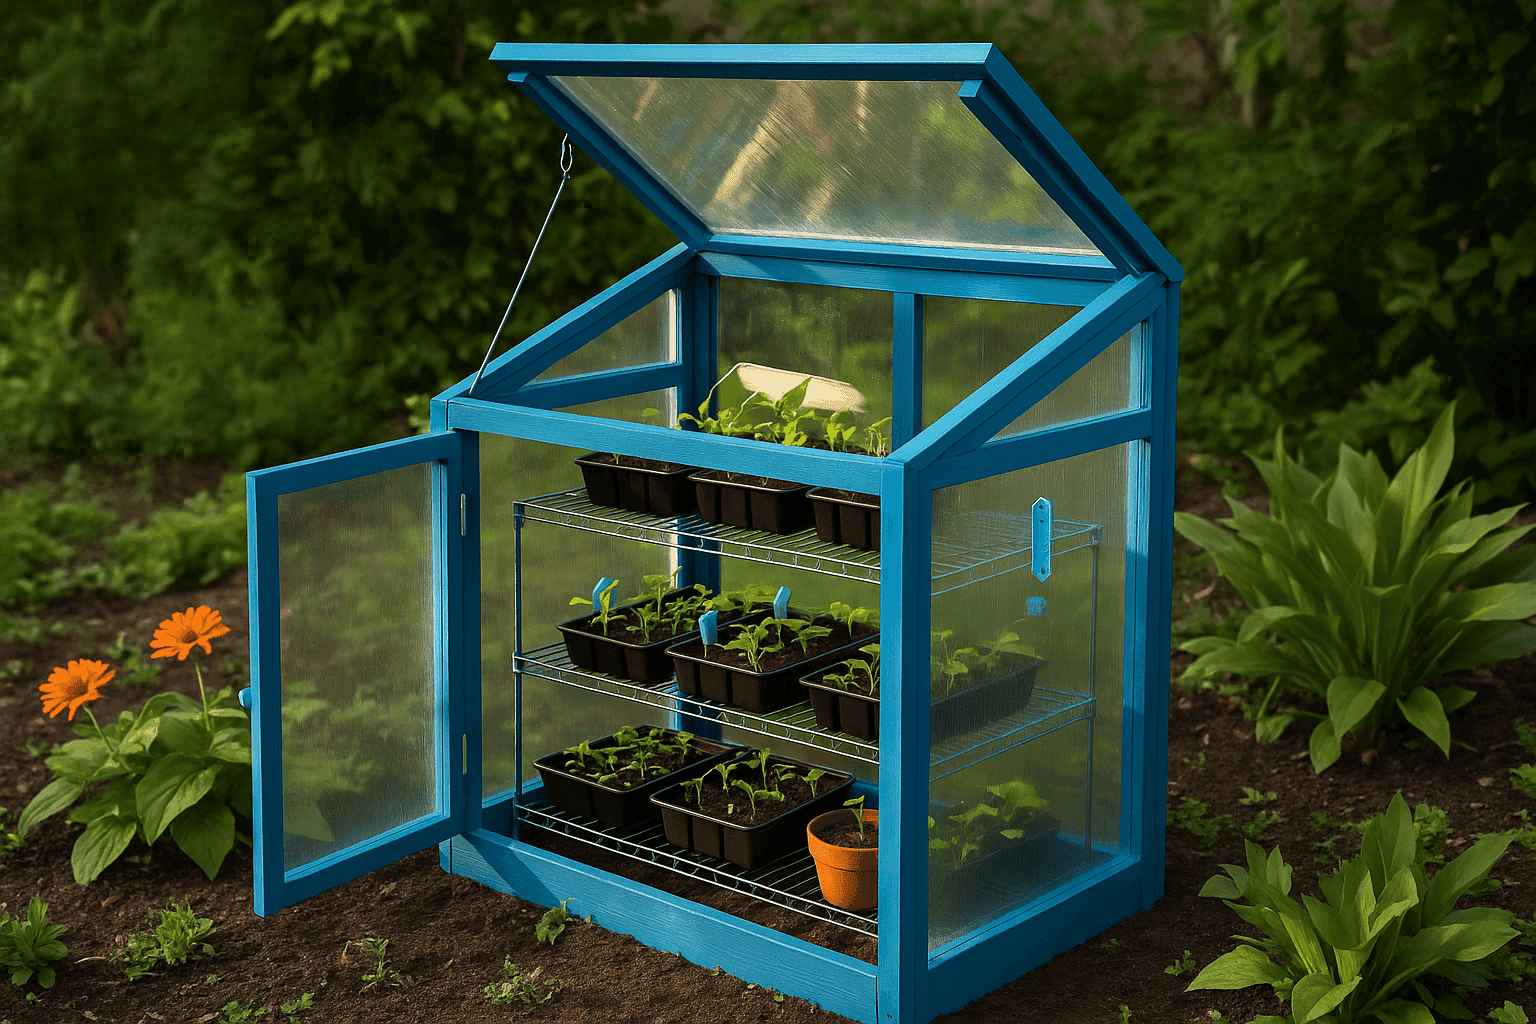
DIY mini greenhouse with seedlings inside
DIY PROJECTS

A mini greenhouse extends your growing season and provides the perfect environment for starting seeds and nurturing young plants. Rather than investing in an expensive commercial option, you can build a customized greenhouse that perfectly fits your space and gardening needs. This weekend project uses readily available materials to create a durable, efficient structure that protects tender plants from cold temperatures, harsh weather, and pests—giving your garden a head start regardless of outdoor conditions.

What You'll Need

For Wood Frame Greenhouse:
• 1"×2" or 2"×2" lumber for frame
• Clear plastic sheeting (6 mil greenhouse plastic)
• Wood screws or nails
• Staple gun and staples
• Hinges (2-4 depending on size)
• Handle for door
• Hook and eye latch
• Wood sealer or paint (exterior grade)
• Wire shelving or wood for shelves
For PVC Frame Alternative:
• ½" or ¾" PVC pipes
• PVC connectors (elbows, tees, crosses)
• PVC cement
• Clear plastic sheeting
• Zip ties or clips
Tools:
• Saw (hand saw or power saw)
• Drill and bits
• Measuring tape
• Level
• Scissors or utility knife
• PVC cutter (if using PVC)
• Safety gear (gloves, goggles)

How To Do It

  1. Design your greenhouse: Determine size and shape based on your space and needs. A good starter size is 3' wide × 2' deep × 4' tall, which fits on a patio or deck. Sketch your design with measurements for each piece.
  2. Prepare your materials:
    • For wood frame: Cut lumber to size according to your plan. Sand cut edges and apply outdoor sealer or paint to all wooden pieces to prevent rot.
    • For PVC frame: Cut PVC pipes to desired lengths using a PVC cutter or saw. Test-fit pieces with connectors before final assembly.
  3. Assemble the base frame: Create a rectangular base using your chosen material. Ensure corners are square by measuring diagonally from corner to corner (measurements should be equal for a perfect rectangle).
  4. Build the vertical supports: Attach four vertical posts at each corner of the base. For stability, ensure they're perfectly vertical using a level.
  5. Create the roof frame: Connect the tops of the vertical supports with horizontal pieces. For a pitched roof, add central supports that are taller than the sides, then connect with angled pieces for the roof slope.
  6. Construct the door frame: Build a door sized to fit one side of your greenhouse. For wood frames, reinforce corners with brackets. For PVC, create a separate rectangular frame that can be attached with hinges.
  7. Install shelving: Add shelves at different heights to maximize growing space. Wire shelving allows drainage and airflow, while wood shelves should have drainage holes or gaps between boards.
  8. Cover with plastic sheeting:
    • For wood frame: Stretch plastic over the frame and staple securely, starting at the middle of each side and working toward corners. Trim excess with scissors.
    • For PVC frame: Drape plastic over the structure and secure with zip ties or special greenhouse clips. Leave some slack for expansion.
  9. Attach the door: Install hinges to hang your door. Add a handle and hook-and-eye latch to keep it closed during windy conditions.
  10. Create ventilation: Install a small window or vent in the roof or upper side that can be opened on warm days to prevent overheating. For simpler designs, the door can serve as ventilation when propped open.
  11. Secure the greenhouse: For outdoor placement, anchor your greenhouse to the ground with stakes or weights to prevent tipping in strong winds.
  12. Add finishing touches: Consider adding a thermometer, automatic vent opener, small fan for air circulation, or irrigation system depending on your needs.
DESIGNER TIP

For a mini greenhouse that combines function with style, consider how it will integrate with your overall garden design. Rather than hiding it away, treat your greenhouse as a garden feature by adding decorative elements like painted trim in a color that complements your home, decorative door hardware, or solar-powered fairy lights for evening ambiance. Position your greenhouse where it receives optimal morning sun but is protected from harsh afternoon heat. For those with limited space, consider a lean-to design that attaches to an existing fence or wall, maximizing space efficiency while providing a protected growing environment. Remember that organization is key to a successful greenhouse—include labeled sections for different plant types and install a pegboard panel for hanging tools and accessories.


Related Content

DIY Projects

04 November 2026

Post

Shoe Bench Build: The Cubby Depth That Keeps Pairs Upright

Build a wooden entryway shoe bench for $35—the cubby depth is what keeps boots standing instead of toppling into a pile every morning....

DIY Projects

03 November 2026

Post

Tension Rod Shelf: The Rod Width That Won't Slip

Build a hidden double-decker shelf under your sink for $6—the rod tension width is what keeps it from crashing down on cleaning day....

DIY Projects

01 November 2026

Post

Sew Flannel Pajama Pants in 3 Hours for $25

Ditch store PJs! Sew cozy flannel pajama pants with an elastic waist in 3 hours for about $25 — perfect for chilly November nights....

DIY Projects

31 October 2026

Post

Build a Trick-or-Treat Bucket Lantern in 1 Hour for $15

Light up Halloween night with a glowing trick-or-treat bucket lantern—1 hour, $15, and way safer than a candle in a pumpkin....

DIY Projects

30 October 2026

Post

Pour Pumpkin Spice Candles in 1 Hour for $15

Ditch the $28 mall candle—pour your own pumpkin spice soy candles at home for $15 and fill your house with fall in an hour....

DIY Projects

29 October 2026

Post

Tabletop Zen Garden: The Sand Depth That Holds Lines

Build a calming tabletop zen garden for $15—the sand depth is the one thing that decides if your rake lines actually hold or vanish....

DIY Projects

28 October 2026

Post

Wooden Dish Rack: The Dowel Angle That Drains Right

Build a slatted wood dish rack for $18—the dowel tilt angle is what actually drains water into the tray instead of pooling on your counter....

DIY Projects

27 October 2026

Post

Pool Noodle Knife Block: The Slice Depth That Stops Wobble

Turn a $1 pool noodle into a safe knife block—the slice depth is what keeps blades from wobbling loose or slicing through the foam....

DIY Projects

27 October 2026

Post

Build a Wooden Pie Carrier in 2 Hours for $25

Never smash a pie in the car again! Build a snug wooden pie carrier in 2 hours for $25—perfect timing for fall potlucks....

DIY Projects

26 October 2026

Post

Make Herb-Infused Honey in 30 Minutes for $12

Turn raw honey into a cold-season secret weapon—infuse it with thyme and ginger in 30 minutes for about $12, no fancy gear needed....

DIY Projects

25 October 2026

Post

Make Homemade Fire Cider in 20 Minutes for $15

Steep this spicy apple cider vinegar tonic now so it's ready to fight off fall colds in 4 weeks—20 minutes, $15, zero cooking skills....

DIY Projects

23 October 2026

Post

Build a Freestanding Coat Rack in 2 Hours for $35

Sick of coats piled on chairs? Build a sturdy freestanding coat rack in 2 hours for $35 — no wall drilling, just solid joinery....

DIY Projects

22 October 2026

Post

Window Frame to Pet Gate: The Hinge Set That Holds

Turn an old wooden window frame into a swinging pet gate for $22 — the hinge mortise depth is what keeps it from sagging open over time....

DIY Projects

22 October 2026

Post

Make Spiced Homemade Applesauce in 1 Hour for $12

Turn a bag of fall apples into silky spiced applesauce in an hour for $12 — no peeling required if you've got the right tool....

DIY Projects

21 October 2026

Post

Floating Nightstand: The Bracket Depth That Holds Weight

Build a wall-mounted wooden nightstand for $25 — the bracket depth inside the wood is what stops it from sagging under a lamp and books....
Terms and ConditionsDo Not Sell or Share My Personal InformationPrivacy PolicyPrivacy NoticeAccessibility NoticeUnsubscribe
Copyright © 2026 DIY HomeBoost












