
Frozen Yogurt Bark: Family Snack for $8
Ten minutes, a sheet pan, Greek yogurt, and a handful of summer berries — and the freezer does the rest while you do anything else.
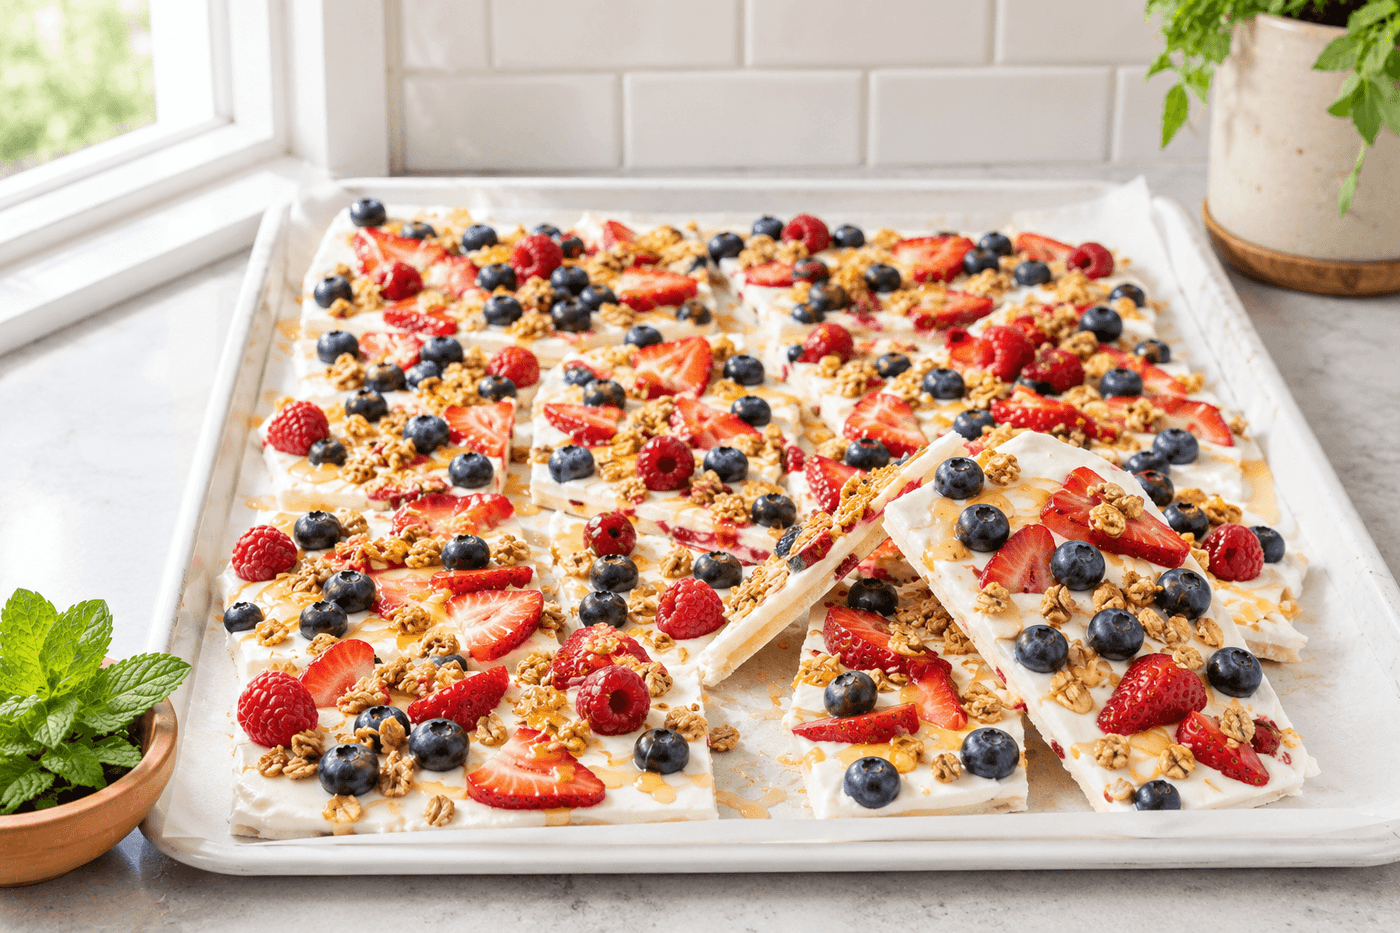
The summer snack problem — something cold, something the kids will actually eat, something with less sugar than ice cream and less frustration than popsicle molds — has a genuinely perfect solution in frozen yogurt bark, and the reason it works as well as it does is that it requires essentially no technique and produces results that look impressive enough that children feel proud to have helped make it. Ten minutes of active time, a rimmed baking sheet, parchment paper, a tub of vanilla Greek yogurt, and whatever fresh berries look best at the market is the complete recipe and supply list. Spread, scatter, drizzle, freeze for two hours, break into irregular pieces — and the result is a sheet pan of creamy, fruity frozen snack that keeps in the freezer for a week, costs about $8 for a batch that feeds a family for two to three days, and satisfies the cold-and-sweet craving that drives commercial ice cream consumption without the sugar load or the cleanup. The topping customization is the feature that makes this a repeatable kitchen project rather than a one-time novelty — once the base technique is understood, every member of the family can design their own section of the sheet pan, which is the specific quality that turns a ten-minute snack project into a genuine summer tradition.
What You'll Need
- Vanilla Greek yogurt, 32 oz — full-fat Greek yogurt produces a creamier, less icy bark than low-fat or non-fat versions, which freeze to a harder, icier texture with less satisfying mouthfeel; Chobani, Fage, or Stonyfield are all excellent choices (~$5–6 for a large tub)
- Fresh berries — choose 2–3 varieties:
- Blueberries — scatter whole; freeze beautifully and burst with flavor in the finished bark
- Strawberries — slice thinly for even distribution and visual impact across the bark surface
- Raspberries — use whole; their tartness contrasts the sweet yogurt base most effectively of any summer berry
- Peaches — thinly sliced; the peach and mint variation produces the most sophisticated flavor profile of any topping combination (~$2–3 for a mixed berry selection)
- Honey — for drizzling across the top after berry scattering; adds visual appeal and a subtle floral sweetness that enhances the yogurt base without significantly increasing sugar content
- Granola — for crunch; sprinkled lightly after the honey drizzle and before freezing; the granola softens slightly in the frozen bark but retains enough texture to provide contrast to the creamy yogurt base
- Optional toppings:
- Fresh mint leaves — pressed lightly into the yogurt surface for the peach version; adds a cooling herbal note
- Dark chocolate chips — scattered across the surface for a dessert-forward version
- Shredded coconut — toasted lightly before sprinkling for a tropical variation
- Chopped nuts — walnuts or sliced almonds for added protein and crunch
- Rimmed baking sheet — a standard half-sheet pan (18x13 inches) produces bark at the correct ¼-inch thickness; a rimmed sheet prevents yogurt from dripping off the edges during spreading
- Parchment paper — essential for clean removal; bark frozen directly on a metal sheet pan bonds to the surface and cannot be removed cleanly without tearing
- Offset spatula or large spoon — for spreading the yogurt layer evenly across the parchment surface to a consistent ¼-inch depth
How to Make It
- Line the baking sheet with parchment paper, pressing it into the corners and folding the edges up slightly so the parchment forms a contained surface — the folded edges prevent yogurt from flowing under the parchment during spreading, which causes the finished bark to stick to the pan rather than lifting cleanly from the parchment after freezing.
- Spread the Greek yogurt across the parchment in an even layer approximately ¼ inch thick using an offset spatula or the back of a large spoon — work from the center outward toward the edges, spreading in long smooth strokes rather than short back-and-forth passes that create uneven ridges. Consistent thickness is what produces bark that freezes evenly and breaks into clean pieces rather than shattering into fragments at thick spots and crumbling at thin ones.
- Scatter berries across the yogurt surface immediately after spreading while the yogurt is still soft — press each berry gently into the yogurt surface so it embeds slightly rather than sitting on top, which prevents the berries from sliding off the bark surface when it is picked up and eaten. Distribute berries in a pattern that ensures every piece of bark will have at least one berry after breaking — cluster-free distribution across the full surface rather than concentrated in the center where the first pieces broken away will take all the fruit.
- Drizzle honey across the berry-topped surface in a thin, even zigzag pattern from one end of the pan to the other — too much honey pools in depressions between berries and creates sticky patches in the finished bark, while a light drizzle adds sweetness and visual appeal without compromising texture. A single drizzle pass with a honey bear or spoon across the full pan length is the correct amount for a half-sheet of bark.
- Sprinkle granola across the surface last — after the honey drizzle, so the granola clusters adhere slightly to the honey rather than sliding across the smooth yogurt surface during the pan's journey to the freezer. Sprinkle from a height of 6–8 inches rather than pinching and dropping from close range, which allows the granola to distribute naturally across the surface rather than concentrating in the area directly above your hand.
- Transfer the pan to the freezer immediately on a flat, level surface — a tilted pan produces bark of uneven thickness that freezes unevenly and breaks unpredictably. Slide the pan onto a freezer shelf rather than lifting it with the front edge high, which causes the yogurt to flow toward the back of the pan during transit and produces a thick back edge and thin front edge that were level when spread but are not when frozen.
- Freeze for a minimum of two hours — three hours for a fully solid bark with no soft center that bends rather than breaks when handled. Check doneness by pressing the center of the bark firmly with one finger; fully frozen bark feels completely rigid with no give, while insufficiently frozen bark has a slight softness at the center that causes it to bend and crack messily rather than breaking cleanly into pieces. Return to the freezer for another 30 minutes if any softness remains.
- Break the frozen bark into irregular pieces by lifting the parchment from the pan and bending it gently until the bark fractures naturally along stress lines — the irregular shapes are part of the appeal and require no cutting or portioning. Store broken pieces in a zip-lock bag or airtight container with parchment between layers to prevent pieces from fusing together, and return immediately to the freezer where the bark keeps well for up to one week before the fruit begins to weep and the texture degrades.
Pastry chefs and food stylists who develop frozen dessert recipes for cookbook photography and restaurant menus use one yogurt preparation technique that produces dramatically creamier, less icy frozen yogurt bark than standard straight-from-the-tub spreading: strain the Greek yogurt through a cheesecloth-lined strainer in the refrigerator for two to four hours before using, which removes additional whey and produces a thicker, richer base with significantly less free water content. Free water in yogurt is what forms ice crystals during freezing — the larger and more numerous the ice crystals, the icier and less creamy the frozen texture. Strained yogurt, sometimes called labneh or yogurt cheese, has so little free water remaining that it freezes to a texture closer to soft-serve ice cream than standard frozen yogurt — smooth, creamy, and cold without the sharp icy quality that makes commercial frozen yogurt less satisfying than ice cream. Pastry chefs who develop frozen desserts consider straining non-negotiable for any recipe where yogurt texture after freezing matters, and a two-hour refrigerator strain the night before a bark session adds zero active work time while producing a result that tastes genuinely premium rather than merely healthy.














