Fix Loose Outdoor Light Fixtures for $18
A screwdriver, LED bulbs, and one afternoon — every wobbling outdoor fixture on your property is solid, bright, and safe before summer entertaining season
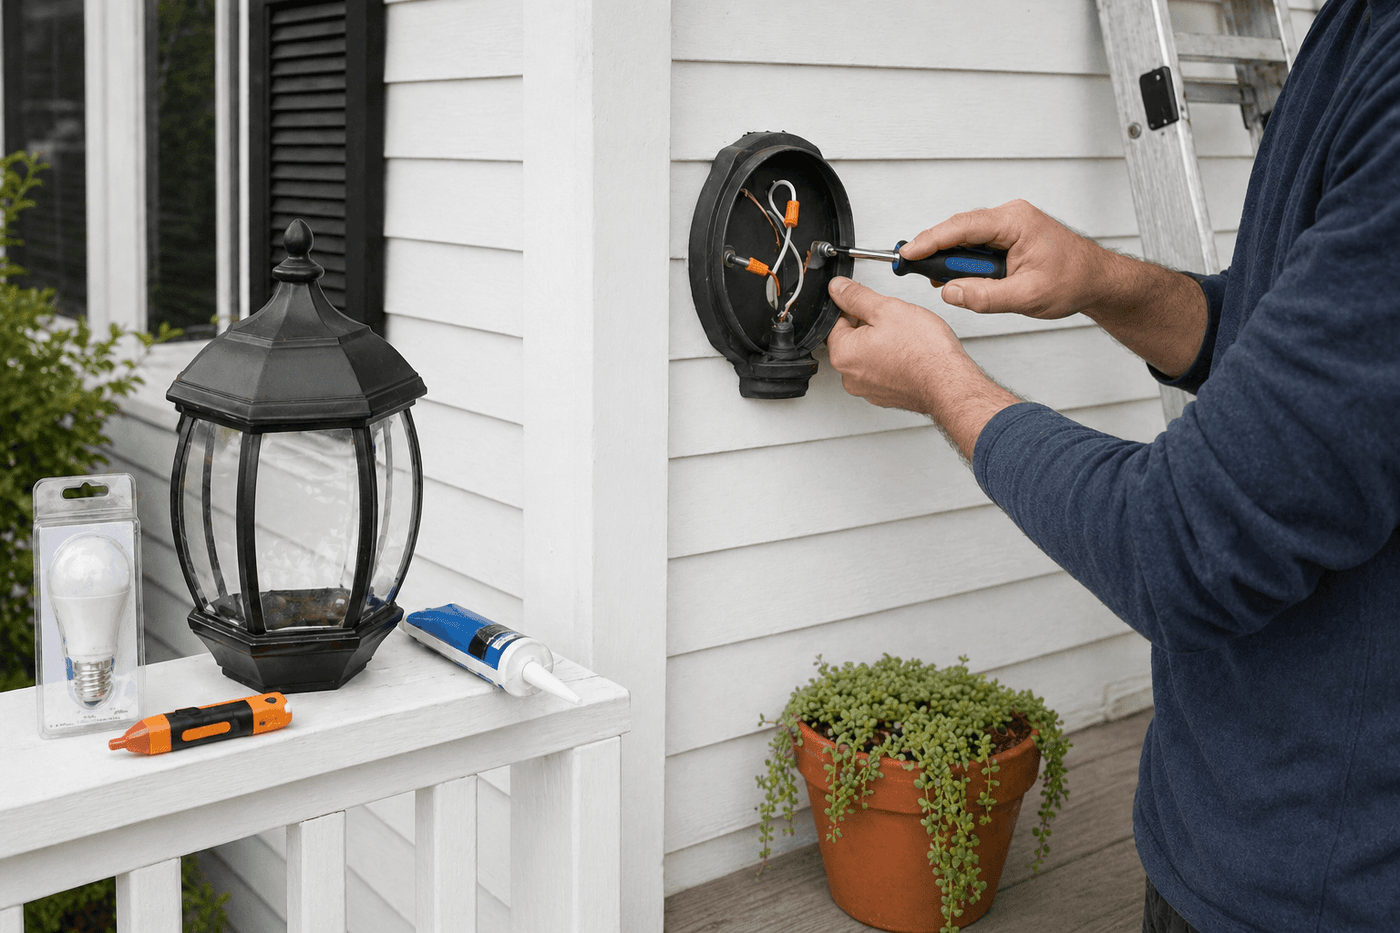
A wobbling outdoor light fixture is the kind of thing that reads immediately as neglect from the street — a tilted porch lantern or a flickering floodlight communicates something about a property that the homeowner almost certainly didn't intend to communicate. The fix is almost always two loose mounting screws, takes fifteen minutes per fixture, and costs nothing beyond the bulbs you were probably going to replace anyway. Turning this into an afternoon project that covers every outdoor fixture on the property — tightening every mount, checking every wire connection, replacing every dim or weathered bulb with an LED at the same time — leaves the whole property looking genuinely more polished and welcoming after dark, with the added benefit of knowing every fixture is safely and properly mounted before the season of outdoor entertaining and extended evening hours begins. This is the afternoon maintenance task with the highest visible return per hour of any project on this list.
What You Need
- Phillips and flathead screwdrivers — for removing fixture covers, tightening mounting screws, and accessing wire connections; most outdoor fixtures use Phillips mounting screws but some older installations use flathead
- LED bulbs sized for outdoor fixtures — replace all existing incandescent or CFL bulbs with outdoor-rated LED equivalents; LED bulbs handle temperature cycling and moisture far better than incandescents and last significantly longer in outdoor conditions (~$4–6 per bulb, ~$18 total for three to five fixtures)
- Exterior silicone caulk or weatherproof sealant — for resealing the gap between the fixture base and the exterior wall surface if the existing seal has cracked or pulled away; cracked seals allow water infiltration into the electrical box that causes corrosion and eventual fixture failure (~$5–8 for a tube)
- Non-contact voltage tester — for confirming power is off at the fixture before removing any cover or touching any wire; this $10–15 tool is non-negotiable for any electrical work regardless of how certain you are the breaker is off (~$12–15)
- Wire nuts and electrical tape — for remaking any wire connections that show corrosion, looseness, or cracked insulation when the fixture cover is removed; corroded wire connections are a fire hazard that the fixture cover conceals from view until a problem develops (~$3–5)
- Stepladder rated for your fixture heights — sized to reach the highest fixture on your property with comfortable working clearance; never stand on the top two rungs or lean a ladder against a surface that cannot support it
- Flashlight or phone torch — for inspecting inside the electrical box where fixture wiring connects; the interior of an outdoor electrical box is shadowed even in daylight and poorly visible without supplemental light
How to Fix Them
- Cut the power to each fixture at the circuit breaker before touching anything — locate the correct breaker in your panel, switch it off, and confirm the fixture is de-energized by testing with a non-contact voltage tester held near the fixture before removing the cover. A non-contact tester that beeps or lights when detecting live current costs $12 at any hardware store and is the one tool that makes this project genuinely safe rather than merely probably safe — never skip this step based on confidence that the correct breaker was switched.
- Walk every outdoor fixture on the property before beginning repairs — make a list of each fixture's location and condition, noting which ones wobble, which have dim or dead bulbs, and which show cracked sealant at the wall junction. A complete property inventory before you set up the ladder the first time means you purchase all the bulbs and materials you need in a single hardware store trip rather than discovering additional fixtures that need attention mid-project.
- Remove the fixture cover according to its specific design — most porch lanterns unscrew counterclockwise at the base, most flush-mount fixtures have two or three screws on the cover face, and most floodlight fixtures have a locking ring that rotates to release. Set the cover and any screws somewhere they won't fall or roll while you work; losing a fixture mounting screw at the top of a ladder is a more common and more frustrating experience than it should be.
- Tighten the mounting screws that secure the fixture's electrical box bracket to the wall or junction box — these are the screws that have loosened and allowed the fixture to wobble, and they are almost always accessible once the fixture cover is removed. Drive each screw firmly clockwise until it seats solidly against the mounting plate; the fixture should feel completely rigid with no lateral movement when you push it firmly from side to side after tightening. If the mounting screws turn freely without tightening, the screw holes in the wall have stripped and need to be repaired with wall anchors before the fixture can be remounted securely.
- Inspect the wire connections inside the electrical box with a flashlight while the fixture cover is removed — look specifically for wire nuts that are loose or have backed off the wires, wires whose insulation shows cracking or discoloration, and any signs of moisture intrusion or corrosion on the wire ends or the box interior. A wire nut that spins freely without gripping the wire bundle beneath it has lost its connection and must be replaced; a loose connection at an outdoor fixture is a fire and shock hazard that the tight fixture cover conceals from view until the consequences make it visible.
- Replace any loose or corroded wire connections by removing the old wire nut, cutting back the wire ends by half an inch to expose clean copper, holding the wire ends parallel and twisting them together clockwise before threading a new wire nut onto the bundle and turning it clockwise until it grips firmly. Pull each wire individually after installing the new nut to confirm the connection holds without the nut spinning — a wire nut connection that releases under modest pulling force is not a secure connection regardless of how firmly the nut was installed.
- Replace the bulb with an outdoor-rated LED equivalent while the cover is off — check the fixture's maximum wattage rating printed inside the socket or on a label inside the cover, and choose an LED that produces the equivalent light output at a fraction of the wattage. Outdoor-rated LEDs are specifically designed to handle the temperature cycling and occasional moisture exposure that causes standard indoor LED bulbs to fail prematurely in exterior fixtures.
- Reseal the fixture base perimeter with exterior silicone caulk before reassembling if the existing seal is cracked, pulled away from the wall, or absent — run a thin bead of caulk around the full perimeter of the fixture base where it meets the exterior wall surface, smooth it with a dampened finger, and allow it to skin over for thirty minutes before reassembling the cover. Restore power at the breaker only after the cover is fully reassembled and all tools are clear of the fixture.
Electrical contractors who service residential outdoor lighting always replace the color temperature of outdoor bulbs when upgrading to LED — they specify 2700K (warm white) for porch and entry fixtures that create a welcoming, residential feeling, and 3000K (soft white) for security and floodlight applications where slightly more neutral light improves visibility without the harsh blue-white cast of higher color temperatures. The color temperature number is printed on every LED bulb package and costs nothing to specify correctly, but a mismatch — warm yellow entry lights beside a cool white floodlight on the same facade — creates a visual inconsistency that makes a property's exterior lighting look improvised rather than considered from the street. Standardizing color temperature across all outdoor fixtures in a single upgrade session produces a cohesive, intentional lighting effect that looks significantly more professional than mixed temperatures installed at different times.