
Drink Holder Stakes: Solve It for $4 Each
A pointed stake, a drilled platform, a triangular brace — and the "nowhere to put my drink" problem at every backyard gathering is permanently solved.
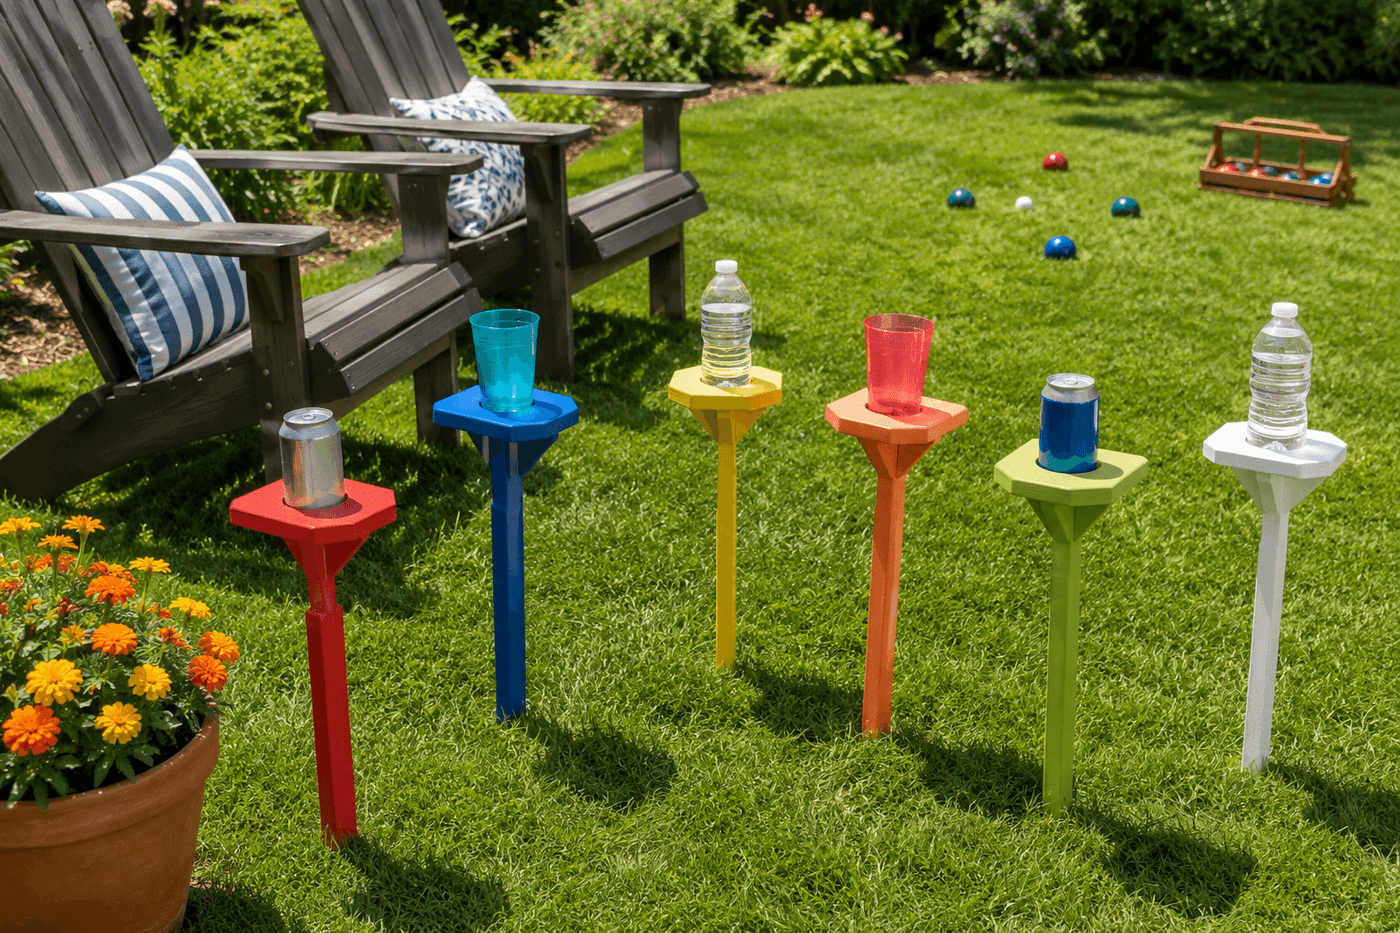
Every backyard gathering has the same drink problem — chairs arranged on the lawn, no side table within reach, and a steady rotation of drinks balanced on armrests, set in the grass where they tip, or held in hand for the entire duration of a three-hour backyard hang because putting them down means losing them or spilling them. Wooden drink holder stakes solve this so completely and simply that the only question after building a set is why this wasn't the first woodworking project you ever made. A pointed stake pushed into the lawn beside any chair, a small platform at the top with a hole saw-drilled opening that holds a can, bottle, or cup snugly at a comfortable reach height — that is the entire project. The build takes about 30 minutes per stake, costs $3–5 each in lumber, and a set of six in different colors means every guest at a lawn gathering has a designated drink spot that is theirs by color rather than by proximity. They stack for storage, push in anywhere, and solve a problem that has existed at every backyard party since backyards were invented.
What You'll Need
- 1x2 lumber, 8 feet — one 8-foot board yields four 18–24-inch stakes with minimal waste; pine is budget-friendly and holds outdoor finish well when sealed properly (~$3–4 per board)
- 1x6 or 1x8 lumber, 2 feet — for the platform tops; cut into 5"x5" squares, one per stake; the extra width compared to the stake body is what creates the visual platform appearance and provides enough material around the hole saw cut to maintain structural integrity (~$3–4 per board, yields multiple platforms)
- Hole saw bit, 2½"–3" diameter — 2½" fits standard 12 oz cans snugly; 3" accommodates most travel mugs and wide-base cups; if building for both, 2¾" is a useful compromise that holds cans with slight play while fitting most cups (~$8–12 for a hole saw bit if not already owned)
- Small scrap wood for triangular braces — cut from 1x2 offcuts at 45 degrees; one brace per stake positioned between the platform underside and the stake face adds the lateral rigidity that prevents the platform from torquing under the weight of a full drink
- Exterior wood glue — Titebond II or similar; applied at the platform-to-stake joint and the brace joints before screwing for a bond that outlasts screws alone in outdoor conditions with ground moisture
- Wood screws, 1¼" and 2" — 2" driven up through the platform underside into the stake top for the main platform joint; 1¼" for the triangular brace; pre-drill all pilot holes to prevent splitting 1x2 lumber at the narrow stake top
- Sandpaper, 80- and 220-grit — for smoothing the pointed stake end, the hole saw cut edge inside the platform hole, and all exterior surfaces; the inside edge of the hole saw cut specifically needs 220-grit smoothing to prevent it from catching on can labels during insertion and removal
- Exterior paint in assorted colors — one color per stake so each person at a gathering claims a color; bright, saturated colors read well against green grass from a distance; DecoArt Outdoor or Rust-Oleum 2X in sample sizes (~$3–4 per sample, each covers multiple stakes)
- Exterior polyurethane sealer — two coats over the finished paint; stakes spend time in damp ground and must be sealed comprehensively including the pointed stake end where ground contact is most sustained (~$8–10 for a small can covering all stakes in a set)
- Circular saw or miter saw — for cutting stakes to length and making the 45-degree point cuts at the stake bottom; a handsaw works for occasional builders willing to take more time on each cut
- Drill and drill bits — for pilot holes and driving screws; the hole saw requires a standard drill rather than an impact driver, which spins too fast for clean hole saw cuts in thin lumber
How to Build Them
- Cut all stakes to length from the 1x2 board before cutting any points — mark each stake at 18–24 inches and crosscut cleanly, then cut all platform squares from the 1x6 or 1x8 board at 5"x5". Cutting all identical pieces together before switching to the angled point cuts reduces saw setup changes and keeps all stakes at a consistent length, which matters when the set is pushed into the ground and the platform heights need to be roughly uniform for visual cohesion.
- Cut the pointed end on each stake by making two angled cuts that meet at the centerline of the board — a 45-degree cut on each of the two wide faces of the 1x2 produces a symmetrical point that pushes into lawn soil cleanly without splitting the stake. A single-sided point cut that tapers from one face only tends to push the stake sideways rather than straight down when driven into firm ground; the symmetrical two-sided point self-aligns during insertion.
- Drill the hole saw opening in each platform square before any assembly — clamp the platform piece firmly to a scrap board before drilling to prevent it from spinning when the hole saw breaks through, which happens suddenly and with significant rotational force that causes injury if the workpiece is held by hand rather than clamped. Position the hole in the exact center of the platform square by measuring and marking the diagonal intersections from corner to corner before drilling.
- Test the hole diameter against an actual can or cup before proceeding to the full set — drill one platform, test the fit, and adjust hole saw size if needed before cutting all remaining platforms. A hole that is too tight scratches can labels and makes insertion difficult; a hole that is too loose allows the drink to shift and tip rather than sitting securely. The correct fit allows the can to drop in smoothly and sit without wobbling when released.
- Sand all pieces thoroughly before assembly — the inside edge of each platform hole with 220-grit wrapped around a dowel or finger, the pointed stake end and all stake faces through 80- then 220-grit, and the platform top and bottom faces. Sanding before assembly reaches every surface; sanding after assembly misses the platform underside and the stake top where they join, which are the surfaces most exposed to moisture from below during ground use.
- Attach the platform to the stake top by applying exterior wood glue to the stake's top end face, centering the platform over the stake top, and driving two 2-inch screws up through pilot holes in the platform underside into the stake end grain — staggered diagonally rather than in a straight line to maximize the screw purchase in the narrow stake end. End grain screw connections in wood have lower holding strength than face grain connections; the glue joint carries the majority of the platform load and the screws prevent separation while the glue cures.
- Cut and attach a triangular brace from 1x2 offcut — cut a piece approximately 3 inches long at 45 degrees on both ends so it fits snugly between the platform underside and the stake face at a 45-degree angle, apply glue to both contact faces, and secure with one 1¼-inch screw through each end. The brace transfers lateral load from the platform — the torque of a full drink sitting off-center in the hole — directly into the stake body rather than relying solely on the platform-to-stake joint to resist it.
- Paint each stake in its assigned color after the glue has fully cured — apply two coats of exterior acrylic paint to all surfaces including the pointed stake end that will be in ground contact, the underside of the platform, and the interior wall of the hole. Allow full cure between coats and before sealing; paint on wood that hasn't fully cured traps solvent under the sealer coat and causes bubbling and peeling within one outdoor season.
- Seal with two coats of exterior polyurethane, paying particular attention to the pointed stake end and the first 4–6 inches of the stake body that will be in contact with moist soil — apply an extra third coat to the stake point specifically, which experiences the most sustained moisture exposure of any part of the finished piece. Allow full cure before use; polyurethane that hasn't cured fully softens when pushed into soil under twisting pressure and can peel away from the wood surface during the first installation.
Outdoor furniture makers and woodworking instructors who design functional yard accessories consistently recommend one platform geometry upgrade that dramatically improves drink holder stake stability in soft or recently watered lawn soil: add a second horizontal crosspiece at ground level — a 6-inch length of 1x2 screwed perpendicular through the stake at approximately 2 inches above the stake point. This ground-level crosspiece acts as a depth stop that prevents the stake from being pushed too deep into soft soil under the weight of a full drink, and the perpendicular orientation distributes the lateral load of the stake into a wider footprint of soil contact rather than concentrating it at the single narrow stake point. Outdoor accessory makers who add this ground crosspiece to drink stakes report elimination of the slow leaning-and-tipping that standard single-point stakes experience in soft summer lawn soil after rain — the problem that causes the full drink to end up sideways in the grass at the exact moment it would be most frustrating. The crosspiece costs one extra piece of scrap wood and five minutes of drilling and screwing per stake, and converts a stake that works in firm soil into one that works in any soil condition a backyard summer produces.














