Deck Board Replacement: Safe Again for $30
Pry up the damaged boards, confirm the joists are solid, cut new lumber to match, fasten down, stain to blend — and a safety hazard that has been rerouting foot traffic all spring is fixed before lunch.
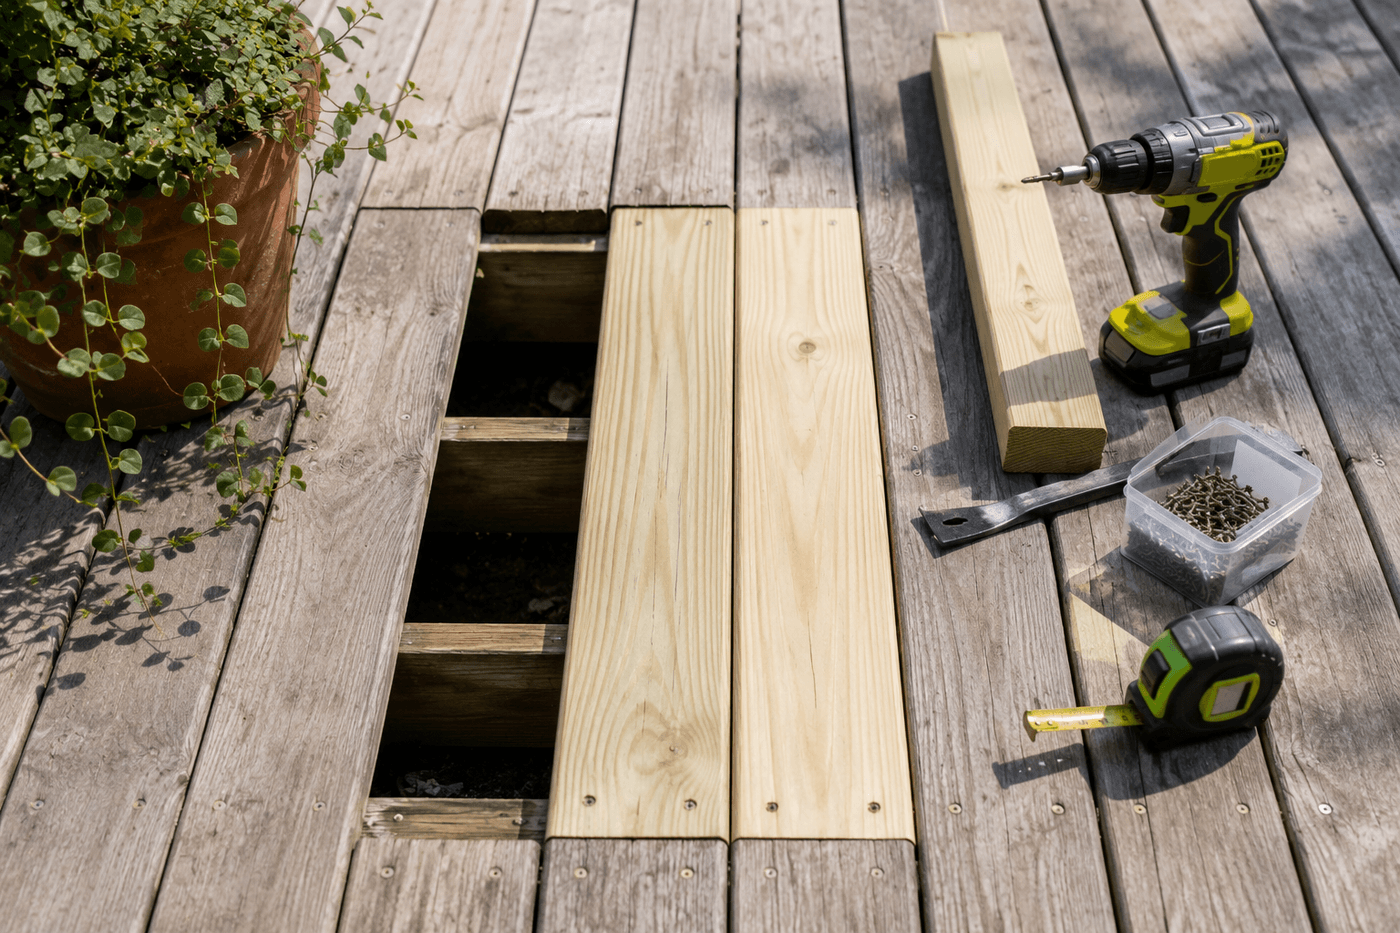
A soft or flexing deck board sits in the category of home repair problems that feel more serious than they usually are — the flex underfoot suggests structural failure, which suggests an expensive contractor visit, which suggests a level of disruption and cost that keeps the repair on the mental list rather than the actual calendar. The reality in the vast majority of cases is that the rot is confined to the surface boards themselves while the structural joists underneath are completely solid, and replacing two or three boards is a two-hour Saturday repair that costs $30 in lumber and screws and requires no more skill than measuring, cutting, and driving screws. The diagnostic moment that determines whether this is a surface board replacement or a more significant structural repair is the joist inspection after the damaged boards are removed — solid joists that do not flex under hand pressure confirm the repair scope is exactly what it appears to be; soft, discolored, or flexing joists indicate rot has penetrated the structure and the repair scope expands significantly. In most cases the joists are fine, the boards are the problem, and two hours of work eliminates a safety hazard, restores the full deck surface, and saves the contractor visit that felt inevitable when the soft spot was discovered.
What You'll Need
- Replacement lumber — bring one of the damaged boards to the lumber yard to match width, thickness, and species exactly; most residential decks use 5/4x6 decking in pressure-treated pine, cedar, or redwood; a board that matches on all three dimensions sits flush with the surrounding surface without shimming (~$8–15 per 8-foot board depending on species and length needed)
- Exterior deck screws, 2½" or 3" — stainless or coated deck screws rated for ground contact if using pressure-treated lumber, which requires corrosion-resistant fasteners; standard coated screws corrode rapidly in contact with the preservative chemicals in pressure-treated wood and cause rust staining on the deck surface within two seasons (~$6–8 per box)
- Flat pry bar or cat's paw — for removing the damaged boards without damaging the adjacent boards or the underlying joists; a cat's paw tool specifically designed for nail and screw removal provides the leverage needed to pop boards free without gouging the joist tops where the new board will bear
- Circular saw — for cutting replacement boards to the exact length of the removed boards; a clean, square crosscut is what produces a board end that sits flush against the adjacent framing without gaps
- Drill and countersink bit — for drilling countersunk pilot holes before driving deck screws; countersinking the screw head just below the board surface produces a clean professional finish and prevents the screw head from catching feet and causing trips on the deck surface
- Speed square and tape measure — for measuring replacement board length accurately and confirming the cut end is square before installation
- Deck stain in a matching tone — for blending the new board color into the surrounding weathered deck surface; apply to the new boards and feather out across two to three neighboring boards on each side for the most invisible color blend (~$8–12 for a small can if not already on hand)
- Awl or stiff wire — for probing joist surfaces after board removal to detect soft spots; an awl that penetrates the wood fiber easily indicates rot; one that requires firm pressure to penetrate confirms solid wood
- Wood preservative — applied to joist tops before new board installation; a coat of end-grain preservative on any exposed joist surfaces extends joist life significantly in the high-moisture zone where deck boards sit (~$5–8)
How to Replace Them
- Conduct a full deck inspection before removing any boards — walk the full deck surface pressing firmly with each foot and noting every board that flexes, sounds hollow, or shows surface checking, discoloration, or crumbling wood fiber at the surface. Addressing all damaged boards in a single repair session is significantly more efficient than returning repeatedly as additional failures become apparent, and the board removal and joist inspection phase that happens during repair is the best opportunity to assess the full scope of surface board condition across the deck.
- Remove the damaged boards by driving the flat pry bar or cat's paw under the board edge at each joist location and applying upward lever pressure — start at one end of each board and work progressively along its length rather than attempting to pop the full board at once, which risks splitting the board rather than releasing it cleanly and may pull joist top material with it. If the original fasteners were nails rather than screws, the cat's paw tool provides the mechanical advantage needed to pull them through the board without damaging the joist top beneath.
- Inspect the exposed joists immediately after board removal — probe each joist top with the awl at six-inch intervals along the full length of the removed board area, pressing firmly to check for soft spots; check visually for discoloration, fungal growth, or surface crumbling that indicates rot; and press the joist body firmly by hand to confirm it does not flex under load. Solid joists that pass all three checks confirm the repair scope is board replacement only; any joist that shows soft spots, visible rot, or flexing under hand pressure needs structural assessment before new boards are installed over it.
- Remove all existing fastener stubs from the joist tops using pliers or the cat's paw — any remaining nail or screw stub in the joist top surface prevents the new board from sitting fully flat on the joist and creates a high spot that is visible and uncomfortable underfoot. The joist top surface should be completely clear and flat before new board installation begins.
- Apply a coat of wood preservative to all exposed joist top surfaces before installing the new boards — the joist top is the highest-moisture zone in any deck structure because it is the surface where water pools between the deck boards and where the most sustained wood-to-wood moisture contact occurs. A preservative coat on joist tops at the time of board replacement adds significant protection at the moment when those surfaces are accessible and extends joist life measurably compared to leaving them uncoated during a repair.
- Measure and cut the replacement boards to length using the removed damaged boards as templates — lay each damaged board beside the replacement lumber and mark the cut line directly from the original rather than measuring independently, which eliminates any measurement error and guarantees the replacement board is exactly the same length as the original. Make square crosscuts and confirm the cut end is perpendicular to the board face before installation; an angled cut produces a gap at the board end that allows water to pool and accelerates rot at the new board end.
- Position the new board in the gap with consistent spacing on each side — use a 16d nail or a dedicated deck spacing tool as a spacer between the new board and each adjacent board to maintain the consistent gap that allows drainage and airflow under the deck surface. A new board installed without consistent gap spacing either contacts the adjacent boards (preventing drainage and accelerating moisture damage) or has an obviously inconsistent gap that is visible across the deck surface.
- Fasten the new board with two exterior deck screws at each joist location, driven through countersunk pilot holes — position the screws approximately ¾ inch from each board edge, which places them in solid wood far enough from the edge that the screw does not split the board and close enough to the edge that the screw reaches full joist depth. Drive screws until the head is just below the board surface rather than flush with it; a slightly countersunk screw head fills with weathering material over time and becomes invisible, while a flush or protruding head remains a visible and foot-catching feature of the repair indefinitely.
- Stain the new boards and feather into the surrounding deck surface to blend the color difference — apply deck stain to the new boards first in the direction of the wood grain, then immediately brush outward onto two or three neighboring boards on each side using progressively lighter pressure so the stain concentration decreases gradually away from the repair. This feathering technique blends the fresh stain into the weathered surrounding surface and avoids the sharp color boundary that makes a deck board repair look like a patch rather than an invisible repair.
Deck contractors and exterior carpentry specialists who perform deck repairs and restorations for residential clients consistently identify one fastener choice that makes the single largest difference in how long replacement boards last before developing the same rot issues that required the original repair: use hidden deck fasteners or pre-bored plug-covered screws rather than surface-driven screws for replacement boards in high-moisture zones. A surface-driven deck screw creates a small depression around the screw head where water pools and penetrates directly into the wood fiber surrounding the fastener — which is precisely the highest-moisture point in any board and the specific location where rot originates most commonly in pressure-treated decking. Hidden fasteners that grip the board from the side rather than driving through the top face eliminate this water-collection point entirely, and plug-covered screws that seal the fastener hole with a matching wood plug prevent water penetration at the fastener location. Deck contractors who specify hidden fasteners for deck repairs and new installations report dramatically reduced recurrence of rot at fastener locations — the most common failure mode of surface-fastened replacement boards — and consider it the single upgrade most worth the small additional cost in any deck board repair or replacement project.