Cracked Garden Hose Fix: $6, 5 Minutes
A $6 brass mending coupling and five minutes in the driveway — and the hose you were about to replace works perfectly for another season.
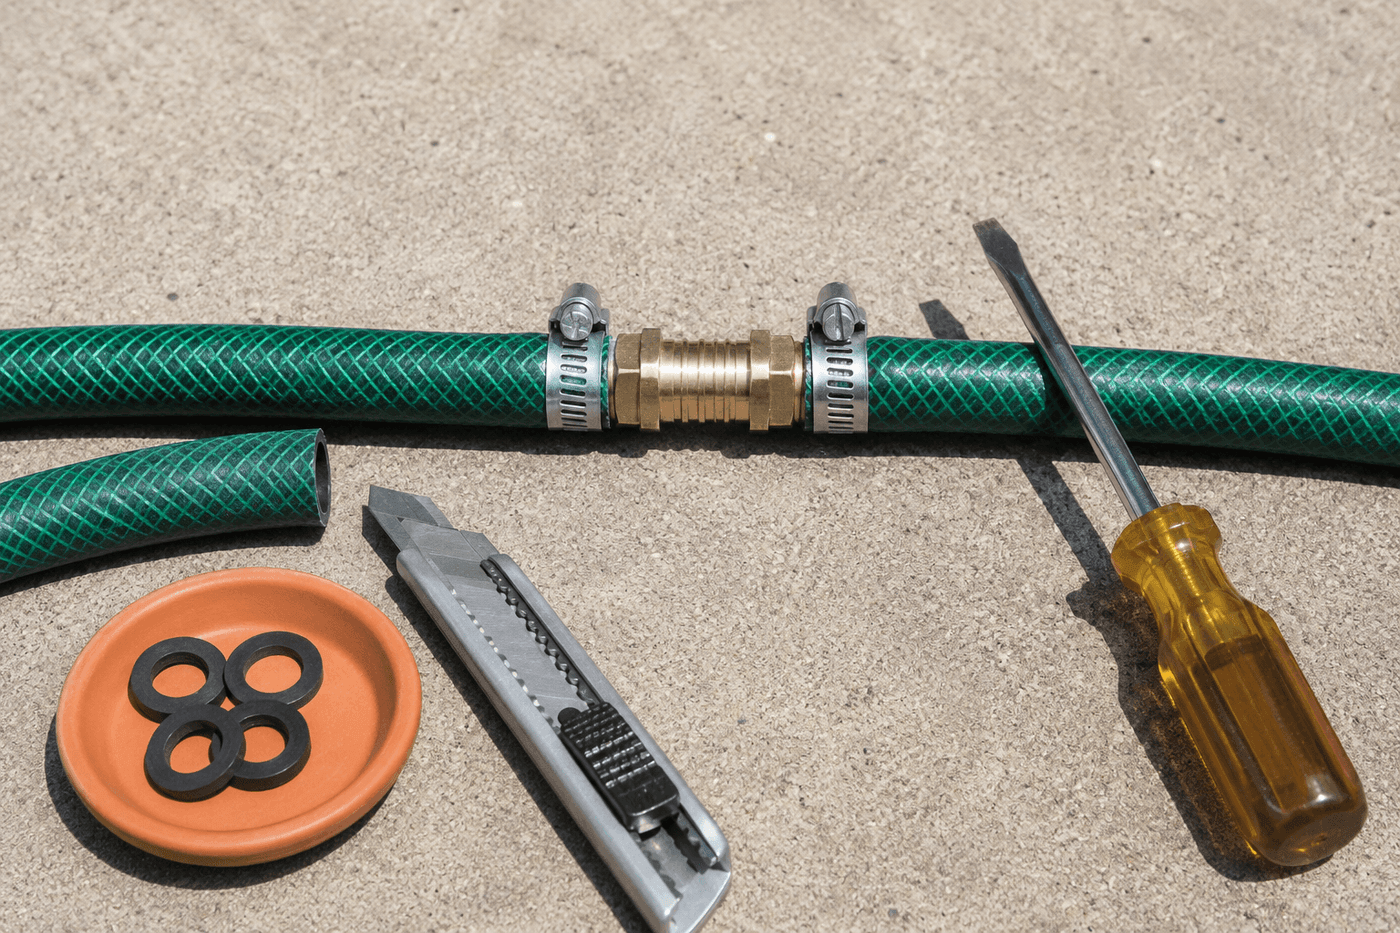
A split garden hose has a way of presenting itself as an emergency — water spraying sideways, the middle of a watering session, a new hose mentally added to the shopping list before the damage is even fully assessed. The hardware store display that holds the replacement hoses almost always also holds the $6 brass mending coupling that fixes the hose you already have in five minutes with a utility knife and a flathead screwdriver, and the gap between those two purchases is one of the more dramatic cost differences available in home maintenance. Cut out the damaged section, push each clean-cut end firmly onto the barbed fitting of the coupling until it seats fully, tighten the clamps on each side until snug, turn on the water — and the repair is done. The mended section is actually more rigid and durable than the surrounding hose material, which means the hose that split once in the middle is unlikely to split at the same location again. A brass coupling kept in the garage means a hose that splits mid-watering session is fixed before the session ends rather than dragged back to the spigot leaking water all the way.
What You'll Need
- Brass hose mending coupling — the complete repair kit; includes the barbed center fitting and two hose clamps; available at any hardware store or garden center on the same display as hose accessories; confirm the coupling diameter matches your hose diameter — most residential hoses are ⅝" or ¾" inner diameter (~$5–8)
- Utility knife or garden shears — for making the two clean perpendicular cuts that remove the damaged hose section; the cut must be completely perpendicular to the hose axis — an angled cut produces an uneven seating surface that prevents the coupling from sealing fully and causes a slow leak at the clamp even when tightened correctly
- Flathead screwdriver — for tightening the hose clamp screw on each side of the coupling; a standard medium flathead is the correct tool for the slotted clamp screw; using a power screwdriver on hose clamps overtightens them easily and splits the hose at the clamp edge
- Bucket of warm water — optional but useful; soaking each cut hose end in warm water for 60 seconds softens the hose material and makes pressing it onto the barbed fitting significantly easier, particularly on older hoses that have stiffened with age and sun exposure
- Rubber gloves — optional; hose clamp edges are sharp during installation and the barbed fitting requires firm pushing pressure that gloves make more comfortable
- Marker or chalk — for marking the damaged section boundaries clearly before cutting so both cuts are positioned in undamaged hose material at least 2 inches beyond the visible split or crack in each direction
How to Fix It
- Turn off the water at the spigot and drain the hose completely before any cutting — a hose under pressure sprays when cut, and residual water in the hose makes the coupling installation messier than necessary. Lay the hose flat on a driveway or other firm surface rather than attempting the repair on grass where the hose shifts during cutting and makes a straight perpendicular cut difficult to execute cleanly.
- Mark the cut positions on either side of the damaged section — place marks at least 2 inches beyond the visible edges of the split or crack in each direction, which ensures both cuts land in fully intact, undamaged hose material that will seat properly on the coupling barbs. A coupling seated in hose that is cracked or weakened within 2 inches of the cut will leak at the fitting edge even when the clamp is properly tightened, because the damaged material cannot maintain the compression seal the clamp relies on.
- Cut the hose at both marks using a sharp utility knife or garden shears in a single clean perpendicular stroke rather than a sawing motion — a sawing cut frays the hose end and produces an uneven cut face that seats unevenly on the coupling barb and creates a leak path at the top or bottom of the fitting where the uneven hose face does not contact the barb fully. Lay the hose on a cutting board or scrap wood during the cut to provide a firm backing surface and produce the cleanest possible cross-section.
- Slide one hose clamp onto each cut hose end before pressing either end onto the coupling — clamps that need to be added after the hose is seated on the fitting require pulling the hose back off the barb to thread them on, which partially defeats the barb seating work and risks kinking the hose at the fitting junction. Position each clamp approximately 1 inch from the cut end so it will sit over the middle of the barbed section once the hose is fully seated.
- Soak each hose end in warm water for 60 seconds if the hose is stiff or old — the warm water temporarily softens the hose compound enough that firm hand pressure seats the hose onto the coupling barbs without requiring tools. Attempting to force a cold, stiff hose onto a coupling barb risks splitting the hose end at the barb edge during installation, which creates a new damage point immediately adjacent to the repair.
- Press each cut hose end firmly onto one side of the coupling barb using a straight pushing motion — push until the hose end is fully seated past all barb ridges and the cut face of the hose contacts the coupling shoulder, which is the visual confirmation that the hose is fully engaged rather than partially seated on only the first one or two barb ridges. A partially seated hose pulls off the coupling under normal water pressure and requires the full installation process to be repeated.
- Slide each hose clamp over the barbed section of the fitting and position it so the clamp band sits over the center of the barbed area — then tighten the clamp screw with the flathead screwdriver using firm hand-pressure turns rather than power tool driving. Tighten until the clamp band compresses the hose slightly against the barb ridges and the clamp screw feels snug with resistance rather than spinning freely — then add one additional quarter turn to ensure the clamp is fully engaged without overtightening to the point of cutting into the hose material.
- Test the repair by turning the water on slowly and watching both clamp areas for any dripping or seeping — run your finger around each clamp while the water is on full pressure to feel for any moisture that visual inspection might miss. A properly installed coupling with correctly tightened clamps produces a completely dry repair at full water pressure on the first test; any dripping indicates either insufficient clamp tightening, which is corrected by one additional quarter turn, or a hose end that is not fully seated past all barb ridges, which requires loosening the clamp, reseating the hose fully, and retightening.
Irrigation specialists and professional groundskeepers who maintain large-scale hose systems consistently recommend one coupling selection detail that most homeowners overlook when standing at the hardware store display: choose brass couplings over plastic ones regardless of the price difference, which is typically $1–2. Plastic mending couplings use the same barb-and-clamp installation method as brass ones and produce a working repair — but the plastic barb material flexes slightly under water pressure cycling, which gradually loosens the hose-to-barb connection over repeated pressurize-depressurize cycles across a full watering season. Brass barbs are dimensionally stable under pressure cycling and maintain the exact interference fit with the hose material that produces a permanent seal rather than a gradually loosening one. Irrigation professionals who specify repair fittings for professional installations exclusively use brass for this reason, and the $1–2 price premium for brass over plastic is the most straightforward cost-benefit calculation in garden maintenance — the part that stays tight for the full remaining life of the hose versus the part that may need replacement within a season or two.