Slow Drain Fix: Clear It in 20 Minutes Free
No chemicals, no plumber, no standing water — just a removed stopper and two minutes of unpleasant but completely satisfying work.
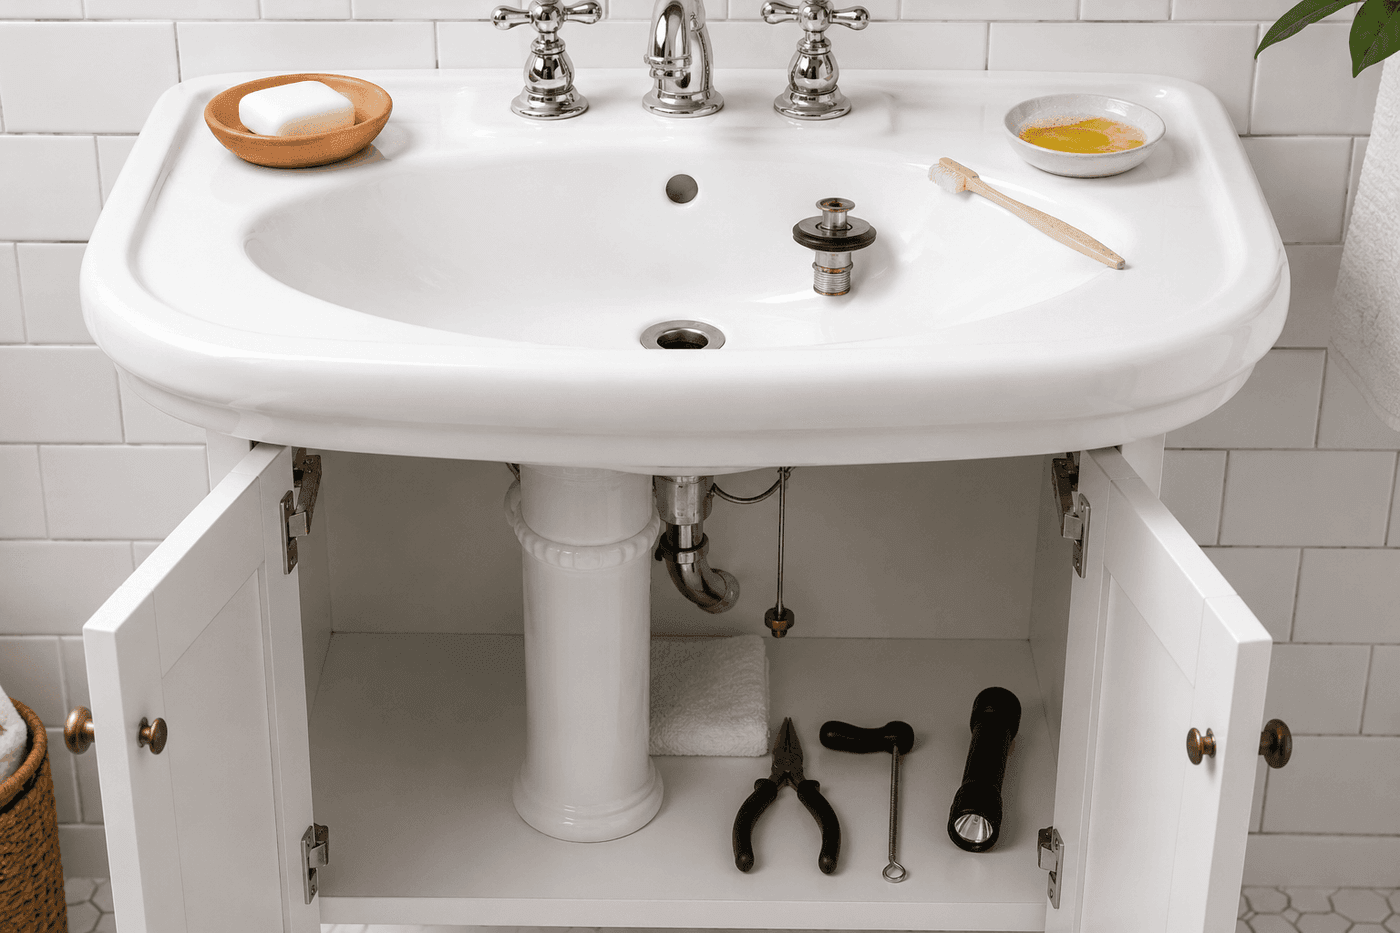
Standing water pooling around your feet while you brush your teeth is one of those daily inconveniences that gets normalized so gradually that most people live with it for months or years before doing anything — and the fix almost always takes twenty minutes and costs nothing, which makes the months of tolerating it feel particularly unnecessary in retrospect. The overwhelming majority of slow bathroom sink drains have a single cause: hair and soap scum accumulating around the pop-up stopper just below the drain opening, at exactly the point where the stopper mechanism creates a ledge for debris to catch on. Removing the stopper, pulling out the clog, and reinstalling everything correctly restores full drainage immediately and completely — no chemical drain cleaner required, no plumber needed, and no specialized tools beyond possibly a pair of pliers for the pivot rod nut under the sink. The monthly baking soda and vinegar maintenance flush that takes three minutes after the initial clearing is what keeps the drain running freely for the rest of the year rather than returning to the same slow state within weeks.
What You'll Need
- Rubber gloves — non-negotiable; what you will find around a pop-up stopper is genuinely unpleasant and handling it bare-handed is a choice you will immediately regret
- Needle-nose pliers or adjustable pliers — for loosening the pivot rod retaining nut under the sink if the stopper doesn't lift straight out; most pivot rod nuts loosen by hand but corroded ones need pliers
- Flashlight or phone torch — for seeing clearly inside the cabinet under the sink while locating and disconnecting the pivot rod assembly
- Old toothbrush — for scrubbing soap scum and biofilm off the stopper body and the drain opening rim once the clog is removed
- Zip-it drain cleaning tool — a barbed plastic strip available for under $3 at any hardware store; more effective than a wire hanger for pulling hair from deeper in the drain pipe beyond where fingers reach
- Wire coat hanger — straightened and bent into a small hook at one end; a free alternative to the zip-it for reaching hair clogs just below the stopper seat
- Small bucket or towel — placed under the pivot rod connection point before disconnecting; a small amount of water in the drain trap releases when the pivot rod is removed
- Baking soda and white vinegar — for the maintenance flush after reinstallation and monthly thereafter; ½ cup baking soda followed by ½ cup vinegar, left to fizz for 15 minutes before flushing with hot water
- Dish soap — for cleaning the stopper thoroughly before reinstalling; soap scum on a reinstalled stopper attracts new hair immediately and shortens the time before the drain slows again
How to Fix It
- Test your stopper type before reaching under the sink — grasp the stopper body and lift straight up with firm pressure. Stoppers that lift straight out require no under-sink work at all and can be removed, cleaned, and replaced entirely from above the drain in under five minutes. Stoppers that rotate slightly and lift out are also top-removal types. Only stoppers that are completely fixed in place require disconnecting the pivot rod from below.
- Locate the pivot rod assembly under the sink if top removal doesn't work — open the cabinet and look at the drain pipe running down from the sink basin; you will see a horizontal rod entering the drain pipe from the side through a retaining nut, connected by a clevis strap to the lift rod that operates the stopper from above. Place a small towel or bucket under this connection point before loosening anything.
- Disconnect the pivot rod by unscrewing the retaining nut where the horizontal rod enters the drain pipe — turn counterclockwise by hand or with pliers if corroded — then pull the pivot rod out of the drain pipe far enough to release its end from the hole in the stopper base. The stopper can now be lifted straight out from above; set the pivot rod and retaining nut somewhere visible so they are not knocked behind the cabinet during the cleaning work above.
- Remove the clog from around and below the stopper — put on your gloves, reach into the drain opening, and pull out whatever has accumulated around the stopper seat. The clog is almost universally a dense mat of hair bonded with soap scum that has been building since the last time the stopper was removed; pull it out in one piece if possible rather than breaking it apart, which makes complete removal easier and reduces the chance of pushing debris deeper into the drain pipe.
- Insert a zip-it tool or bent wire hanger into the drain pipe past the stopper seat and pull upward slowly with a slight twisting motion to catch any hair clinging to the pipe walls below the immediate clog — most slow drains have a secondary accumulation 4–6 inches below the stopper seat that the stopper removal alone doesn't address, and retrieving this second layer is what produces the dramatically improved drainage that makes the repair feel completely effective rather than partially improved.
- Clean the stopper thoroughly with dish soap and an old toothbrush, scrubbing all surfaces including the underside and the pivot rod hole — reinstalling a soap-scum-coated stopper creates an immediate hair-catching surface that begins rebuilding the clog from the first use. Rinse the stopper completely and inspect the rubber seal around the stopper body, which degrades over time and can be replaced inexpensively if cracked or flattened.
- Clean the drain opening rim and the inside of the drain pipe as far as the old toothbrush reaches, removing the soap scum film that coats the pipe walls and acts as the adhesive that bonds hair into solid clogs — a clean pipe surface catches far less hair than a soap-coated one, and this surface cleaning step meaningfully extends the interval before the drain slows again compared to simply removing the clog without cleaning the surrounding surfaces.
- Reinstall the stopper by lowering it into the drain opening and aligning the hole in its base with the pivot rod entry point on the drain pipe — reconnect the pivot rod through the stopper hole, thread the retaining nut back onto the drain pipe by hand and snug with pliers, then test stopper function from above by pressing the lift rod. The stopper should raise and lower smoothly; if it stays down when the lift rod is raised, the pivot rod needs to engage the stopper hole more fully, which is corrected by pushing the pivot rod slightly farther into the drain pipe before retightening the retaining nut.
- Flush the drain with the hottest tap water available for two full minutes to confirm full drainage is restored and to clear any remaining loosened debris from the pipe — then pour ½ cup of baking soda down the drain followed immediately by ½ cup of white vinegar, allow the fizzing reaction to work for 15 minutes, and flush again with hot water. Set a monthly phone reminder to repeat this three-minute maintenance flush, which is the single habit that prevents the clog from rebuilding and keeps the drain running freely indefinitely.
Licensed plumbers who service residential bathroom fixtures consistently recommend one stopper upgrade that eliminates the hair clog problem almost entirely rather than simply managing it through periodic cleaning: replace the standard pop-up stopper with a hair-catching drain cover such as the TubShroom Sink Edition or a similar silicone drain strainer that sits in the drain opening and intercepts hair before it reaches the stopper mechanism. Standard pop-up stoppers are designed purely for water control and have no hair-catching function — hair passes directly into the drain and accumulates around the stopper body below the visible surface. Hair-catching strainers sit at the drain opening, collect hair on the surface where it is visible and easily removed in seconds without any under-sink work, and eliminate the monthly maintenance flush entirely for most households. Plumbers who install these strainers for clients report callback rates for slow bathroom sink drains dropping to near zero — the fix costs under $10, takes two minutes to install, and converts a recurring maintenance problem into a 30-second weekly wipe that prevents the problem from ever forming.