Lattice Privacy Screen: Patio Fix for $70
Cedar lattice, a simple frame, and four hours — and your patio finally feels like a room instead of a fishbowl.
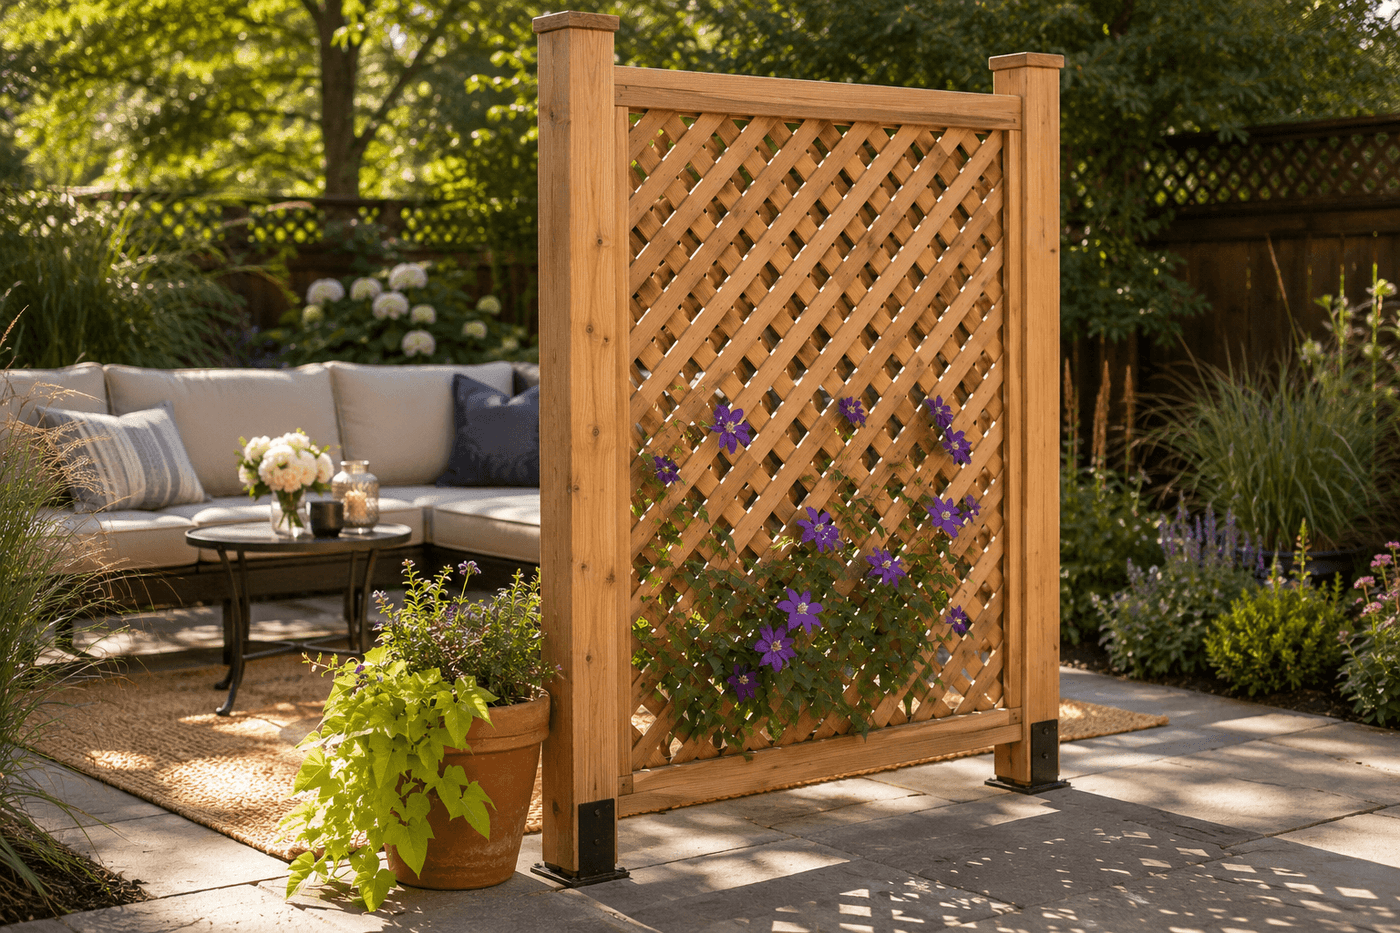
There is a particular kind of outdoor discomfort that comes from sitting on your own patio while feeling completely visible to everyone around you — neighbors on their deck, passersby on the sidewalk, anyone with a sightline to your space — and it quietly keeps you from actually using and enjoying the outdoor space you have. A lattice privacy screen solves this without the closed-in heaviness of a solid fence: the crisscross pattern blocks sightlines at seated and standing height while still letting air circulate and light filter through, which keeps the patio feeling open and connected to the garden rather than walled off from it. Cedar lattice panels, framing lumber, and post hardware run about $70 total, the build takes four hours, and the result is a freestanding framed screen that looks intentional and designed rather than defensive. Plant a clematis or a climbing rose at the base of each post and within a season the whole structure softens into something that reads less like a privacy barrier and more like a beautiful garden feature — one that just happens to mean you can finally eat dinner outside without an audience.
What You'll Need
- Cedar lattice panel — standard 4x8 sheets; one panel makes a screen approximately 4 feet wide by 6 feet tall after framing (~$25–30)
- 2x4 cedar lumber — for the outer frame; cedar resists rot and weathers beautifully without needing paint or stain (~$15–20 for one screen)
- 1x2 cedar trim — for sandwiching the lattice panel inside the frame on both faces; this is what holds the panel securely without visible hardware (~$8–10)
- 4x4 cedar posts, 8 feet — two per screen panel; set in ground anchors or bolted to deck framing (~$10–12 each)
- Post anchor hardware — surface-mount deck anchors for bolting to existing deck boards, or drive anchors for setting in soil (~$8–12 per pair)
- Exterior wood screws — 2½-inch for frame assembly, 1¼-inch for trim pieces; stainless or coated for weather resistance
- Exterior wood glue — for reinforcing trim-to-frame joints before screwing
- Circular saw or miter saw — for cutting frame lumber and trim to length
- Drill and bits — for pilot holes and driving screws
- Level — non-negotiable; a screen that's visibly out of plumb undermines the finished look entirely
- Clamps — for holding frame pieces square during assembly while glue sets
How to Build It
- Plan your screen dimensions before buying materials by standing on the patio and identifying the specific sightlines you need to block — seated height from a neighbor's deck is different from standing height at a property line, and building to the right height for your actual situation rather than a generic dimension is what makes the screen genuinely effective rather than just decorative.
- Cut your 2x4 frame pieces to form a rectangle sized about ½ inch larger than your lattice panel on all four sides, which allows the panel to drop in without forcing while leaving no visible gap at the edges. Cut two long rails for the top and bottom and two shorter stiles for the sides, then check all cuts for square before assembly.
- Assemble the outer frame by applying exterior wood glue to each joint, clamping the pieces square, and driving two 2½-inch screws through pilot holes at each corner. Check diagonal measurements corner to corner before the glue sets — equal diagonals confirm a square frame; unequal diagonals mean the frame is racked and will look visibly wrong once the lattice is installed.
- Set the lattice panel into the assembled frame, positioning it centered with even margins on all sides. The panel should sit flat against the inner face of the frame with no bowing or gaps — if the panel is slightly oversize, score and snap lattice to fit rather than forcing it, which cracks the thin wood strips at the intersections.
- Secure the lattice by cutting 1x2 cedar trim strips to run along all four interior edges of the frame on the front face, then gluing and screwing them through the lattice and into the frame behind — this sandwiches the panel firmly between the frame face and the trim strips without any visible hardware on the lattice itself. Repeat on the back face for a finished appearance from both sides.
- Install post anchors at your chosen locations, checking that spacing matches your frame width precisely before committing anchor positions — bolt deck-mount anchors through existing decking into the structural framing below, or drive ground anchors into soil with a maul. Anchor placement is the decision that's hardest to undo, so measure twice and confirm the screen will clear any existing furniture or traffic paths before drilling.
- Set the 4x4 posts into the anchors and check plumb on two adjacent faces with your level before tightening the anchor hardware fully — a post that's even slightly out of plumb transfers that lean to the entire screen and is visible from twenty feet away. Shim the anchor base if needed to achieve true vertical before final tightening.
- Mount the framed lattice panel between the posts by driving screws through the frame stiles into the post faces on each side, pre-drilling to prevent splitting the cedar frame. Check level across the top of the panel before driving the final screws — a screen that's plumb in both posts but not level across the top looks off and is worth the thirty seconds to confirm and adjust before committing.
Landscape architects who design outdoor rooms for residential projects use one siting principle for privacy screens that most homeowners overlook entirely: position the screen to block the specific sightline angle rather than running it parallel to the property line. A screen placed parallel to the fence line is often less effective than one angled 10–15 degrees toward the neighbor's deck, because sightlines between two spaces are rarely perfectly perpendicular to the boundary between them. Stand at your patio seating position, identify exactly where you make eye contact with the neighboring space, and orient the screen to interrupt that specific angle — even a slight rotation from parallel dramatically improves screening effectiveness while using the same materials and the same footprint. Landscape designers call this "sightline targeting," and it's the difference between a screen that genuinely creates privacy and one that looks right on paper but leaves you still feeling visible when you're actually sitting outside.