Freezer Cleanout: Organized and Waste-Free in 25 Minutes
Pull everything out, toss the mystery items and freezer-burned packages, wipe with vinegar water, group like with like, label and date what goes back — and a freezer that was costing money in waste and confusion is functional again in 25 minutes.
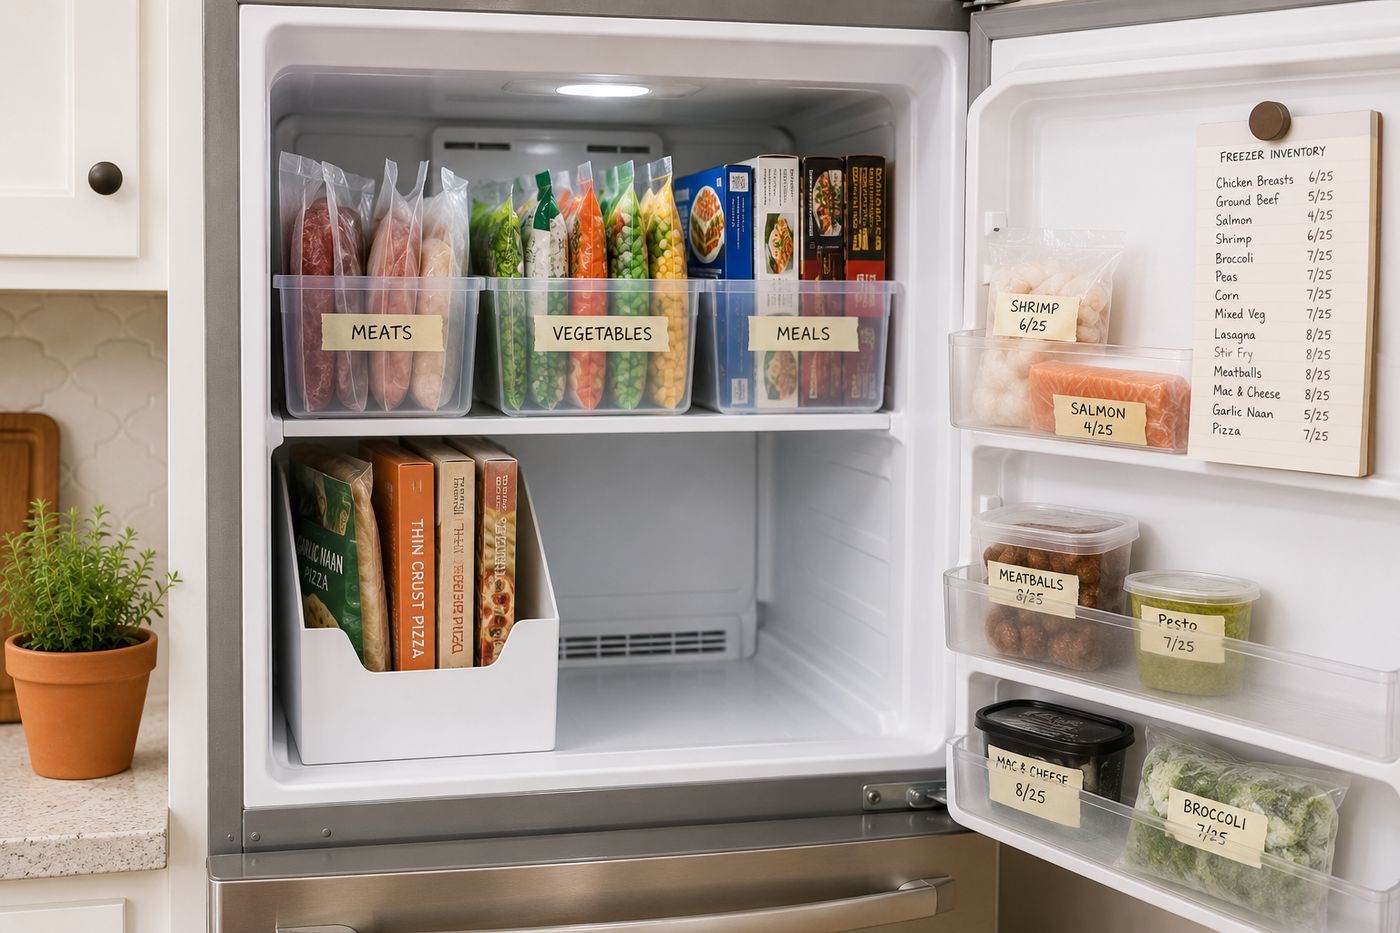
A disorganized freezer costs money in two specific ways that are easy to overlook because neither produces an immediate bill: food that is pushed to the back and forgotten until it is too freezer-burned to use, and duplicate purchases of items already in the freezer that were simply invisible under the avalanche of bags and boxes that accumulated on top of them. Twenty-five minutes of pulling everything out, tossing what cannot be identified or salvaged, wiping the interior with vinegar water, and returning items grouped by category and standing upright converts a freezer from a space that contributes to food waste into one that actively supports meal planning — because everything in it is visible, labeled with a date, grouped with similar items, and accessible without excavating to find it. The masking tape and marker system is the specific addition that makes the organization last beyond the first week: every item going back into the freezer gets a label with what it is and when it went in, which means the next cleanout is faster because the mystery item problem has been eliminated at the source.
What You'll Need
- Cooler or insulated bags — for holding freezer contents during the cleanout session; items left on the counter during a 25-minute cleanout warm significantly, particularly meat and fish; a cooler or insulated bags maintain safe temperatures through the full session without rushing the organization decisions that produce a genuinely functional result
- Warm water and white vinegar, 1:1 ratio in a spray bottle or bowl — the cleaning solution for the freezer interior; vinegar neutralizes the odors that develop in any freezer from package leaks, frost accumulation, and the general absorption of food smells into the plastic interior surfaces; warm water rather than cold dissolves frost residue and food deposits more effectively and dries without leaving a residue that traps new odor sources
- Clean cloths or paper towels — for the wipe-down; microfiber cloths leave no lint on the freezer interior surfaces; paper towels are more practical for the initial wipe of any interior surfaces with visible food residue or frost accumulation before the vinegar water pass
- Clear bins or freezer organizer baskets — one per food category; clear bins allow contents to be seen without removing the bin from the shelf; categories that warrant their own bin: meats and fish, vegetables, frozen meals and prepared foods, breakfast items, treats and ice cream, and bread and baked goods; bins already owned from other organization projects work equally well as purpose-made freezer organizers (~$8–15 for a set if purchasing new)
- Magazine holders or upright file holders — for corralling flat frozen packages like veggie bags, pizza boxes, and flatbreads that tend to fall sideways and create the avalanche problem that makes freezer contents invisible; a magazine holder placed on its side with the open end facing out allows flat packages to be filed upright and pulled individually without disturbing adjacent items (~$3–5 each at dollar stores)
- Masking tape and a permanent marker — for labeling every unlabeled item going back into the freezer and for adding dates to items that are labeled with content but not with the freeze date; masking tape adheres to frozen packages without the adhesive failure that many label systems produce at freezer temperatures and peels cleanly without residue when the package is used
- Notepad or phone — for taking the inventory that prevents the duplicate-purchase problem; a simple category-by-category list of what is in the freezer after the cleanout, photographed with a phone or written on a notepad taped to the freezer door, serves as the shopping reference that prevents buying a third bag of frozen peas when two are already in the organized freezer
The 25-Minute Cleanout Sequence
- Prepare the cooler and the counter space before opening the freezer — a cooler with ice packs positioned beside the freezer, a clear counter surface for the sorting process, a trash bag open and ready, and the masking tape and marker within reach. The preparation step prevents the situation of the freezer open and contents warming while hunting for the trash bag or the marker; every minute the freezer stands open with everything on the counter is a minute of warming on the items that are going back in.
- Remove everything from the freezer as quickly as possible and place meat, fish, and dairy directly into the cooler — vegetables, frozen meals, and baked goods are more forgiving of counter time than proteins, but all items should move from freezer to cooler or counter in a single continuous sweep rather than the examine-and-decide approach that extends the open-freezer time. The tossing decisions happen at the counter after everything is out, not at the freezer door during removal.
- Toss aggressively and without deliberation — freezer burn visible as white, papery patches on the food surface or grayish discoloration on meat; packages with no label and no recognizable content; anything that has been in the freezer longer than can be remembered; partial bags with less than one serving remaining that will never be used as a standalone meal; and anything with a broken seal that has been exposed to freezer air directly. The items being discarded are the source of the money waste the disorganized freezer was producing — keeping them in the freezer does not recover their cost, it only delays acknowledging it while continuing to take up space that productive items need.
- Wipe the full freezer interior with the vinegar water solution while it is empty — spray or wipe all shelf surfaces, the interior walls, the door shelves, and the drawer interiors if the freezer has them; pay particular attention to any areas where package leaks have left sticky residue or where frost has accumulated unevenly, which indicates a seal issue or an airflow blockage worth investigating. Allow the wiped surfaces to dry completely before returning any items — a minute or two in the ambient room temperature with the freezer door open is sufficient for the warm vinegar water to evaporate from the smooth interior surfaces.
- Label every unlabeled item before it goes back into the freezer — write the content and the current date on a strip of masking tape and press firmly onto the package surface. Items that are already labeled with content but not with a freeze date get a date-only tape label; items that are completely unlabeled and whose content can be identified get a full content-and-date label; items whose content cannot be identified go in the trash rather than back in the freezer. The labeling step adds approximately 30 seconds per item and is the single practice that most reduces the future mystery item problem and the discarding of food at the next cleanout.
- Group all labeled items by category before placing any bin in the freezer — meats together, vegetables together, frozen meals together, breakfast items together, treats together, bread and baked goods together. Seeing the full volume of each category as a group before assigning bin space reveals whether the category needs its own dedicated bin, can share a bin with a related category, or is large enough to require front-and-back shelf positioning rather than a bin at all. A meat category with twenty packages needs a dedicated large bin and possibly two shelf levels; a treats category with three items shares a small bin with the breakfast items.
- Return items to the freezer organized with the most frequently accessed categories at the most accessible positions — breakfast items and frequently used vegetables at the front of the most eye-level shelf; long-term storage proteins and seasonal items at the back of the lower shelf where they are accessible when needed but not in the path of daily access. Stand bagged items upright in bins or magazine holders so individual items can be removed and returned without disturbing adjacent items; flat items standing upright take significantly less shelf space than the same items stacked flat and are fully visible without moving anything to see what is behind or beneath.
- Photograph or write the freezer inventory immediately after the organized contents are returned — a phone photo of each shelf taken from the open freezer door creates the visual inventory that serves as a shopping reference; a written category list on a notepad taped to the freezer door serves the same purpose and is more immediately accessible during meal planning. Update the inventory when items are removed or added — a single line crossed off the notepad list when the last package of an item is used, and a new line added when new items go in, is the minimal maintenance that prevents the inventory from becoming inaccurate and therefore useless within two weeks of the cleanout.
Meal prep specialists and professional home organizers who design kitchen systems for clients consistently recommend one freezer management practice that extends the period between necessary full cleanouts from the typical two to three months to six months or longer: implement a first-in-first-out loading system by placing new items at the back of each category bin and pulling from the front — the same stock rotation system used in restaurant kitchens and grocery stores to prevent older items from being buried under newer purchases of the same category. Most household freezers fail the first-in-first-out principle because new items go in front of existing items for convenience, which means the oldest packages are progressively buried deeper in the back of each bin as new purchases arrive, and the freezer burn and mystery item problems that require the full cleanout are produced entirely by the items that were consistently pushed to the back. Professional organizers who install this front-pull-back-load habit in client kitchens report that full freezer cleanouts become largely unnecessary because individual items move through the system in purchase order and the oldest items are always the most accessible and therefore the most likely to be used before they require discarding.