Fix a Sagging Closet Rod in 20 Minutes for Under $10
A center support bracket, two wall anchors, and twenty minutes — the rod that's been slowly bending under your winter coats is solid before the weekend
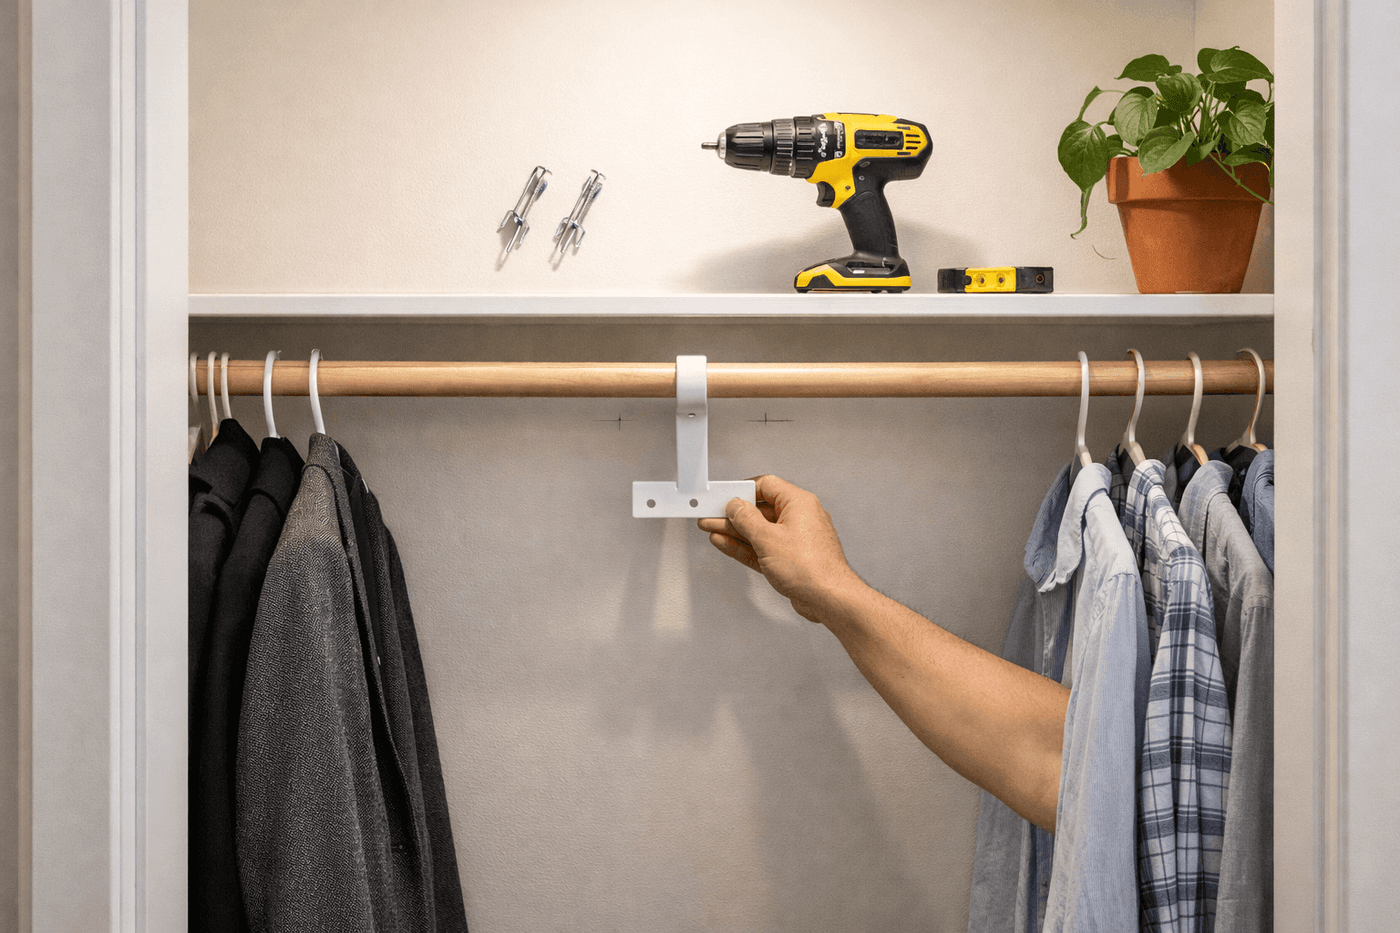
A sagging closet rod is not a structural mystery — it is almost always one of two things happening in combination: a rod that is longer than its diameter can support without a center bracket, and the weight of clothes clustered at the center where the sag is worst. Left unaddressed, a sagging rod eventually fails completely, depositing everything hanging on it onto the closet floor at the least convenient possible moment. The fix is a center support bracket mounted to the back wall at the rod's midpoint — a $5 piece of hardware, two wall anchors, and twenty minutes of straightforward work that eliminates the sag immediately and prevents the catastrophic failure that was coming eventually. No carpentry experience required, no special tools beyond a drill, and no reason to keep monitoring that increasing bend every time you reach for a shirt and wonder if today is the day the whole thing comes down.
What You Need
- Center closet rod support bracket — sized to match your rod diameter; standard closet rods are 1¼" or 1½" diameter and support brackets are sized accordingly; available at any hardware store or home center (~$4–6)
- Wall anchors, toggle bolts, or drywall anchors — for mounting the center bracket to the back wall of the closet without hitting a stud; toggle bolts rated for at least 50 lbs are the most reliable anchor for a bracket that will carry significant dynamic load from clothing weight (~$3–5 for a pack)
- Drill with bit set — for drilling anchor holes in the back wall and driving mounting screws through the bracket into the anchors
- Stud finder — worth checking before drilling; a stud directly behind the bracket mounting location means you can skip wall anchors entirely and drive directly into solid wood for a significantly stronger mount (~$10–15 if you don't own one, or borrow)
- Level — for confirming the bracket is mounted at exactly the rod height rather than slightly above or below, which would force the rod into a bend rather than supporting it straight
- Wood filler or toothpicks and wood glue — for repairing stripped screw holes in the end socket brackets before remounting if the original screws have pulled out of the wall (~$3–5 for wood filler)
- Measuring tape — for finding the true midpoint of the rod span where the center bracket needs to be positioned
How to Fix It
- Remove all clothes from the rod and take the rod down from its end brackets before doing any measuring or mounting work — a loaded rod that is already sagging has taken a slight permanent set in the center that makes accurate midpoint measurement difficult, and working around hanging clothes makes bracket positioning awkward and imprecise. With the rod down, you can also inspect its full length for any cracking or permanent deformation that indicates replacement rather than support is the correct fix.
- Inspect the existing end socket brackets at both walls before addressing the center sag — press firmly on each bracket and confirm its mounting screws are holding solidly in the wall rather than turning freely in stripped holes. A center bracket that prevents mid-span sag but transfers the full load to end brackets with stripped mounting screws shifts the failure point rather than preventing it; address any loose end brackets before or simultaneously with the center support installation.
- Repair stripped end bracket screw holes by removing the bracket, filling each stripped hole with wood filler or with toothpicks packed tightly and secured with wood glue, allowing the repair to cure fully before remounting. The toothpick method — packing the hole with glue-coated toothpicks snapped off flush, allowing full cure, and then drilling a fresh pilot hole through the repair — restores the screw grip in a stripped drywall or wood anchor hole more reliably than filler alone and costs essentially nothing.
- Measure the total span between the two end brackets precisely and mark the exact midpoint on the back wall of the closet — this is where the center support bracket will mount. For rods over six feet long, two intermediate support brackets spaced at equal thirds of the total span provide better load distribution than a single center bracket, which concentrates support at one point on a rod that may still develop secondary sag on either side of the single support under heavy loading.
- Check for a wall stud at the marked midpoint using a stud finder before drilling any holes — a stud at or within an inch of the target location means you can drive the bracket mounting screws directly into solid framing for a mount that is several times stronger than any drywall anchor alternative. If no stud is accessible at the midpoint, toggle bolt anchors rated for the expected load are the correct choice over standard plastic expansion anchors, which can pull through drywall under sustained clothing weight.
- Mount the center support bracket at the marked midpoint, positioning it so the rod-receiving notch sits at exactly the same height as the rod rests in the end socket brackets — use a level held against the back wall at the rod height to confirm the bracket position before driving any screws. A center bracket mounted even half an inch higher than the rod's natural resting height forces the rod into an upward bow that is almost as problematic as the original downward sag, and is immediately visible when the rod is reloaded with clothes.
- Install wall anchors at the marked mounting hole positions according to the anchor type's specific installation method — toggle bolts require a larger pilot hole than the bolt diameter and are installed by folding the toggle wings against the bolt, inserting through the pilot hole, and pulling back until the wings spring open against the back of the drywall before tightening. Drive all mounting screws firmly before loading the bracket with the rod.
- Replace the rod and redistribute clothes evenly across its full length rather than returning everything to the center zone where it was clustered before — heaviest items like winter coats and suit jackets distributed toward the supported quarter-points of the rod span rather than concentrated at the center dramatically reduces the load on the center bracket and extends the life of the repair significantly. Test the rod's stability by pressing down firmly at the center point before rehanging everything; a properly supported rod should feel completely rigid with no perceptible flex under direct hand pressure.
Professional closet organizers who design and install custom closet systems always specify 1½-inch diameter steel rods rather than the 1¼-inch diameter wood or hollow steel rods that most builder-grade closets ship with — the larger diameter steel rod has a significantly higher load capacity per linear foot and a much greater resistance to permanent deformation under sustained weight, which means it maintains a straight profile across spans up to eight feet without any center support whatsoever. Upgrading from a builder-grade 1¼-inch rod to a 1½-inch steel rod costs about $15 for a standard closet length at any hardware store and is the single improvement that most dramatically extends the interval between closet rod maintenance interventions — often from every two to three years to never, for the life of the closet.