DIY Pergola: Patio Shade Structure for $450
Four posts, a grid of cedar beams, and a weekend — and your patio goes from exposed slab to genuine outdoor room.
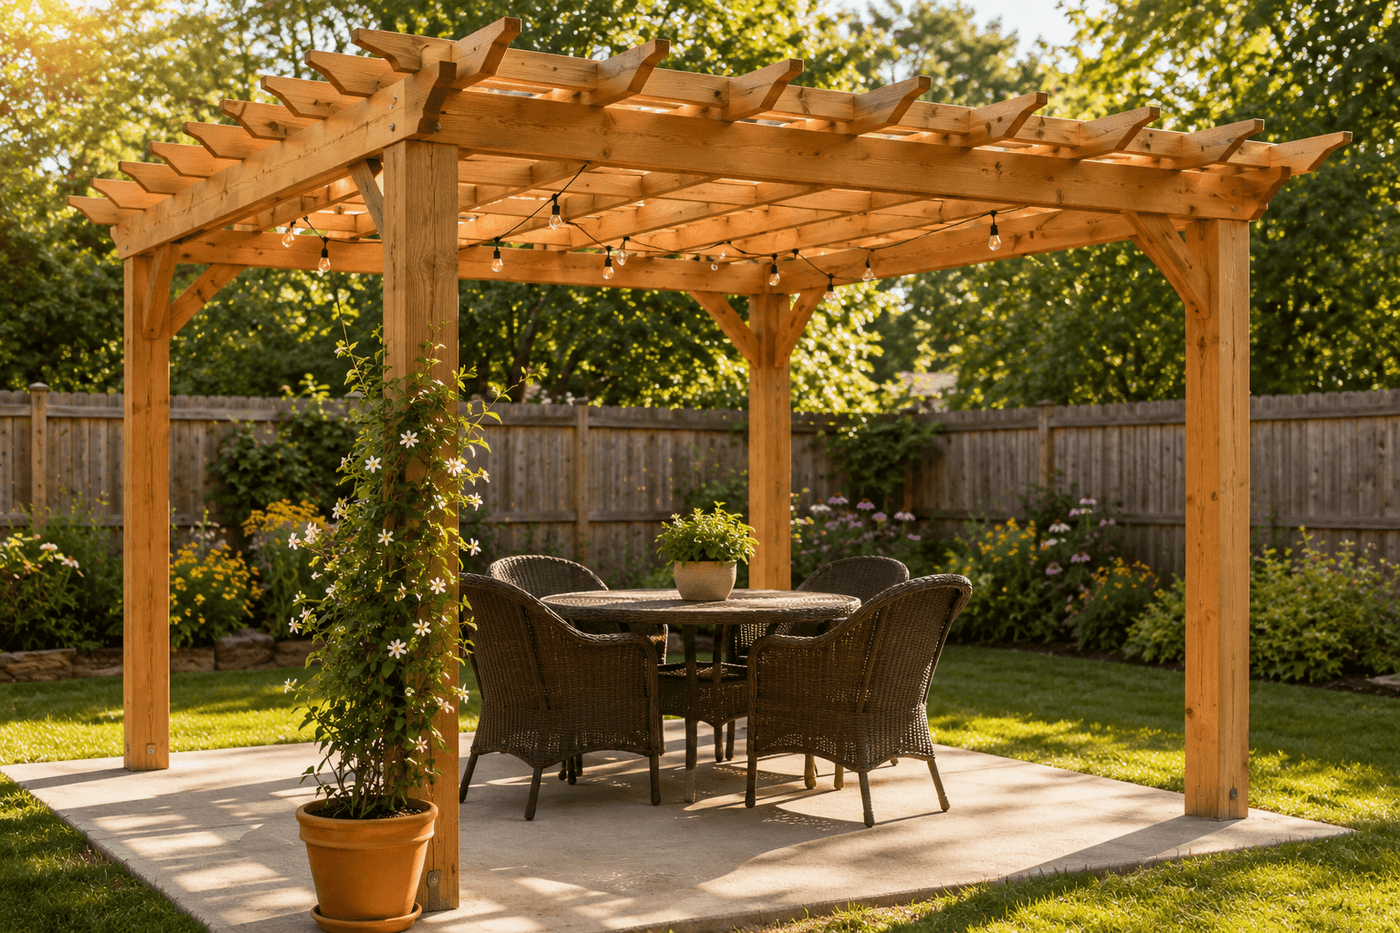
A bare patio slab in full summer sun is one of those outdoor spaces that exists on paper but doesn't really get used — too hot by mid-morning, too exposed to feel comfortable, too featureless to feel worth furnishing properly. A pergola changes all of that without enclosing the space: the open beam roof filters direct sun into dappled shade, defines the patio as a room rather than a transition zone, and creates the overhead structure that string lights, climbing vines, and shade cloth need to transform a slab into somewhere people actually want to spend time. A 10x10 foot freestanding pergola built from pressure-treated posts and cedar overhead framing runs about $400–500 in materials, takes a weekend of focused work, and stays under the size threshold that triggers permit requirements in most municipalities — though confirming with your local building department before breaking ground takes ten minutes and is always worth doing. This is a two-day build: Day 1 sets posts in concrete and allows curing overnight; Day 2 installs the beam and rafter framework on solid, fully cured footings. The result is the single most architecturally significant addition a patio can receive without touching the house structure.
What You'll Need
- 4x4 pressure-treated posts, 10 feet — four posts; pressure treatment is non-negotiable for any lumber in ground contact (~$12–15 each)
- 2x8 cedar ledger beams — two beams running the 10-foot length of the pergola on each side, sitting atop the posts (~$25–35 each, two needed)
- 2x6 cedar rafters — seven rafters spanning the 10-foot width, spaced evenly across the top (~$15–20 each, seven needed)
- 2x4 cedar purlins — optional decorative top layer running perpendicular to rafters for additional shade and visual interest (~$8–10 each, six to eight needed)
- Fast-setting concrete — Quikrete Fast-Setting or similar; two 50-lb bags per post hole (~$8–10 per bag, eight bags total)
- Post base hardware — adjustable post bases allow posts to be set precisely after concrete cures rather than in wet concrete, which improves alignment accuracy significantly (~$8–12 each, four needed)
- Structural screws and timber bolts — 3-inch structural screws for rafter-to-beam connections; ½" carriage bolts for beam-to-post connections (~$25–30 total)
- Post cap hardware — metal post caps that connect the top of each post to the ledger beam for structural connection beyond surface screws (~$8–12 each, four needed)
- Rafter hanger hardware — metal joist hangers sized for 2x6 lumber for securing each rafter end to the ledger beam (~$2–3 each, fourteen needed)
- Circular saw or miter saw — for cutting decorative tails on rafter and purlin ends
- Drill and impact driver — for driving structural screws and boring carriage bolt holes
- Post hole digger or rented auger — holes must reach below local frost line depth, typically 24–36 inches depending on climate
- Level, string line, and batter boards — for establishing square layout before digging; a pergola that is out of square is visible from every angle
- Cedar stain or sealer — applied to all overhead lumber before assembly; reaching overhead framing after installation is difficult (~$25–35/gallon)
How to Build It
DAY 1: Layout and Posts
- Check local permit requirements before purchasing any materials — most municipalities exempt freestanding structures under 100–120 square feet from permit requirements, but the threshold varies and an unpermitted structure that requires removal later is a significantly more expensive problem than a permit application now. A ten-minute call to your local building department answers the question definitively.
- Lay out the pergola footprint using batter boards and string lines set at the exact 10x10 foot perimeter, confirming square by measuring diagonally corner to corner in both directions — equal diagonal measurements confirm a square layout; unequal measurements mean one or more corners are off and must be adjusted before any digging begins. A pergola built on an out-of-square layout looks visibly wrong from inside and out, and no amount of finishing work corrects it after the posts are set.
- Dig four post holes at the layout corners to a depth that reaches below your local frost line — typically 24 inches in mild climates, 36–42 inches in freeze-thaw regions. Holes that don't reach below frost depth heave upward with seasonal ground movement, eventually racking the entire structure out of plumb. Contact your local extension office or building department to confirm the frost line depth for your specific location.
- Set post base hardware anchors in each hole using fast-setting concrete — pour dry concrete into the hole, insert the anchor bolt at the center, confirm plumb with a level, and add water according to package directions without mixing. Fast-setting concrete achieves working strength in 20–40 minutes but requires a full 24-hour cure before any load is applied; mark the anchor positions carefully and do not disturb them during the cure period.
- Finish and stain or seal all overhead lumber — both ledger beams, all seven rafters, and all purlins — while waiting for concrete to cure on Day 1. Apply stain or sealer to all four faces of every board including cut ends, which are the most vulnerable to moisture penetration. Finishing lumber on the ground before installation is faster, more thorough, and produces better coverage than trying to reach and coat overhead framing after the structure is assembled.
DAY 2: Framing
- Set the four posts into the cured post base anchors, plumbing each post on two adjacent faces with a level and bracing temporarily with diagonal 2x4 stakes driven into the ground — posts that are set and left unbraced while hardware is installed drift out of plumb under their own weight, and a post that is even slightly out of vertical at the base translates to a visibly racked beam at the top where the error is most visible.
- Mark and cut all four posts to uniform height using a chalk line snapped at the correct height around all four posts simultaneously — this is the most reliable method for achieving a level top plate across all four posts regardless of any minor variation in ground elevation between post locations. Cut with a circular saw and confirm all post tops are level to each other across both axes before proceeding to beam installation.
- Install the two ledger beams across the post tops on the long sides of the pergola, setting each beam into post cap hardware and securing with carriage bolts driven through pre-bored holes — two bolts per post-to-beam connection, staggered vertically to prevent splitting the post along the grain. The ledger beams carry the full load of the rafter and purlin system above, and bolted connections rather than screwed ones are the structural standard for this load-bearing joint.
- Cut decorative tails on all rafter ends before installation — a simple 45-degree angled cut at each end takes three minutes per rafter and transforms the visual quality of the finished pergola from utilitarian to architectural. Mark a consistent tail profile on a template board and trace it onto each rafter end for uniform results; inconsistent tail cuts are immediately visible once the rafters are installed at eye level.
- Install rafters by setting each one into rafter hanger hardware secured to the inside face of both ledger beams, spacing evenly across the 10-foot span — seven rafters at approximately 18-inch centers produces the classic pergola proportion that reads as both structurally substantial and visually open. Drive structural screws through the hanger flanges into the rafter sides and confirm each rafter is level across its width before moving to the next.
- Add purlins across the top of the rafters perpendicular to the rafter direction, toenailing down into each rafter with two structural screws per intersection — purlins add the second layer of shade filtering, complete the grid pattern that defines the pergola aesthetic, and significantly stiffen the overall structure against lateral racking. Space purlins evenly and confirm the overhang at each end matches before fastening to maintain the symmetry that makes a pergola look designed rather than assembled.
Landscape architects and outdoor living designers who specify pergolas for residential projects use one proportioning rule for rafter and purlin sizing that distinguishes a pergola that reads as architecturally considered from one that looks like lumber stacked on posts: the depth of the rafter should equal approximately one inch for every foot of span. A pergola spanning 10 feet uses 2x10 rafters by this rule — deeper than the 2x6 minimum the span structurally requires, but producing the visual weight overhead that makes the structure feel substantial and intentional rather than thin and temporary. The same principle applies to purlin sizing relative to rafter depth: purlins should be roughly half the depth of the rafters, which produces the layered visual hierarchy — heavy beam, medium rafter, light purlin — that landscape designers recognize as the proportional signature of a well-designed pergola. Building to minimum structural dimensions produces a pergola that is safe but visually underwhelming; building to these designer proportions produces one that looks like it was drawn before it was built.