
Wind Garden: Kinetic Spinner Display for $45
Five copper spinners at three different heights, arranged in a single garden bed — and the most hypnotically relaxing feature in any yard costs $45 and an afternoon of experimenting.
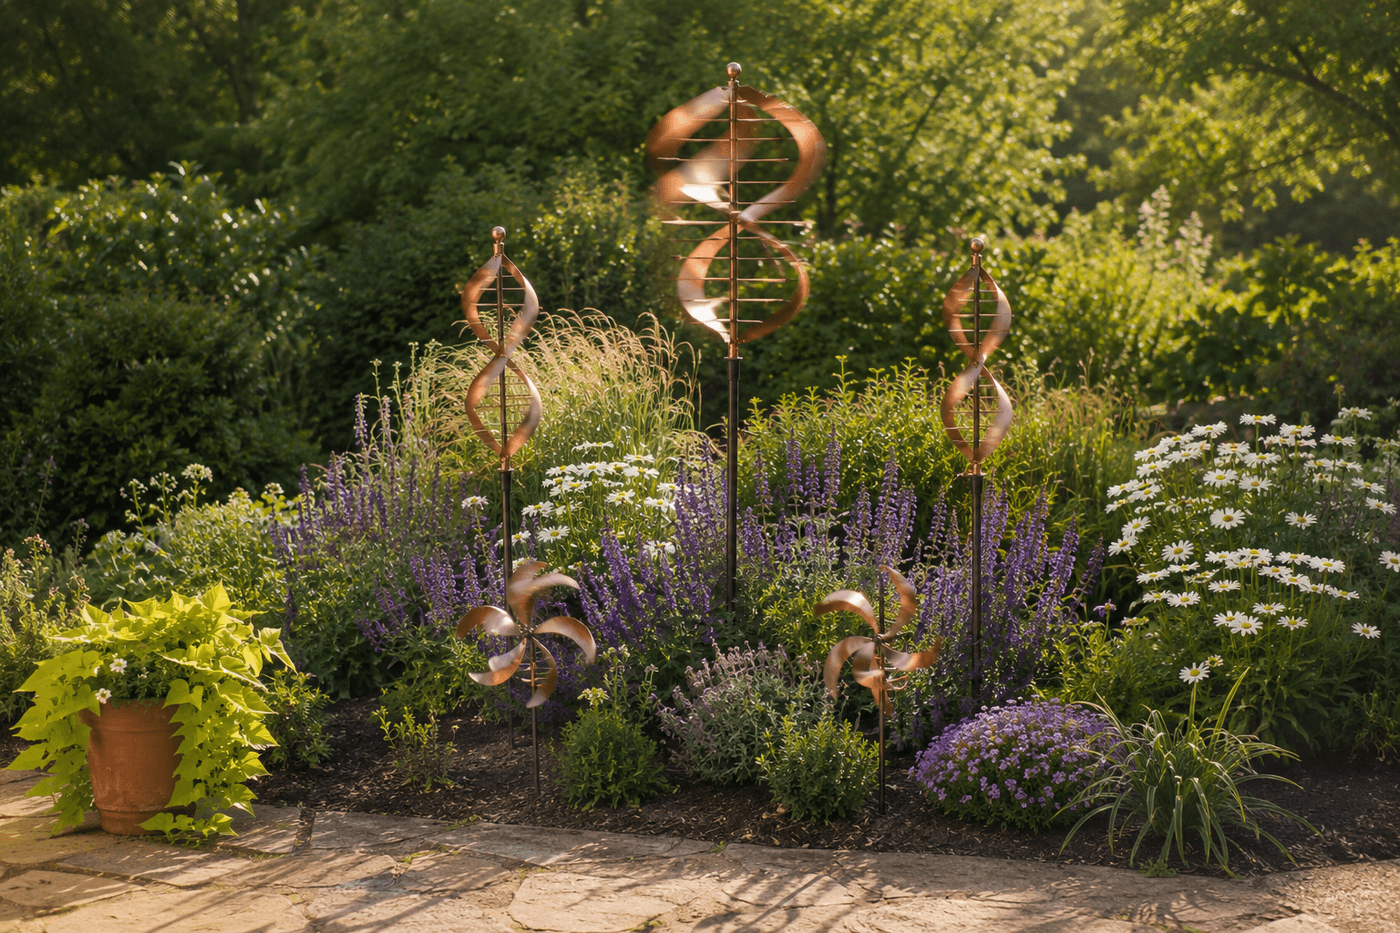
Most garden features are static — you plant them, stake them, or set them in place, and they stay exactly as they are until the season ends. A wind garden is different in a way that is genuinely difficult to anticipate until you have one: it is always moving, always slightly different from moment to moment, and the layered movement of multiple spinners at different heights responding to the same breeze at slightly different rates creates a visual complexity that is both calming and endlessly interesting in the specific way that running water or a fire is calming and interesting — because it is never quite the same twice. Copper is the material worth choosing over painted metal or plastic for this application because it does not stay the same either: the natural patina cycle from bright orange through rose gold to deep verdigris green makes each spinner look more beautiful and intentional with every passing season rather than faded and cheap. Five spinners arranged at three dramatically different heights in a single garden bed — one tall spiral at the back, two medium pieces flanking it at mid-height, two low whirligigs at the front edge — costs about $45 and creates the kind of installation that stops people on the sidewalk and makes them ask who did your garden.
What You'll Need
- Tall spiral or helix spinner, 1 — the focal anchor of the display; 24–36 inch spinner on a 48–60 inch ground stake; copper or copper-finish metal; this is the piece viewed from the greatest distance and should be the most visually complex of the five (~$12–18 at garden centers, craft fairs, or online)
- Medium double-helix or pinwheel spinners, 2 — identical or complementary pairs that flank the tall spinner; 18–24 inch spinners on 36–48 inch stakes; matching the pair creates symmetry that reads as intentional design rather than accumulation (~$8–12 each)
- Small whirligigs or low spinners, 2 — front edge pieces that catch even the faintest air movement and keep the display active on nearly still days; 6–12 inch pieces on 12–18 inch stakes; these are the pieces that animate the whole display at the lowest wind threshold (~$5–8 each)
- Copper vs. alternative materials:
- Solid copper — most expensive but weathers to the most beautiful patina; worth the premium for the tall focal piece
- Copper-coated steel — more affordable; weathers similarly to solid copper in the first season before the steel underneath begins to show at wear points
- Painted metal — acceptable for lower pieces; choose exterior-rated paint finishes and accept that repainting every two to three seasons is part of the maintenance cycle
- Additional ground stakes if not included — most spinners come with stakes; confirm stake length before purchasing to achieve the intended display heights above the surrounding plant canopy (~$3–5 each if purchased separately)
- Small rubber mallet — for driving stakes into garden bed soil without bending the stake top; a regular hammer concentrates impact on a small area that deforms stake tops
- Measuring tape and garden twine — for temporarily marking the planned spinner positions before committing stakes to the ground, which allows the spacing and height arrangement to be assessed from a distance before any holes are made
How to Install It
- Choose the garden bed location based on two criteria before purchasing any spinners — prevailing wind direction for your specific yard and the primary viewing angle from inside the house or from the main outdoor seating area. A wind garden sited in a wind shadow behind a fence or hedge will barely move; one sited in the open where air flows freely across the bed will perform dramatically better with identical spinners. The primary viewing angle determines which direction the display faces and where the tall focal piece should be positioned within the bed.
- Assemble all five spinners fully before placing any stake in the ground — confirm all spinner mechanisms rotate freely without binding, that stake connections are secure and will not work loose over a season of wind movement, and that the finished heights of each assembled piece match your planned display heights. A spinner that arrives with a bent bearing or a stiff rotation mechanism should be exchanged before installation rather than placed in a display position where accessing it for return or repair requires removing surrounding plants.
- Mark the five installation positions with temporary garden stakes or markers before driving any permanent stake — position the tall focal piece first at the back center of the display area, then mark the two medium flanking positions at equal distances on each side and slightly forward of the focal piece, and finally the two front low positions at the front edge of the bed. Step back 10–15 feet and assess the marked positions from the primary viewing angle, adjusting spacing until the arrangement reads as balanced from that distance rather than from directly above the bed where you marked it.
- Consider the surrounding plant heights at their mature summer size when determining spinner stake lengths — a medium spinner that reads as mid-height in an empty spring bed may disappear entirely behind mature hostas or ornamental grasses by August. Stake length should position the spinner body at least 6–8 inches above the anticipated mature plant canopy height at each installation position, which keeps every piece visible and moving freely without surrounding foliage interfering with rotation.
- Install the tall focal piece first by driving the stake with a rubber mallet to the depth that achieves the intended finished height — most garden stakes drive to full stability at 8–12 inches of depth in established garden bed soil, and less than 8 inches of stake depth in soft amended soil will allow the stake to lean under the leverage of a large spinner in strong wind. Check plumb on two adjacent sides of the stake before the full depth is reached, correcting any lean while the stake is still easily adjusted.
- Install the two medium flanking spinners at their marked positions, confirming symmetry by measuring the distance from the focal piece stake to each flanking stake before driving to full depth — equal distances from center confirm symmetrical placement that reads as intentional from any viewing angle. Flanking pieces that are visibly different distances from the center piece read as casually placed rather than composed, which undermines the curated installation quality that makes a wind garden stop people at the sidewalk.
- Install the two front low whirligigs at the bed edge — position them slightly offset from directly in front of the medium flanking pieces rather than centered below them, which creates a staggered diagonal arrangement through the display depth that reads as more dynamic than a strictly symmetrical grid of five. The front pieces should be close enough to the bed edge that their low movement is visible from standing height at the viewing distance rather than hidden behind the bed border plantings.
- Assess the complete installation from multiple distances and angles before considering it finished — walk the full perimeter of the viewing area and watch the display from each position, adjusting any stake that reads as slightly off in its spacing or height relationship to the surrounding pieces. The final test is waiting for a breeze and observing whether all five pieces move simultaneously — if any spinner remains still while others are active, it is positioned in a local wind shadow created by surrounding plants or structures and needs to be relocated to a more exposed position in the bed.
Landscape designers and kinetic garden artists who create wind garden installations for residential and public spaces use one composition principle that distinguishes a curated wind garden from a collection of individual spinners: the height differences between the display tiers should be dramatically exaggerated rather than subtle — aim for the tall focal piece to stand at least twice the height of the medium pieces, and the medium pieces to stand at least twice the height of the low front pieces. A display where the tall piece is 60 inches, the medium pieces are 36 inches, and the low pieces are 18 inches — a 2:1 ratio at each tier — reads as a designed three-dimensional composition with genuine depth and visual hierarchy from any viewing distance. A display where the heights are 48, 36, and 24 inches reads as graduated rather than layered, and loses the architectural quality that makes wind gardens look like intentional garden features rather than a collection of decorative stakes. Kinetic garden artists refer to this as "bold height contrast," and it is the single design decision most responsible for the sidewalk-stopping quality of the best wind garden installations — because the eye travels upward and downward through the height range of the display in a way that a subtly graduated arrangement simply cannot produce.














