Build a Winter Bird Roost Box in 3 Hours for $30
A roost box saves birds only if the entrance sits near the bottom and the perch pegs are staggered, because warm air rises and huddled birds need to trap it.

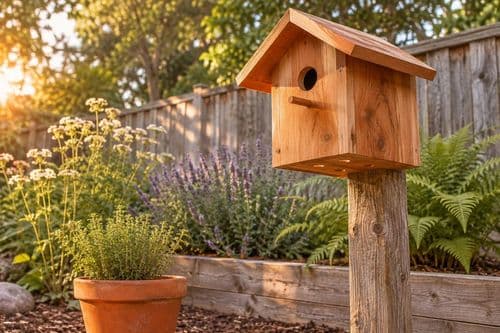
Songbirds can lose a quarter of their body weight on a single freezing night, and a regular nest box often does them little good in December. The difference between a roost box that saves lives and one that becomes a cold wooden freezer comes down to the entrance hole position. Heat rises, so a hole drilled near the top lets precious warmth escape, while a hole near the floor traps rising body heat inside, where a dozen huddled birds can share it. Staggered interior perches let them stack without anyone getting soaked by droppings. This cedar build takes about 3 hours for $30, needs only basic tools, and is a great early-December project, since birds start hunting for shelter right as hard freezes begin.
What You'll Need
- Materials (~$30 total):
- One 1x8 untreated cedar board, 6 feet long (~$14)
- One 1x2 cedar furring strip, 4 feet long (~$4)
- Three 3/8-inch hardwood dowels, 12 inches long (~$3)
- 1 1/4-inch exterior deck screws, box of 20 (~$5)
- One 1/4-inch-thick scrap or small hinge-free cedar shingle for the roof overhang (~$2)
- Small stainless-steel hook-and-eye latch is not needed; use two extra deck screws for the cleanout door (~$2)
- Tools:
- Handsaw or circular saw
- Drill with 1/8-inch bit, 3/8-inch bit, and 1 1/2-inch spade or Forstner bit
- Tape measure and pencil
- Sandpaper, 80 grit
- Safety glasses
How to Do It
- Cut the 1x8 into one 12-inch back, one 10-inch front, two 10-inch sides, one 5 1/2-inch floor, and one 8-inch roof. Untreated cedar resists rot and is safe for birds, unlike pressure-treated wood with chemical preservatives.
- Angle the top edges of both sides by marking a slope from 10 inches down to 8 inches and cutting along it. This slope sheds rain and snow so the roof does not pool water that would freeze.
- Drill a 1 1/2-inch entrance hole in the front panel, centered 1 inch up from the bottom edge. A low hole traps warm air like an upside-down cup, which is the single feature that makes this a roost and not a nest box.
- Mark the inside of both side panels for three dowel perches, staggered at 3, 5, and 7 inches up. Drill 3/8-inch holes halfway through each side, then push the dowels in. Staggering keeps birds from perching directly above one another.
- Drill four 1/4-inch drainage holes in the floor and pre-drill all screw locations with the 1/8-inch bit. Condensation builds up inside in winter, and pre-drilling prevents the cedar from splitting in the cold.
- Assemble the sides between the front and back, with the floor set 1/4 inch up inside the walls. Use deck screws, leaving the front panel attached by just two screws at the top, so you can unscrew it later for cleaning.
- Attach the roof so it overhangs the front by 2 inches, then sand every rough edge. The overhang keeps sleet off the entrance and keeps the interior dry, which matters because damp feathers lose their insulation.
- Mount the box 8 to 10 feet up a tree or post, facing southeast to catch morning sun, and tilt it slightly forward. Add a handful of pine shavings inside. Check that it is stable before you leave.
Wildlife habitat specialists at Audubon-style bird conservation programs recommend leaving the box unpainted and unstained, and cleaning out old droppings once in late winter. Make the interior walls slightly rough by scoring them with a screw tip in horizontal lines, which gives tiny claws something to grip when birds cling.