
Watering Can Planters: Cottage Charm for Free
A leaky thrift store watering can, a handful of gravel, potting mix, and trailing petunias spilling from the spout — and the most charming planter on the porch cost nothing but an afternoon.
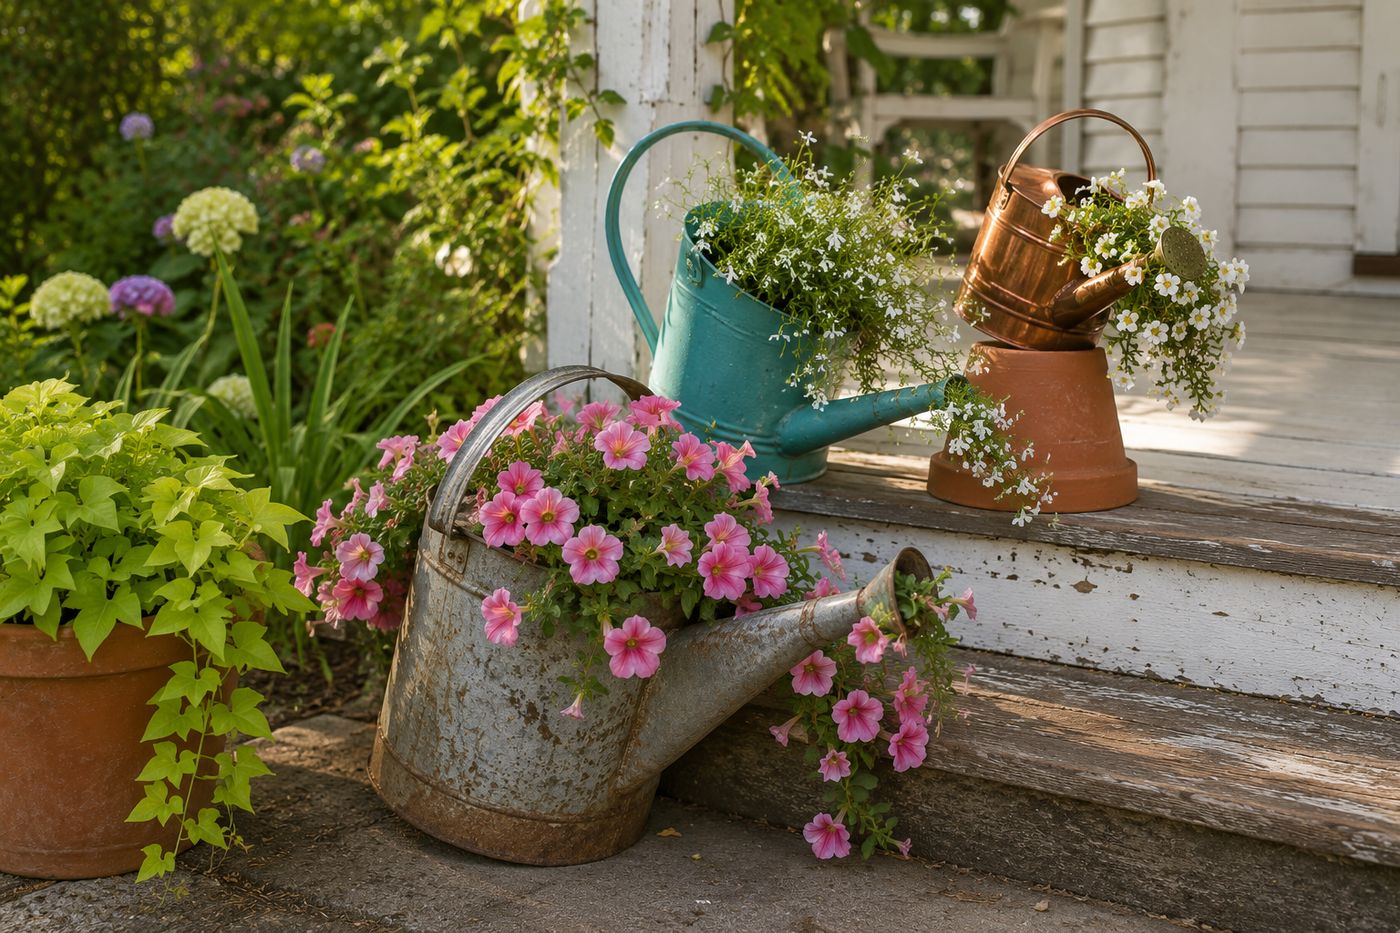
A watering can that has rusted through, developed a leak, or simply aged past its functional usefulness has simultaneously become the ideal planter — the leak that ended its working life is the drainage that a potted plant requires, and the shape and character that decades of use have given the metal surface is exactly the quality that makes a watering can planter so visually compelling as a garden object. Thrift stores and yard sales price leaky watering cans at $1–5 because they can no longer do their intended job; the gardener who recognizes that their failure mode is a planting asset walks away with the most characterful container in the garden for essentially nothing. Trailing petunias or lobelia planted to spill from the spout side specifically — so the flowers appear to flow outward the way water once did — produce the whimsical, narrative quality that makes a watering can planter the piece that every garden visitor photographs and asks about. Three in varying sizes grouped on a porch step, each at a slightly different angle with trailing plants at different stages of cascade, creates the kind of cottage garden moment that takes an afternoon to assemble and looks like it grew there over years.
What You'll Need
- Watering cans — thrift, yard sale, or shed:
- Vintage galvanized metal cans — the most visually compelling and most structurally sound; rust-through holes that ended their working life provide instant drainage; look for cans with interesting proportions, long spouts, or original painted details (~$1–5 at thrift stores)
- Plastic or resin decorative cans — less rustic but still charming when painted; require drilling drainage holes since they do not rust through naturally; more lightweight and durable in outdoor conditions than thin-gauge metal
- Small galvanized buckets or pitchers — the same treatment applies to any handled metal vessel that has aged past its functional use
- Spray paint — choose a finish:
- Leave natural patina — the most authentic cottage garden look; aged rust and faded paint need only a wire brush to remove loose scale and a coat of clear exterior sealer to stabilize the surface
- Spray paint in a cheerful solid color — teal, coral, sage green, or butter yellow; Rust-Oleum 2X in satin finish adheres to metal without primer and weathers well outdoors (~$6–8 per can)
- Metallic gold or copper finish — Rust-Oleum Metallic for a glamorous take on the cottage can that reads as intentional rather than found
- Gravel or small rocks — a 1-inch layer at the bottom of each can before soil; improves drainage beyond the existing holes and prevents soil from washing through larger rust-through openings during watering
- Quality potting mix — not garden soil; a lightweight container mix with perlite drains freely and maintains the aeration that trailing plant roots require in a metal container that heats significantly in direct sun
- Trailing plants — choose for the spout effect:
- Trailing petunias — the most visually dramatic; wave petunias cascade 18–24 inches and produce the most convincing flowing-from-the-spout effect when the can is angled slightly
- Lobelia — delicate and abundant; blue or white lobelia produces a more refined, cottage-appropriate cascade than petunias
- Bacopa — tiny white flowers on trailing stems; the most continuous bloomer of any trailing annual and the most forgiving of the heat that metal containers accumulate
- Trailing herbs — thyme, oregano, and trailing rosemary for a functional and fragrant can planter
- Wire brush — for removing loose rust scale and flaking paint from aged metal cans before spray painting or sealing; loose scale under paint causes the new finish to bubble and lift within one outdoor season
- Drill with metal bit — for adding drainage holes to cans that do not already have rust-through drainage; drill three to five holes in the bottom of each can before adding gravel and soil
How to Make Them
- Assess each watering can structurally before cleaning or painting — press firmly on all sides to confirm the metal has not rusted through in a way that compromises the structural integrity of the can body rather than simply providing drainage at the bottom; a can that collapses under gentle hand pressure will not hold soil weight for a season and should be retired as a purely decorative object without soil. Confirm the handle and spout are firmly attached; a spout that is loose at the base becomes an irrigation leak that directs all watering water out the spout rather than through the soil, which is charming in appearance but problematic for plant health if it is too severe to allow adequate moisture retention.
- Clean each can thoroughly — remove all interior grime, old mineral deposits, and any residual garden chemicals with hot soapy water and a scrub brush; rinse completely and allow to dry for at least two hours before painting or sealing. Use a wire brush on all exterior surfaces to remove loose rust scale, flaking paint, and any surface contamination that would prevent new paint from bonding; the wire brush pass takes two minutes per can and is the preparation step that determines whether the new paint holds through a full outdoor season or bubbles and lifts within the first month.
- Drill drainage holes if the can does not already have adequate rust-through openings — three to five quarter-inch holes distributed across the can bottom provide sufficient drainage for most container sizes; concentrate holes toward the center of the bottom rather than the edges, which ensures drainage occurs from the lowest point of the soil mass rather than only from the perimeter. Wear eye protection during drilling; metal shavings from drill-through on thin-gauge watering can metal travel at high velocity and at unpredictable angles.
- Spray paint in two to three light coats rather than one heavy coat — hold the can 10–12 inches from the surface and apply each coat in smooth, overlapping horizontal passes. Allow each coat to dry fully — typically 20–30 minutes for Rust-Oleum 2X — before the next; wet-on-wet coats on metal surfaces run and sag at the bottom edges where gravity concentrates the excess paint from too-heavy application. Paint the interior of the can as well as the exterior for cans that will be placed where the interior is visible from above; an unpainted interior reads as unfinished in any display position where the open top is at or below eye level.
- Position the spout before planting to determine the trailing plant placement — the spout-side planting that creates the flowing-water visual effect requires the plant to be positioned toward the spout opening rather than centered in the can; a trailing plant centered in the can cascades evenly in all directions, which is attractive but does not produce the narrative quality of plants appearing to flow from the spout specifically. Angle the planted can slightly toward the spout side in its display position — a 15–20 degree tilt toward the spout face — which directs the trailing plant growth naturally toward the spout opening and increases the flowing effect as the plant develops.
- Add the gravel layer first — approximately one inch of gravel or small stones across the full bottom of the can before any soil is added. The gravel layer serves two functions simultaneously: it prevents fine potting mix from washing through larger drainage openings during the thorough watering that a metal container in full sun requires, and it creates a drainage reservoir below the soil mass that prevents the waterlogging that causes root rot in containers without adequate drainage space below the soil line.
- Fill with potting mix to within 2 inches of the can rim — press gently to eliminate large air pockets while maintaining the loose, aerated texture that container roots require. Leave the 2-inch headspace rather than filling to the rim; a can filled to the rim has no capacity for the temporary water pooling that occurs during watering before drainage begins, which results in overflow that carries soil and potting mix over the can edge with every irrigation.
- Plant with one to three trailing plants positioned toward the spout side of the can — press the root balls in firmly, fill any gaps with additional potting mix, and water immediately until water flows freely from the drainage holes. The first watering also settles the soil around the root balls and reveals any large air pockets that need additional mix before the planting is considered complete. Place the finished can in its intended display position immediately after the first watering, angled slightly toward the spout, and assess from a step back to confirm the spout orientation and trailing plant positioning produce the intended flowing visual effect before the roots begin establishing in the angled position.
Cottage garden designers and prop stylists who create watering can planter displays for editorial garden photography and residential garden installations use one grouping principle that produces a display that reads as a composed garden vignette rather than a collection of individual containers: group three watering cans in three different sizes at three different heights — one on the ground, one elevated on a brick or upturned pot, and one on a step or shelf — and orient each can at a slightly different angle rather than all facing the same direction. The height variation creates the vertical dimension that makes the grouping read as designed rather than arranged; three cans at the same height read as a row rather than a composition. The varied angles — one facing directly toward the viewer, one turned 30 degrees left, one turned 45 degrees right — create the casual, organically placed quality that makes a cottage garden grouping feel as though it grew into position over time rather than being set down deliberately. Container garden stylists who use this three-size, three-height, three-angle principle for watering can groupings describe it as the arrangement that produces the most photographed and most complimented garden moment from the simplest materials — and the one that guests most consistently assume required more skill and intention than it actually did.














