
Upside-Down Tomato Planters: 3 Buckets, $18
Three five-gallon buckets, a drill, $18 in soil and starts — and a pergola full of cherry tomatoes all season from a garden that had no ground space left.
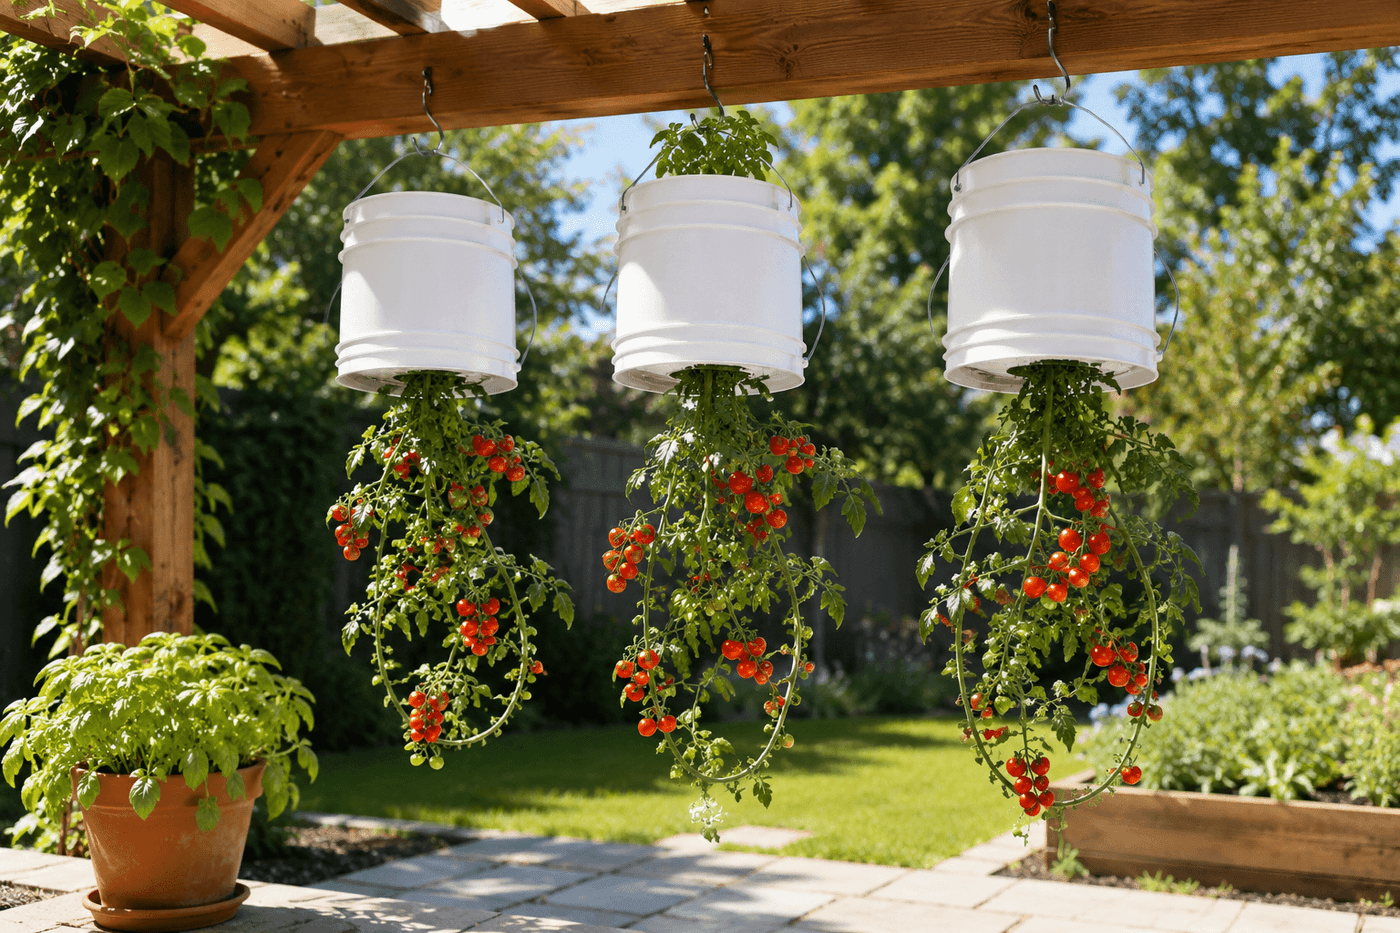
The upside-down tomato planter solves three gardening problems simultaneously that ground-level growing cannot address without significant intervention: no ground space required, fruit that never contacts soil and therefore never develops the rot and blight that frustrated so many tomato seasons, and a natural air circulation around every part of the plant that commercial growers spend considerable effort replicating with stakes, cages, and careful pruning. Five-gallon buckets hang from a pergola, fence beam, or sturdy hook; tomato transplants are fed roots-first through a drilled hole in the bucket bottom; soil packed around the stem holds everything in place; and once the bucket is inverted and hung, the plant grows downward by initial gravity and then curves back toward the light within days in the graceful arc that makes a row of upside-down tomato planters one of the most visually beautiful and structurally interesting things a productive garden can display. The watering is counterintuitive and elegant — water goes in through the open bucket top which now faces up, moves down through the soil past the root zone, and exits near the plant stem exactly where it is needed. Three buckets, $18 in soil and starts if the buckets are already on hand, and an hour of setup produce more cherry tomatoes than a family can eat all season.
What You'll Need
- Five-gallon plastic buckets with lids — the lid is what becomes the water reservoir top once the bucket is inverted; buckets without lids work but require a coffee filter or landscape fabric circle secured over the open top to prevent soil from washing out during watering; food-grade buckets from bakeries and delis are often available free; hardware store buckets run $4–6 each
- Tomato starts — cherry or small-fruited varieties only — large beefsteak and slicing tomatoes are too heavy for the downward-hanging stem to support as fruit develops; cherry tomato varieties (Sweet 100, Sun Gold, Black Cherry) are the correct scale for this method and produce prolifically in bucket volume; a six-pack of starts runs $4–6 at garden centers
- Tomato-specific potting mix — not garden soil, which compacts in containers and cuts off root oxygen; a potting mix formulated for vegetables or tomatoes with added perlite for drainage is the correct choice; one 16-quart bag fills two five-gallon buckets to the level needed (~$8–12)
- Slow-release tomato fertilizer — worked into the potting mix at planting; tomatoes are heavy feeders and five gallons of potting mix depletes quickly under a productive cherry tomato plant's nutrient demand; slow-release granular fertilizer at planting reduces the need for frequent liquid feeding throughout the season (~$5–8 for a small bag)
- Drill with 2-inch hole saw bit — for the single centered hole in the bottom of each bucket through which the tomato stem passes; a 2-inch diameter hole fits most tomato transplant stems at transplant size with enough clearance to pack soil around the stem without cramming
- Coffee filter or landscape fabric circles — cut to fit around the tomato stem inside the bucket bottom hole to prevent soil from washing out through the hole during watering; press the filter against the hole interior and pack soil on top to hold it in place
- Heavy-duty S-hooks or hanging hardware — rated for at least 50 lbs per hook; a filled five-gallon bucket of wet potting mix weighs 40–50 lbs, and the hanging structure must be rated for this weight multiplied by the number of buckets hung from the same beam (~$5–8 for a pack of heavy-duty S-hooks)
- Sturdy hanging structure — a pergola beam, fence top rail, or dedicated hanging bracket rated for the full wet bucket weight; test the structure's load capacity before hanging by applying 50 lbs of pressure by hand before any buckets are installed
How to Plant and Hang Them
- Drill a 2-inch centered hole in the bottom of each bucket while the bucket is right-side up — center the hole saw on the bucket bottom center point marked by measuring diagonals, and drill at slow speed with firm pressure to produce a clean circular cut rather than a cracked or jagged hole that damages transplant stems during installation. Smooth any rough plastic edges around the hole interior with sandpaper after drilling; rough edges abrade the tomato stem at the contact point and create a wound that invites disease entry.
- Water the tomato transplants thoroughly an hour before planting — a well-hydrated root ball holds together during the upside-down installation process rather than falling apart when the plant is inverted and fed through the bucket hole; a dry root ball that crumbles during installation loses the fine root hairs that are most important for immediate post-transplant water and nutrient uptake.
- Install the coffee filter or landscape fabric circle inside the bucket bottom around the hole — press it flat against the inside bucket bottom surface with the hole in the center aligned with the drilled hole, which prevents soil from washing through the gap between the stem and hole edge during every watering session. Without this filter, each watering washes a small amount of potting mix out through the hole and onto whatever is below the hanging bucket.
- Feed the tomato transplant roots-first through the bucket bottom hole from inside the bucket — hold the bucket upright with one hand and lower the root ball and stem through the hole from inside until the stem protrudes approximately 3–4 inches below the bucket bottom and the root ball clears the hole and hangs freely below. This is the counterintuitive step that feels wrong until the bucket is inverted; the plant that appears to be hanging out the bottom of the right-side-up bucket will become the downward-growing plant when the bucket is flipped.
- Pack damp potting mix around the stem inside the bucket while an assistant holds the bucket upright — fill the bucket to within 2 inches of the top edge, working the soil around the stem and root ball to eliminate air pockets while maintaining enough soil contact around the stem that it is held securely in the hole rather than pulling through when the bucket is inverted. Mix slow-release fertilizer into the soil at this stage according to package directions, distributing it throughout the root zone rather than concentrating it in one layer.
- Cover the open top of the right-side-up bucket with the lid or with a cut circle of landscape fabric secured with a rubber band — this cover becomes the watering access point once the bucket is inverted, and prevents soil from falling out through the open top during the inversion process. Buckets with snap-on lids handle this most cleanly; lidless buckets need the landscape fabric cover secured firmly enough to hold the soil in place through the physical inversion.
- Invert the bucket carefully with assistance — one person holds the bucket while the other supports the plant stem protruding from what was the bottom, now becoming the top of the hanging planter. Flip in a single smooth motion rather than a hesitant gradual rotation, which allows the soil to shift and compact unevenly during a slow inversion. Once inverted, the plant stem should protrude downward from the hole in the now-upward-facing bucket bottom, and the lid or landscape fabric cover should be on top as the watering access surface.
- Hang the inverted bucket from the S-hook through the bucket handle — confirm the hook is fully engaged through the handle bail and that the load is distributed evenly before releasing the bucket weight fully. Space multiple hanging buckets at least 24 inches apart to prevent the downward-growing plants from tangling as they develop, and position them where they receive full sun for at least eight hours — south-facing pergola beams are ideal, east or west-facing acceptable, north-facing produces insufficient light for productive tomato yield regardless of method.
- Water through the lid or landscape fabric top immediately after hanging — pour slowly until water drips from around the plant stem at the hole below, which confirms the soil is wetted through and the drainage path is functioning correctly. Check soil moisture daily in the first two weeks as the transplant establishes, and water whenever the top inch of visible soil through the lid opening feels dry — hanging containers in full sun dry significantly faster than ground-level containers and require more frequent watering than the same plant in a conventional pot.
Market gardeners and small-scale commercial tomato growers who use vertical and inverted growing methods for maximum yield in limited space consistently recommend one companion planting technique for upside-down bucket planters that significantly increases seasonal productivity without additional buckets or hanging space: plant the open top of each inverted bucket — the watering access surface — with a single basil plant or a small trailing nasturtium after the tomato is established and growing. The bucket top, facing upward after inversion, has exposed potting mix with full sun exposure and the same watering that the tomato below receives — which makes it functional growing space that most upside-down planter users leave bare. Basil planted in the bucket top thrives in full sun, requires no additional watering beyond what the tomato needs, and provides the classic companion planting benefit of deterring aphids and whitefly from the tomato plant below through its aromatic volatile compounds. Market gardeners who add this companion planting step to every upside-down tomato bucket describe it as doubling the productivity of the hanging planter footprint — one bucket yields both cherry tomatoes below and a continuous fresh basil harvest above for the full season.














