
DIY Projects

Recent Content

Shoe Bench Build: The Cubby Depth That Keeps Pairs Upright

Shoe Bench Build: The Cubby Depth That Keeps Pairs Upright

Build a wooden entryway shoe bench for $35—the cubby depth is what keeps boots standing instead of toppling into a pile every morning.

Style a Layered Nightstand Vignette in 1 Hour for $35

Style a Layered Nightstand Vignette in 1 Hour for $35

Turn a cluttered nightstand into a cozy styled vignette with the height-rule trick—1 hour, $35, instant bedroom upgrade.

The Cafe Rod Trick for a Fake Built-In Vanity

The Cafe Rod Trick for a Fake Built-In Vanity

Fake a built-in bathroom vanity shelf with a tiny cafe rod and basket—zero drilling, zero suction cups, full deposit intact.

Tension Rod Shelf: The Rod Width That Won't Slip

Tension Rod Shelf: The Rod Width That Won't Slip

Build a hidden double-decker shelf under your sink for $6—the rod tension width is what keeps it from crashing down on cleaning day.

Mulch Perennial Beds for Winter in 1 Hour for $25

Mulch Perennial Beds for Winter in 1 Hour for $25

Tuck your perennials in right! A 3-inch mulch blanket now saves roots from winter heave for about $25.

logo
  • Home Improvement
  • DIY Projects
  • Interior Design
  • Gardening & Outdoor
  • Real Estate
  • Home Improvement
  • DIY Projects
  • Interior Design
  • Gardening & Outdoor
  • Real Estate
  • ​

Turn Halloween Candy Chaos Into an Organized Treat System

Create a smart rotation system that keeps treats fresh and teaches healthy habits
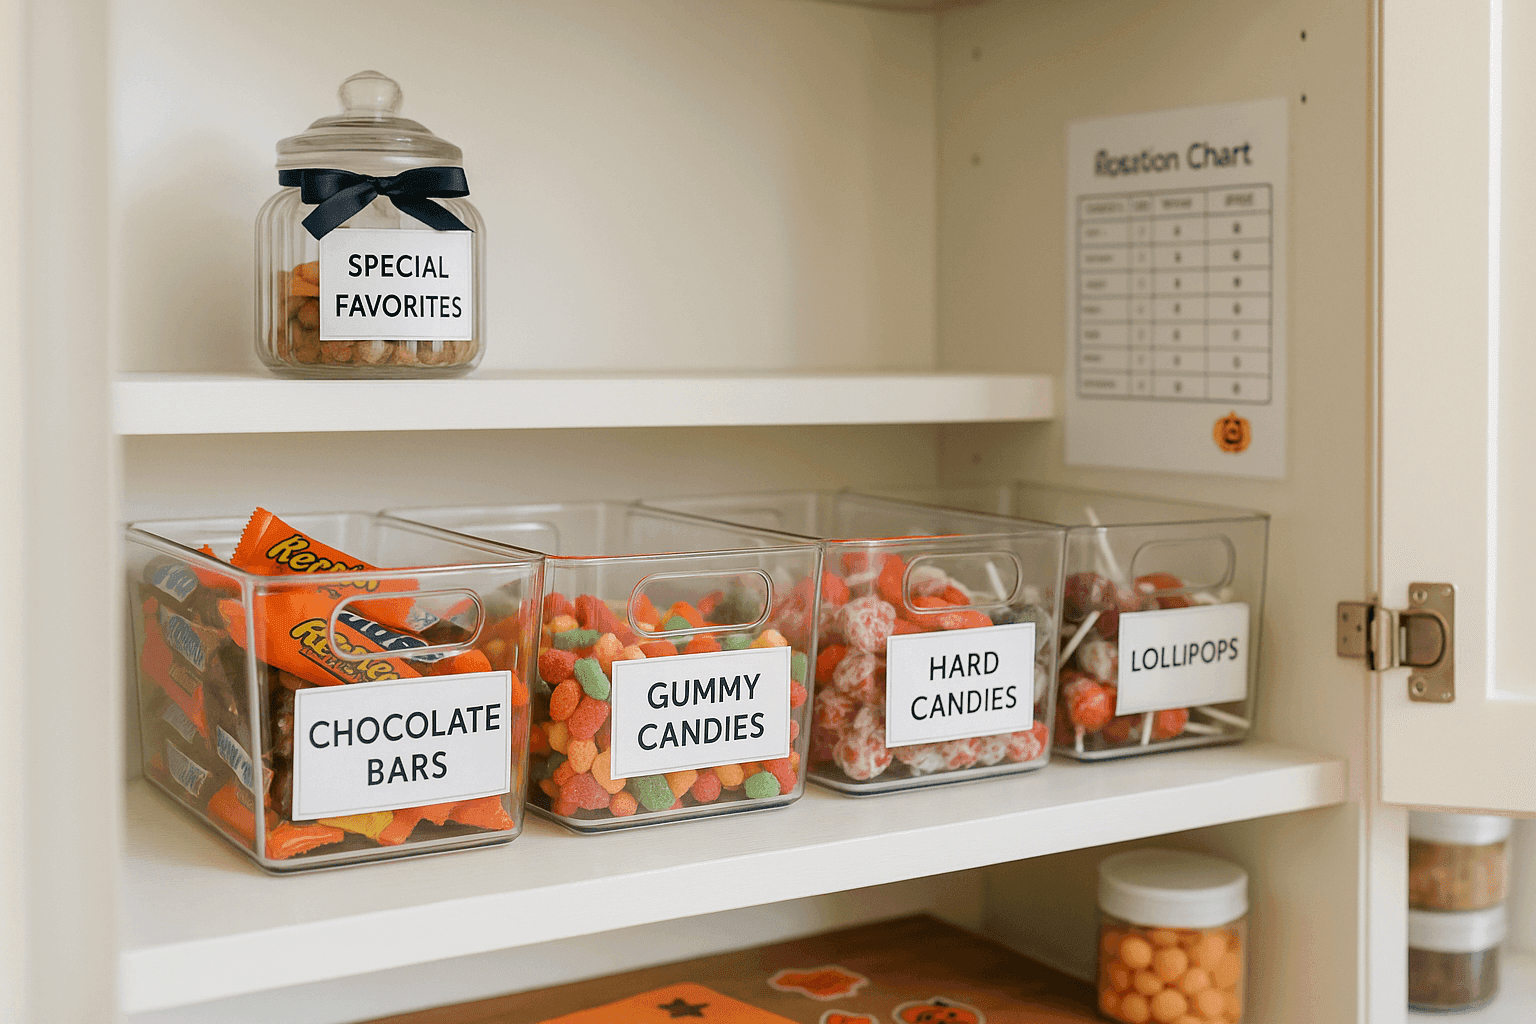
Clean pantry shelf with clear labeled containers organizing Halloween candy by type, with a rotation chart mounted on the inside of the cabinet door
DIY PROJECTS

The night after Halloween, every parent faces the same challenge—a massive pile of candy that threatens to become either a free-for-all disaster or a source of daily battles over treats. Creating a thoughtful candy organization system transforms this chaos into an opportunity to teach kids about portion control, delayed gratification, and food management while actually keeping those treats fresh and enjoyable for months. I love this project because it's practical parenting disguised as organization, giving kids ownership over their haul while you maintain reasonable boundaries that prevent sugar meltdowns and wasted candy. With about $20 worth of clear containers, labels, and a simple tracking chart, you'll set up a system that works way better than hiding candy on top of the refrigerator or letting it sit in pillowcases until Valentine's Day. The beauty of this approach is that it makes treats special rather than forbidden, creates natural limits without constant nagging, and honestly makes the candy last so much longer because everything stays fresh and nothing gets forgotten or crushed at the bottom of a bag.

Organization Supplies

  • Storage Containers:
    • Clear plastic bins with lids (3-4 medium size, $10-12 total)
    • Small snack-size containers or bags for daily portions ($5 for reusable set)
    • Large glass jar or clear container for "special treats" display ($5-8)
  • Labeling Materials:
    • Label maker or printable labels
    • Permanent markers for dating
    • Colored stickers for category coding
  • Tracking System:
    • Poster board or cardstock for rotation chart ($2-3)
    • Dry-erase board and markers (optional, $8-10)
    • Small calendar or sticker chart for tracking treats
  • Tools:
    • Scissors for opening packages
    • Kitchen scale (optional, for portioning)
    • Measuring cups for consistent portions

Creating Your System

  1. Sort by Category: Work with your kids to organize candy into clear groups like chocolate bars, gummy candy, hard candy, and lollipops—this initial sorting makes everything easier and helps kids see exactly what they have while teaching categorization skills.
  2. Check Expiration Dates: Go through each category and remove any candy that's already opened, crushed, or suspicious, then organize remaining treats with shortest expiration dates in front so you naturally rotate through them in the right order.
  3. Label Clear Containers: Assign one bin to each candy category with clear labels, adding the date you organized everything so you can track freshness—transparent containers let kids see options without dumping everything out every time they want a treat.
  4. Create the Rotation Chart: Design a simple visual system that shows how many pieces kids can choose per day or week, using stickers, checkboxes, or a calendar format that makes the rules clear and puts kids in charge of tracking their own consumption.
  5. Establish Selection Rules: Set up a system like "choose 2 pieces after lunch and 1 after dinner" or "pick 5 items for the week on Sunday," then let kids make their own choices within those boundaries—this builds decision-making skills and prevents constant candy negotiations.
  6. Designate Storage Location: Place containers in an accessible but not constantly visible spot like a pantry shelf or cabinet, keeping them at a height where kids can reach with permission but aren't staring at candy all day long.
  7. Set Up Special Treats: Create a separate "favorites jar" where each child can put their 5-10 most prized pieces that they're saving for later, teaching the concept of saving the best for last and delayed gratification in a concrete, visual way.
  8. Plan Monthly Review: Schedule a quick check-in at the end of each month to reorganize, discard anything that's gone stale, and adjust the system based on what's working—this keeps the organization functional and gives kids ongoing practice with food management.
DESIGNER TIP

Savvy parents take this system one step further by implementing the "trade-up" concept that professional organizers use for toys and collectibles. After the initial sorting, offer kids the option to trade quantity for quality—exchange ten pieces of candy they're lukewarm about for one special trip to pick out their favorite treat at the store, or swap duplicate candies with siblings to get more of what they actually love. This naturally reduces the total volume while increasing satisfaction, teaches negotiation and value assessment, and honestly makes kids way more thoughtful about what they actually want to eat versus what they grabbed just because it was there. Many families also institute a "Switch Witch" tradition where kids can leave out candy they don't want on November 1st in exchange for a small toy or book, which accomplishes the same goal of reducing overwhelming quantities while maintaining the magic and giving kids agency over their choices.


Related Content

DIY Projects

04 November 2026

Post

Shoe Bench Build: The Cubby Depth That Keeps Pairs Upright

Build a wooden entryway shoe bench for $35—the cubby depth is what keeps boots standing instead of toppling into a pile every morning....

DIY Projects

03 November 2026

Post

Tension Rod Shelf: The Rod Width That Won't Slip

Build a hidden double-decker shelf under your sink for $6—the rod tension width is what keeps it from crashing down on cleaning day....

DIY Projects

01 November 2026

Post

Sew Flannel Pajama Pants in 3 Hours for $25

Ditch store PJs! Sew cozy flannel pajama pants with an elastic waist in 3 hours for about $25 — perfect for chilly November nights....

DIY Projects

31 October 2026

Post

Build a Trick-or-Treat Bucket Lantern in 1 Hour for $15

Light up Halloween night with a glowing trick-or-treat bucket lantern—1 hour, $15, and way safer than a candle in a pumpkin....

DIY Projects

30 October 2026

Post

Pour Pumpkin Spice Candles in 1 Hour for $15

Ditch the $28 mall candle—pour your own pumpkin spice soy candles at home for $15 and fill your house with fall in an hour....

DIY Projects

29 October 2026

Post

Tabletop Zen Garden: The Sand Depth That Holds Lines

Build a calming tabletop zen garden for $15—the sand depth is the one thing that decides if your rake lines actually hold or vanish....

DIY Projects

28 October 2026

Post

Wooden Dish Rack: The Dowel Angle That Drains Right

Build a slatted wood dish rack for $18—the dowel tilt angle is what actually drains water into the tray instead of pooling on your counter....

DIY Projects

27 October 2026

Post

Pool Noodle Knife Block: The Slice Depth That Stops Wobble

Turn a $1 pool noodle into a safe knife block—the slice depth is what keeps blades from wobbling loose or slicing through the foam....

DIY Projects

27 October 2026

Post

Build a Wooden Pie Carrier in 2 Hours for $25

Never smash a pie in the car again! Build a snug wooden pie carrier in 2 hours for $25—perfect timing for fall potlucks....

DIY Projects

26 October 2026

Post

Make Herb-Infused Honey in 30 Minutes for $12

Turn raw honey into a cold-season secret weapon—infuse it with thyme and ginger in 30 minutes for about $12, no fancy gear needed....

DIY Projects

25 October 2026

Post

Make Homemade Fire Cider in 20 Minutes for $15

Steep this spicy apple cider vinegar tonic now so it's ready to fight off fall colds in 4 weeks—20 minutes, $15, zero cooking skills....

DIY Projects

23 October 2026

Post

Build a Freestanding Coat Rack in 2 Hours for $35

Sick of coats piled on chairs? Build a sturdy freestanding coat rack in 2 hours for $35 — no wall drilling, just solid joinery....

DIY Projects

22 October 2026

Post

Window Frame to Pet Gate: The Hinge Set That Holds

Turn an old wooden window frame into a swinging pet gate for $22 — the hinge mortise depth is what keeps it from sagging open over time....

DIY Projects

22 October 2026

Post

Make Spiced Homemade Applesauce in 1 Hour for $12

Turn a bag of fall apples into silky spiced applesauce in an hour for $12 — no peeling required if you've got the right tool....

DIY Projects

21 October 2026

Post

Floating Nightstand: The Bracket Depth That Holds Weight

Build a wall-mounted wooden nightstand for $25 — the bracket depth inside the wood is what stops it from sagging under a lamp and books....
Terms and ConditionsDo Not Sell or Share My Personal InformationPrivacy PolicyPrivacy NoticeAccessibility NoticeUnsubscribe
Copyright © 2026 DIY HomeBoost












