Turn a Free Pallet into a Vertical Herb Garden for $15
One free pallet, a staple gun, and an afternoon — fresh herbs four steps from your kitchen door all summer long
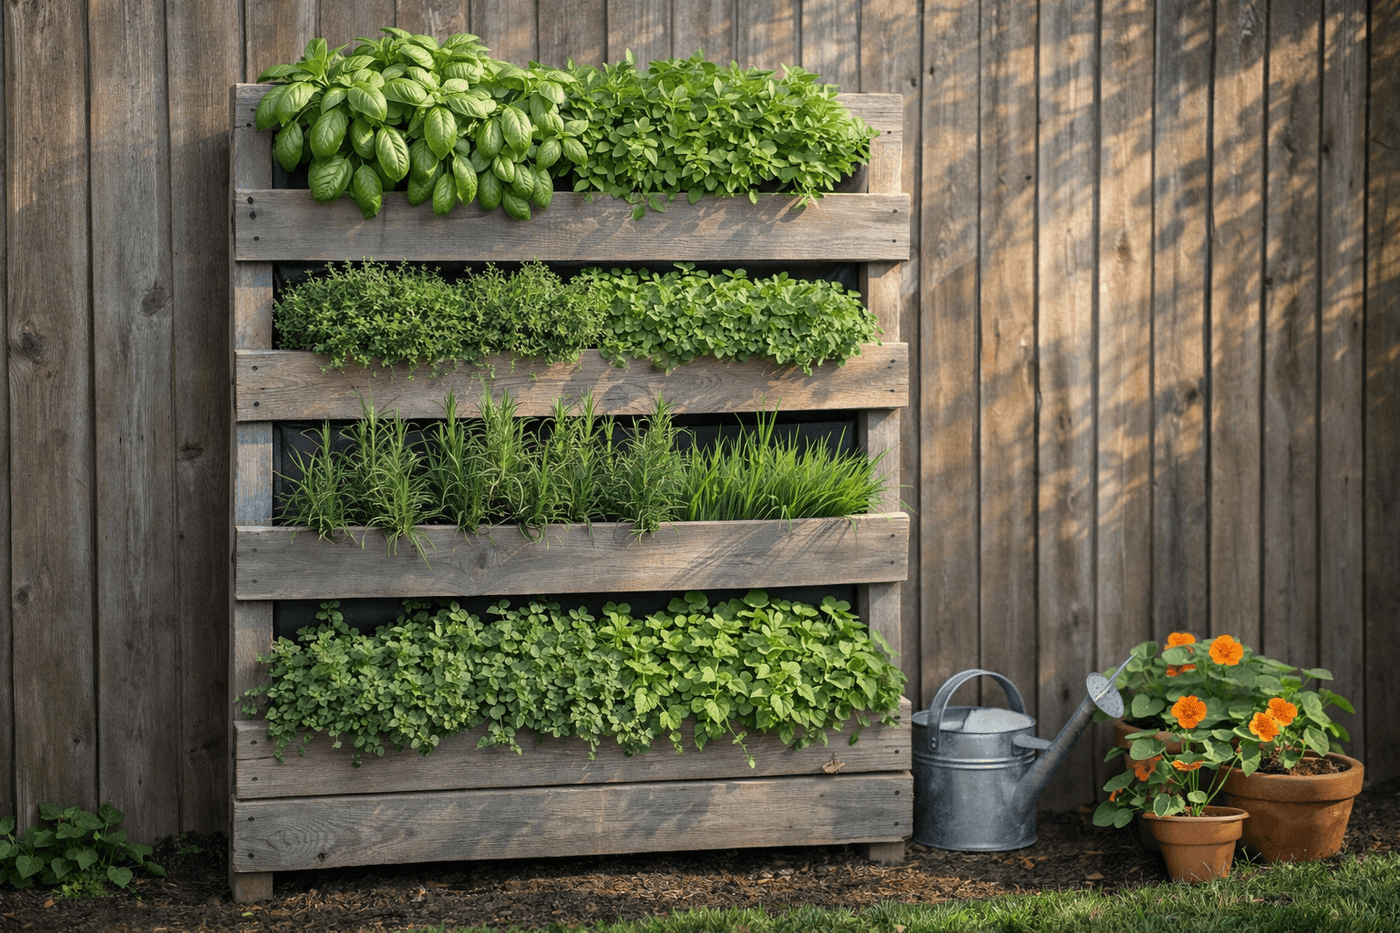
A wooden pallet leaning against the fence behind a garden center is, in its best possible life, a vertical herb garden standing four steps from your back door — and the distance between those two states is landscape fabric, a staple gun, a bag of potting mix, and about two hours of a Saturday afternoon. The vertical format solves the problems that frustrate most in-ground and container herb gardens simultaneously: every plant gets individual light exposure and air circulation without crowding, harvesting is effortless because everything is at eye level and arm's reach, and the whole structure occupies about four square feet of floor space while producing the kind of abundant, lush herb display that makes neighbors stop and ask which nursery you bought it from. The total materials cost is about $15 if the pallet is free, which it usually is — garden centers, hardware stores, and furniture retailers all accumulate more pallets than they know what to do with, and most will hand them over for the asking. This is one of those builds where the inputs are almost embarrassingly modest and the output is genuinely beautiful.
What You Need
- Wooden pallet, standard size (40"×48") — look for pallets stamped HT (heat treated) rather than MB (methyl bromide treated); HT pallets are safe for food growing, MB pallets are not and should never be used for edible gardens (free from garden centers, hardware stores, or furniture retailers)
- Landscape fabric, 1–2 yards — for stapling across the back and bottom of the pallet to create the soil-retaining pocket; weed barrier fabric is ideal because it retains soil while allowing drainage and airflow through the back of the structure (~$5–8 for a small roll)
- Staple gun with ½" staples — for securing the landscape fabric firmly to the pallet back and bottom boards; hand stapler works fine for this application
- Potting mix, 1 cubic foot bag — enough to fill all slat rows on a standard pallet; use quality potting mix rather than garden soil, which compacts in the enclosed slat pockets and drains poorly (~$5–8)
- Herb starts, qty 5–8 — one per slat row; basil, thyme, oregano, rosemary, chives, parsley, and mint all work well. Keep mint in a contained row or separate pot as it spreads aggressively (~$2–4 per start from any garden center)
- Sandpaper, 80-grit — for smoothing any rough or splintered slat edges before planting; rough edges on a garden feature that gets handled regularly are both uncomfortable and a splinter risk
- Exterior wood stain or outdoor paint — optional, for giving the pallet a finished, intentional look before standing it up; a single coat of gray or white exterior stain transforms a raw pallet into something that looks deliberately designed (~$6–8 for a small can)
- L-brackets or fence hooks — for securing the standing pallet to the fence so it cannot tip forward in wind when wet soil adds significant weight (~$3–5)
How to Build It
- Inspect your pallet carefully before doing anything else — check the HT stamp on the end grain of the pallet boards, look for any boards with significant rot or structural damage, and confirm the overall frame is solid enough to hold the weight of wet soil across all slat rows. A pallet that looks structurally marginal lying flat becomes a collapse risk standing upright against a fence with twenty pounds of wet potting mix distributed across its rows — five seconds of inspection prevents that outcome entirely.
- Sand any rough or splintered slat surfaces with 80-grit sandpaper, paying particular attention to the top edges of each slat where hands will make regular contact during planting and harvesting. Splinters in a garden feature handled bare-handed multiple times per week are a persistent annoyance that thorough sanding at this stage eliminates completely.
- Stain or paint the pallet if desired before attaching landscape fabric — it is significantly easier to finish the wood before the fabric is stapled across the back than to try to work around it afterward. Allow the stain to dry completely before proceeding; wet stain transfers to landscape fabric and soil during assembly and can introduce unwanted chemicals into a food-growing environment.
- Lay the pallet flat with the front face down and cut landscape fabric to cover the entire back face plus the bottom edge, adding several extra inches on all sides for stapling overlap. Cut a single large piece rather than individual strips per slat — a continuous fabric backing prevents soil from escaping through gaps between fabric sections, which is the most common construction failure that causes pallet herb gardens to leak soil every time they're watered.
- Staple the landscape fabric firmly across the full pallet back, starting at the center and working outward to keep the fabric smooth and tension-free rather than puckered. Drive staples every four to six inches along every board the fabric crosses, and fold and double-staple the fabric at all four corners where stress concentration is highest — a corner that pulls free when the pallet is lifted drops the entire fabric assembly and requires complete refastening before any soil can go in.
- Stand the pallet upright in its final position against the fence before adding any soil or plants — a filled pallet is extremely heavy and nearly impossible to reposition without losing soil and disturbing plants. Confirm the chosen location receives at least six hours of direct sun daily for most culinary herbs, and secure the pallet to the fence with L-brackets or heavy fence hooks before proceeding. An unsecured pallet with wet soil across all rows is a tip-over risk in wind that damages plants and creates a significant cleanup problem.
- Fill each slat row with potting mix working from the bottom row upward, packing the soil firmly into each pocket created between the landscape fabric backing and the slat face. Firm packing at this stage is what prevents the settling and slumping that leaves roots exposed and plants leaning sideways within the first week of watering — press the soil all the way to the back of each pocket and mound it slightly above the slat face to account for the settling that occurs with the first deep watering.
- Plant one herb start per slat row by pressing the root ball firmly into the soil pocket at a slight forward angle so the plant face naturally tilts toward the viewer rather than growing straight up and out of the slat channel. Water each row thoroughly immediately after planting and again daily for the first two weeks while the root systems establish in the new soil environment — a vertical planter dries out faster than a ground bed, and consistent moisture in the establishment phase is what determines how quickly each herb fills out its row into the lush, spilling display that makes this structure look so spectacular at full growth.
Market gardeners who grow culinary herbs in vertical pallet systems commercially always plant the most aggressive spreaders — mint, lemon balm, and tarragon — in the top rows rather than the bottom, because roots in a vertical planter follow moisture and gravity downward over time and vigorous spreaders planted at the bottom will eventually colonize adjacent lower rows by growing downward through the soil column. Planting aggressive herbs at the top confines their spread to the direction with nowhere further to go, while drought-tolerant compact herbs like thyme and oregano perform best in the lower rows where they receive the most incidental drainage moisture from the rows above. The planting order from bottom to top — compact drought-tolerant herbs at the bottom, moderate growers in the middle, vigorous spreaders at the top — is the one design decision that keeps a pallet herb garden thriving and organized through an entire season without any individual row overtaking its neighbors.