Splatter-Painted Doormat: Art for $14
A plain coir mat, three colors of outdoor paint, an old toothbrush, and twenty completely feral minutes in the driveway — and your front step has more personality than anything in a boutique home shop.
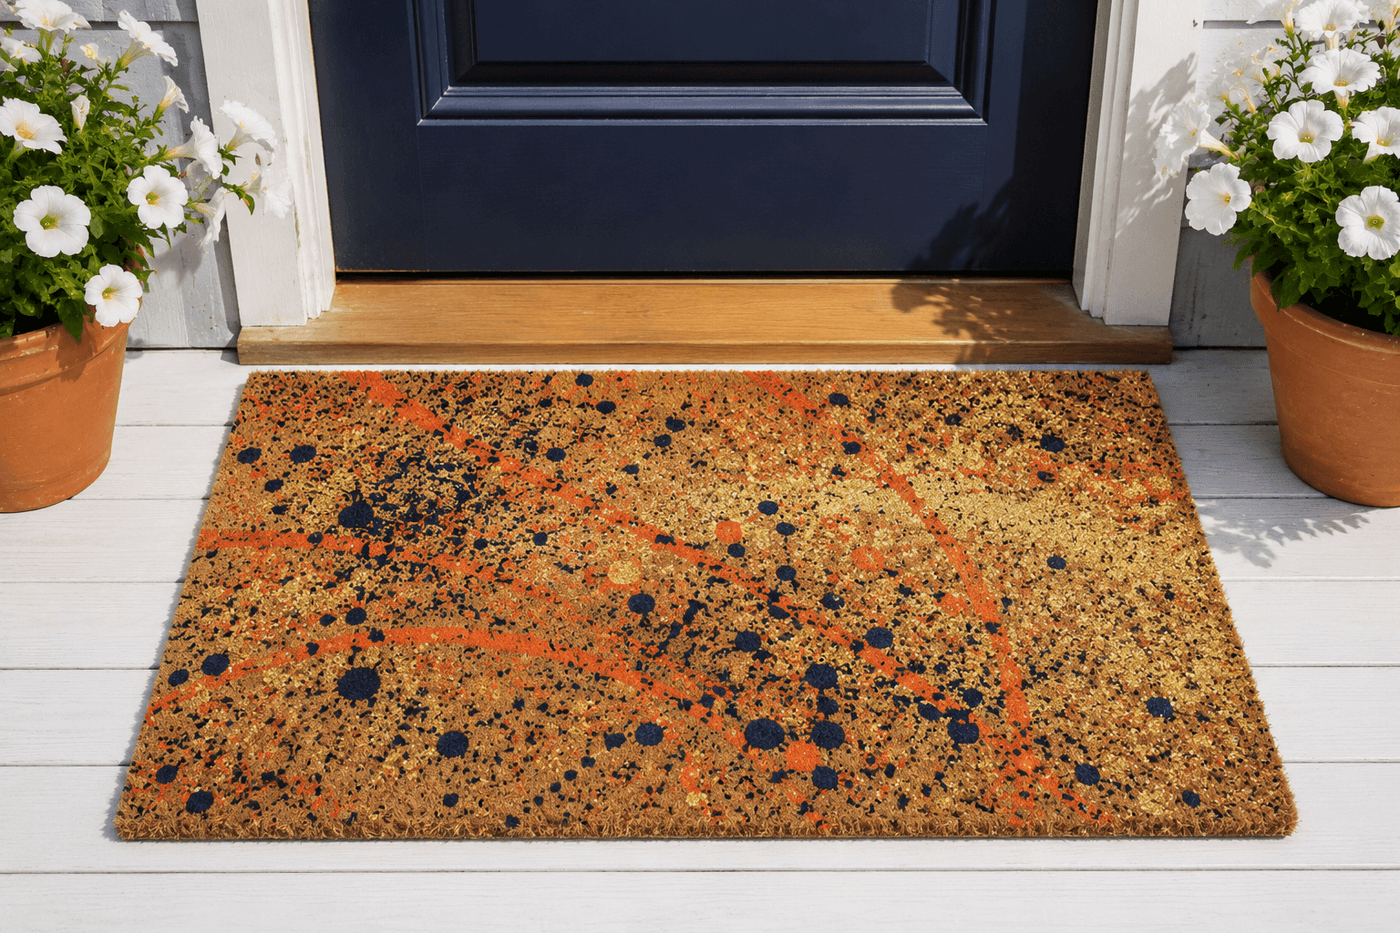
The splatter-painted doormat sits in a rare category of craft projects where the technique actively rewards less control rather than more — the more freely and energetically you work, the better the result looks, which makes it both genuinely enjoyable to make and genuinely difficult to produce a bad outcome. A plain coir mat from the dollar store, three colors of outdoor acrylic paint chosen to coordinate with your front door, an old toothbrush for fine speckle, and a regular paintbrush for bold arcing splashes is the complete toolkit. Work in layers with ten minutes of drying time between colors so each new splatter lands on a dry surface rather than blending into wet paint, and by the third color the mat has the kind of layered, dimensional paint energy that looks intentional and artistic rather than accidentally dropped. Two coats of clear outdoor sealer lock everything in place through a full season of daily foot traffic and weather without fading or flaking. The finished mat costs $14 and looks like something from a boutique home shop that would price it at $55 — which is the most satisfying part of the whole project, and the part that makes every person who sees it ask where you found it.
What You'll Need
- Plain coir doormat — flat, tightly woven coir fiber rather than looped or heavily textured; the flat surface accepts paint splatter cleanly and allows the drops to sit on the fiber tips rather than disappearing into a loose pile; dollar store mats are ideal since the lower-cost fiber is actually more absorbent of paint than premium sealed coir (~$6–8)
- Outdoor acrylic paint in 3 colors — choose colors that relate to your front door or exterior trim; the most effective splatter palettes pair one dark anchor color, one medium accent, and one light or metallic highlight:
- Navy + coral + gold — the most universally striking combination on natural coir
- Black + white + copper — graphic and modern
- Forest green + cream + terracotta — earthy and warm
- DecoArt Outdoor Living or Rust-Oleum 2X in 2 oz craft sizes (~$2 per bottle, three needed)
- Old toothbrush — the fine speckle tool; stiffer bristles produce a tighter, finer spatter pattern than soft bristles; an old medium-firm toothbrush is the ideal density for thumb-flick splatter technique
- Large paintbrush, ½"–1" wide — for the bold arc splatters produced by loading the brush heavily and flicking the wrist sharply; a dedicated cheap craft brush is better than a good brush since this technique is hard on bristles
- Craft sticks or palette knife — for loading paint onto the toothbrush bristles without getting hands entirely covered in paint; drag a loaded craft stick across the bristles rather than dipping the toothbrush directly into the bottle
- Drop cloth or newspaper — for protecting the driveway surface from overspray that travels several feet beyond the mat during aggressive splatter work; tape newspaper around the mat perimeter if working on a surface that cannot be easily cleaned
- Old clothes — non-negotiable; splatter technique sends paint in every direction including directly back at the person doing the splattering, and outdoor acrylic paint on fabric is permanent
- Clear outdoor sealer spray — two coats applied after full 24-hour paint cure; UV-resistant formula specifically, since the natural coir fiber accelerates paint fading without UV protection (~$6–8)
How to Paint It
- Lay the mat flat on the drop cloth in an outdoor space with no wind — wind during splatter painting redistributes droplets unpredictably and carries fine paint mist onto surfaces far beyond the mat and the drop cloth. Stand directly over the mat rather than at an angle during toothbrush splatter work, which directs the fine mist straight down onto the mat surface rather than projecting it sideways across the driveway.
- Choose your color order before opening any paint — always work from darkest to lightest, applying the darkest color first so lighter colors land on top of it rather than being visually absorbed into it. Dark paint splattered over light paint reads as layered and dimensional; light paint splattered over dark paint that is not fully dry produces muddy mixing at the contact points rather than clean drops landing on a dry surface.
- Load the toothbrush for fine speckle by dragging a loaded craft stick across the bristle tips rather than dipping the brush directly into the paint bottle — the craft stick method loads only the bristle tips rather than the full bristle depth, which produces finer, more controlled speckle rather than the large blobs that a fully saturated toothbrush drops rather than splatters. Hold the loaded toothbrush 6–10 inches above the mat surface and run your thumb firmly back across the bristle tips to release the fine mist.
- Work the toothbrush splatter across the full mat surface in overlapping passes rather than concentrating on one area — move the toothbrush in a grid pattern across the mat length and width between each release, which distributes the fine speckle evenly rather than producing a dense concentration in one corner and sparse coverage at the opposite end. The goal for the first color layer is coverage across the full mat surface without any large bare coir areas visible between speckle dots.
- Add bold arc splatters with the loaded paintbrush — load the brush heavily with paint, hold it at arm's length above the mat, and flick the wrist sharply downward so the paint releases in a long arc across the mat surface. The wrist snap speed determines the arc length; a slow flick produces a short splash, while a fast snap sends paint in long dramatic arcs that cross the full mat width. Make three to five bold arcs in different directions across the mat for the first color to create the directional energy that the fine speckle layer alone cannot produce.
- Allow the first color to dry for ten minutes before starting the second — outdoor acrylic dries to the touch quickly in warm conditions but needs the full ten minutes for the surface to be firm enough that the second color's splatter lands as discrete dots rather than spreading into the first color and producing a muddy blend. Test dryness by touching an inconspicuous corner with a fingertip; the paint should feel firm rather than tacky before the next color is applied.
- Repeat the toothbrush speckle and wrist-flick arc sequence with the second and third colors, allowing ten minutes of drying between each layer — by the third color the mat should show all three colors in both fine speckle and bold arc patterns overlapping across the full surface. The areas where two or three colors overlap in the arc pattern are the most visually compelling sections of the finished mat and are the sections most likely to be interpreted as deliberately artistic rather than randomly splattered.
- Cure the finished mat for a full 24 hours before sealing or placing at the door — outdoor acrylic on coir fiber needs the complete cure time to bond to the natural fiber surface at the molecular level, and sealer applied over uncured paint traps solvents that cause the paint to peel from beneath the sealer rather than bonding to the fiber. Apply two coats of UV-resistant outdoor sealer spray from 12 inches, allowing the first coat to dry fully before the second, then wait another 24 hours before foot traffic.
Surface designers and decorative painters who create hand-painted floor and textile pieces for editorial and retail use consistently apply one color proportion principle to splatter work that produces a result that reads as designed rather than randomly applied: use the darkest color most sparingly and the lightest color most generously, in roughly a 20/30/50 distribution across the three colors. The instinct when working with three colors is to use each equally, which produces a mat where no color reads as dominant and the eye has nowhere to land — a visually busy result that reads as chaotic rather than energetic. A palette where the light or metallic highlight covers approximately half the mat, the medium accent approximately a third, and the dark anchor approximately a fifth produces the visual hierarchy that reads as intentional color composition rather than random coverage — because the dominant light ground gives the eye a resting place while the darker colors provide the punctuation that makes the overall pattern legible from the viewing distance of someone approaching the front door. Apply this distribution starting with the lightest color if you want it to dominate, or work the proportions in reverse order by starting with a heavy light base and ending with a restrained dark accent.