
DIY Projects

Recent Content

Shoe Bench Build: The Cubby Depth That Keeps Pairs Upright

Shoe Bench Build: The Cubby Depth That Keeps Pairs Upright

Build a wooden entryway shoe bench for $35—the cubby depth is what keeps boots standing instead of toppling into a pile every morning.

Style a Layered Nightstand Vignette in 1 Hour for $35

Style a Layered Nightstand Vignette in 1 Hour for $35

Turn a cluttered nightstand into a cozy styled vignette with the height-rule trick—1 hour, $35, instant bedroom upgrade.

The Cafe Rod Trick for a Fake Built-In Vanity

The Cafe Rod Trick for a Fake Built-In Vanity

Fake a built-in bathroom vanity shelf with a tiny cafe rod and basket—zero drilling, zero suction cups, full deposit intact.

Tension Rod Shelf: The Rod Width That Won't Slip

Tension Rod Shelf: The Rod Width That Won't Slip

Build a hidden double-decker shelf under your sink for $6—the rod tension width is what keeps it from crashing down on cleaning day.

Mulch Perennial Beds for Winter in 1 Hour for $25

Mulch Perennial Beds for Winter in 1 Hour for $25

Tuck your perennials in right! A 3-inch mulch blanket now saves roots from winter heave for about $25.

logo
  • Home Improvement
  • DIY Projects
  • Interior Design
  • Gardening & Outdoor
  • Real Estate
  • Home Improvement
  • DIY Projects
  • Interior Design
  • Gardening & Outdoor
  • Real Estate
  • ​

Shutter Revival: Creative Ways to Repurpose Vintage Shutters

Transform architectural salvage into charming decor with endless possibilities
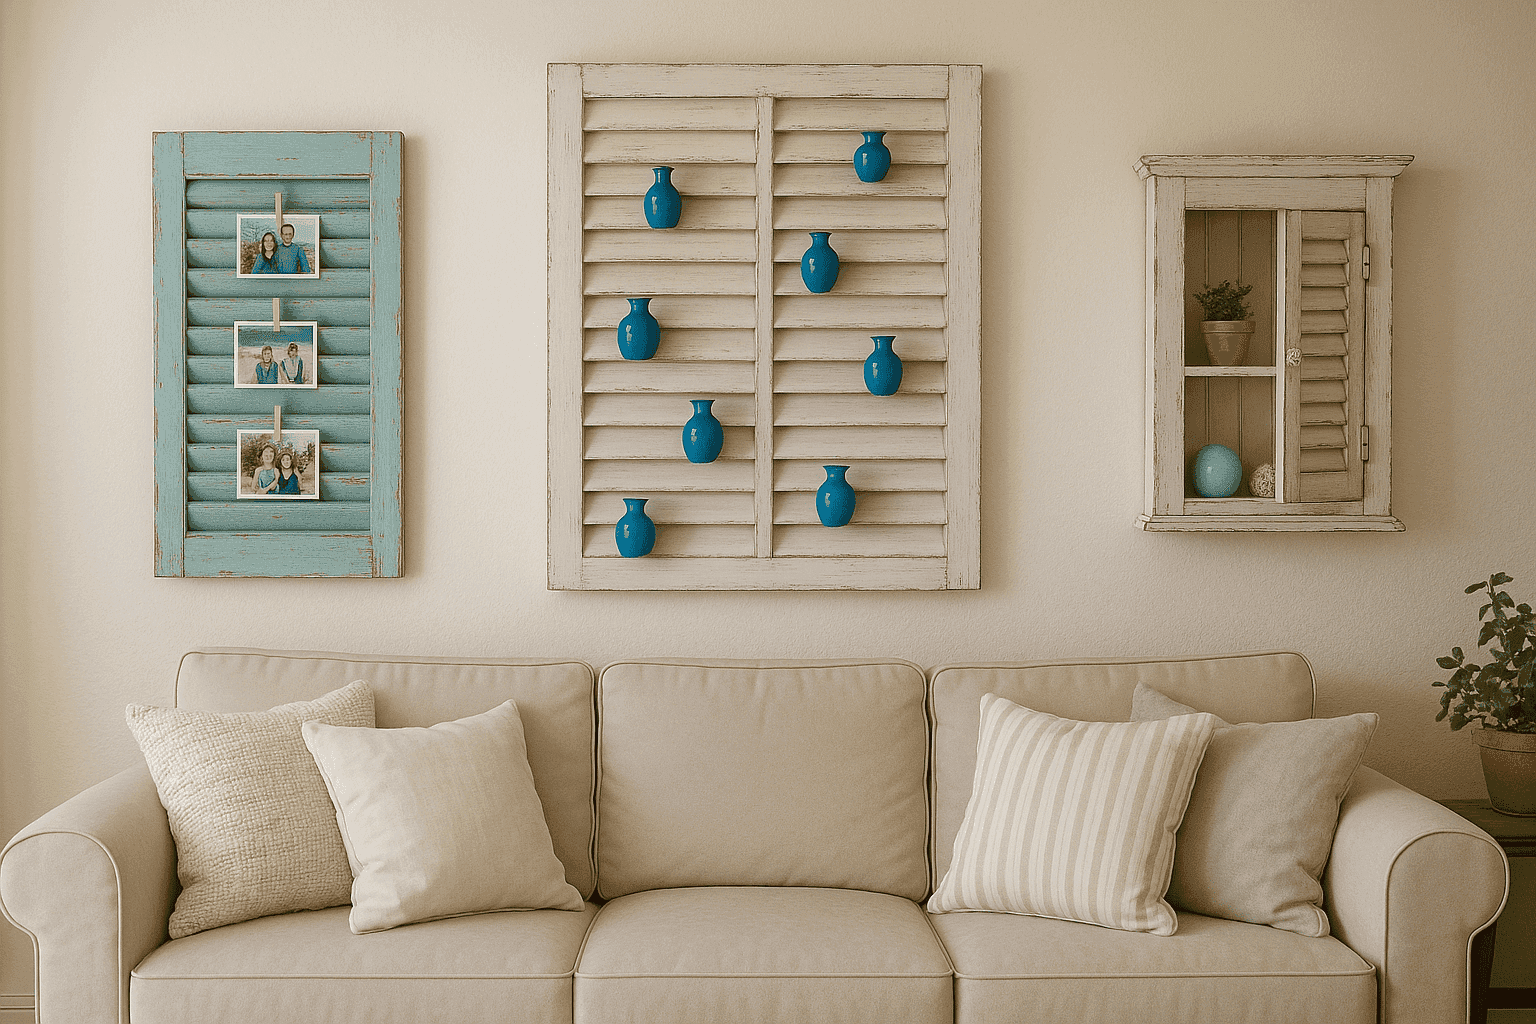
Living room featuring beautifully repurposed vintage shutters as wall decor
DIY PROJECTS

Vintage shutters carry the perfect blend of history and charm, making them ideal candidates for creative repurposing projects. Whether salvaged from your own renovation or discovered at a flea market, these architectural elements can be transformed into functional pieces that add character and vintage appeal to any home. With their distinctive louvered or paneled designs, shutters offer a versatile starting point for projects ranging from practical storage solutions to stunning decorative statements.

Materials & Tools

• Base Materials: Vintage shutters (wood preferred)
• Cleaning Supplies: TSP cleaner, wire brush, rags
• Prep Tools: Sandpaper (various grits), wood filler
• Finishing Materials: Primer, paint, or stain
• Hardware: Hinges, hooks, knobs, picture hangers
• Tools: Drill, screwdriver, saw, measuring tape
• Optional Additions: Mirror, corkboard, chicken wire
• Mounting Hardware: Wall anchors, brackets, screws

Creative Transformation Ideas

  1. Wall-Mounted Message Center
    • Clean and sand shutter thoroughly.
    • Apply primer and paint in desired color.
    • Mount corkboard or chalkboard panels between louvers.
    • Add hooks at bottom for keys or small items.
    • Mount securely to wall using appropriate anchors.
  2. Rustic Headboard
    • For queen bed, use 2-3 shutters mounted side by side.
    • Clean thoroughly, deciding whether to preserve patina or repaint.
    • Secure shutters together using wood strips across the back.
    • Add decorative hardware or crown molding for extra detail.
    • Mount to wall above bed using French cleats for stability.
  3. Folding Privacy Screen
    • Select 3-4 shutters of similar size and style.
    • Clean, repair, and finish consistently across all panels.
    • Connect shutters using decorative hinges, allowing them to fold.
    • Add feet at bottom if needed for stability.
    • Customize with photos, fabric panels, or decorative paper.
  4. Bathroom Storage Cabinet
    • Create a box frame from 1x4 lumber sized to match shutter dimensions.
    • Attach shutters as "doors" using hinges and magnetic catches.
    • Add interior shelving for toiletries and supplies.
    • Finish with semi-gloss or satin paint for moisture resistance.
    • Mount securely to wall studs due to weight when filled.
  5. Decorative Photo Display
    • Clean and finish shutter while preserving original character.
    • Attach small clips, clothespins, or wires to louvers.
    • Use for displaying photos, holiday cards, or children's artwork.
    • Mount horizontally or vertically depending on available space.
    • Rotate displayed items seasonally for fresh appearance.
DESIGNER TIP

When working with vintage shutters, resist the urge to sand away all signs of age and wear. The nicks, scratches, and faded paint areas contribute to their character and tell a story of their history. Instead of complete refinishing, consider "strategic distressing"—preserve the authentic worn areas while gently cleaning away dirt and loose paint. For a more modern look while maintaining vintage charm, try a two-tone approach: apply a new color as a base, then lightly sand edges and raised areas to reveal hints of the original finish underneath, creating depth and visual interest.


Related Content

DIY Projects

04 November 2026

Post

Shoe Bench Build: The Cubby Depth That Keeps Pairs Upright

Build a wooden entryway shoe bench for $35—the cubby depth is what keeps boots standing instead of toppling into a pile every morning....

DIY Projects

03 November 2026

Post

Tension Rod Shelf: The Rod Width That Won't Slip

Build a hidden double-decker shelf under your sink for $6—the rod tension width is what keeps it from crashing down on cleaning day....

DIY Projects

01 November 2026

Post

Sew Flannel Pajama Pants in 3 Hours for $25

Ditch store PJs! Sew cozy flannel pajama pants with an elastic waist in 3 hours for about $25 — perfect for chilly November nights....

DIY Projects

31 October 2026

Post

Build a Trick-or-Treat Bucket Lantern in 1 Hour for $15

Light up Halloween night with a glowing trick-or-treat bucket lantern—1 hour, $15, and way safer than a candle in a pumpkin....

DIY Projects

30 October 2026

Post

Pour Pumpkin Spice Candles in 1 Hour for $15

Ditch the $28 mall candle—pour your own pumpkin spice soy candles at home for $15 and fill your house with fall in an hour....

DIY Projects

29 October 2026

Post

Tabletop Zen Garden: The Sand Depth That Holds Lines

Build a calming tabletop zen garden for $15—the sand depth is the one thing that decides if your rake lines actually hold or vanish....

DIY Projects

28 October 2026

Post

Wooden Dish Rack: The Dowel Angle That Drains Right

Build a slatted wood dish rack for $18—the dowel tilt angle is what actually drains water into the tray instead of pooling on your counter....

DIY Projects

27 October 2026

Post

Pool Noodle Knife Block: The Slice Depth That Stops Wobble

Turn a $1 pool noodle into a safe knife block—the slice depth is what keeps blades from wobbling loose or slicing through the foam....

DIY Projects

27 October 2026

Post

Build a Wooden Pie Carrier in 2 Hours for $25

Never smash a pie in the car again! Build a snug wooden pie carrier in 2 hours for $25—perfect timing for fall potlucks....

DIY Projects

26 October 2026

Post

Make Herb-Infused Honey in 30 Minutes for $12

Turn raw honey into a cold-season secret weapon—infuse it with thyme and ginger in 30 minutes for about $12, no fancy gear needed....

DIY Projects

25 October 2026

Post

Make Homemade Fire Cider in 20 Minutes for $15

Steep this spicy apple cider vinegar tonic now so it's ready to fight off fall colds in 4 weeks—20 minutes, $15, zero cooking skills....

DIY Projects

23 October 2026

Post

Build a Freestanding Coat Rack in 2 Hours for $35

Sick of coats piled on chairs? Build a sturdy freestanding coat rack in 2 hours for $35 — no wall drilling, just solid joinery....

DIY Projects

22 October 2026

Post

Window Frame to Pet Gate: The Hinge Set That Holds

Turn an old wooden window frame into a swinging pet gate for $22 — the hinge mortise depth is what keeps it from sagging open over time....

DIY Projects

22 October 2026

Post

Make Spiced Homemade Applesauce in 1 Hour for $12

Turn a bag of fall apples into silky spiced applesauce in an hour for $12 — no peeling required if you've got the right tool....

DIY Projects

21 October 2026

Post

Floating Nightstand: The Bracket Depth That Holds Weight

Build a wall-mounted wooden nightstand for $25 — the bracket depth inside the wood is what stops it from sagging under a lamp and books....
Terms and ConditionsDo Not Sell or Share My Personal InformationPrivacy PolicyPrivacy NoticeAccessibility NoticeUnsubscribe
Copyright © 2026 DIY HomeBoost












