
Set Up a Sun Tea Jar Station for $35
Two glass dispenser jars, fresh herbs, and afternoon sunlight — the self-serve beverage station that makes every backyard gathering feel genuinely catered
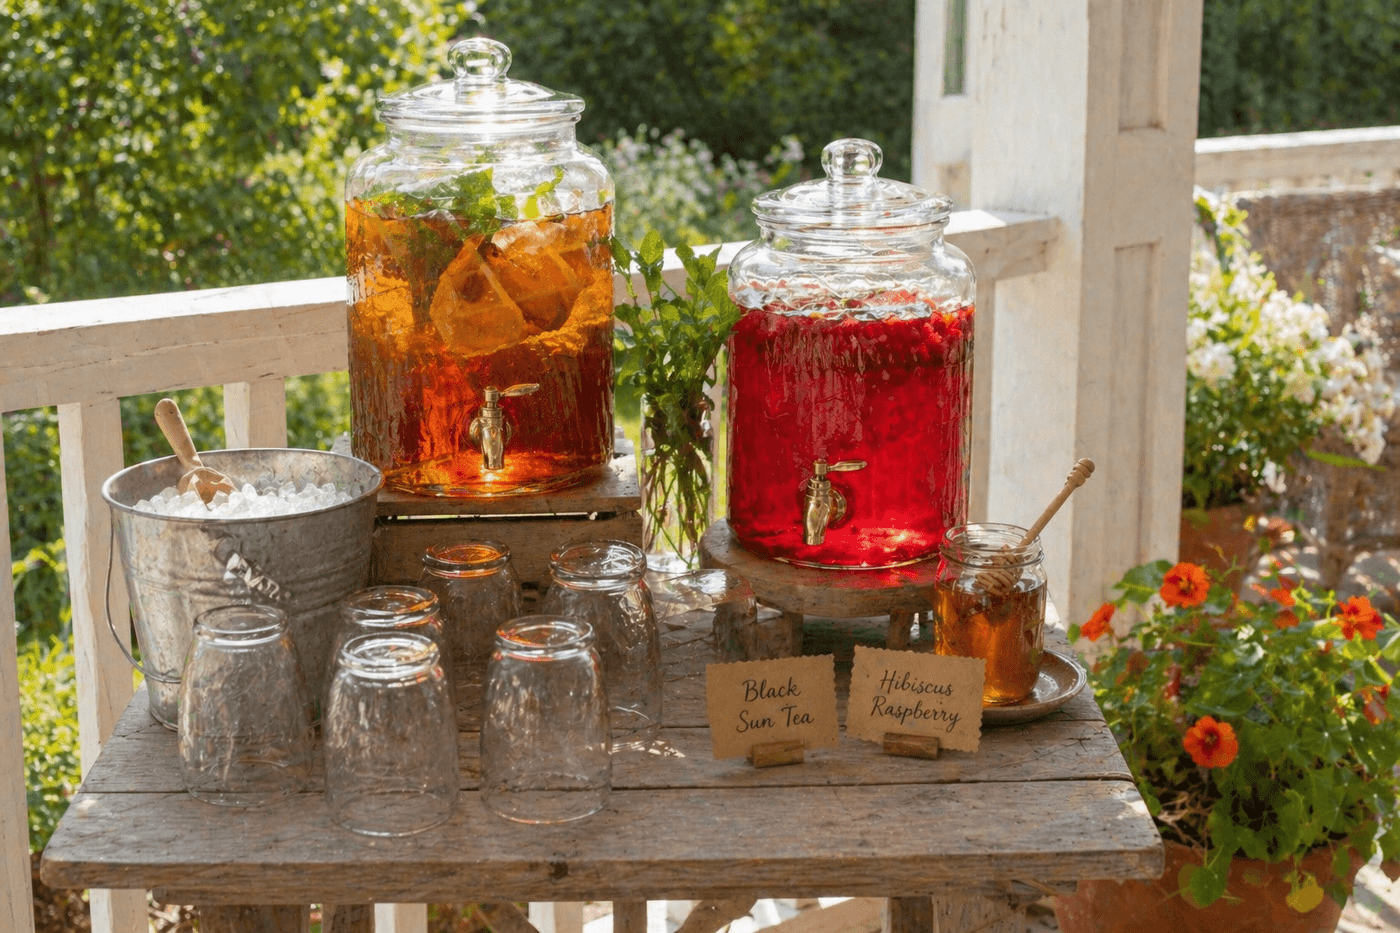
There is a specific quality of effortless hospitality that the best outdoor gatherings have — the feeling that the host put genuine thought into the experience without it looking like effort — and a sun tea station captures that quality more completely than almost any other single setup decision. Two glass dispenser jars glinting in afternoon light, one filled with amber black tea and floating lemon slices and fresh mint, one deepening into vivid pink hibiscus with scattered raspberries, set up self-serve with glasses and ice on a small table beside them: this is the detail that makes guests feel attended to without anyone attending to them. The brewing itself is as hands-off as hosting gets — cold water, tea bags, herbs, and sunlight do the entire work over three to four hours while you do something else entirely. Two dispenser jars for $35, about $10 in tea and fresh ingredients per gathering, and a twenty-minute setup transforms a backyard hangout into the kind of afternoon people bring up weeks later when they're telling someone about the best summer party they attended.
What You Need
- Glass dispenser jars with spigots, 1-gallon, qty 2 — glass rather than plastic for sun tea; glass heats evenly and doesn't leach compounds into the tea the way some plastics can when warmed by direct sun. Wide-mouth openings allow easy addition of herbs and fruit and thorough cleaning between uses (~$15–20 each, available at grocery stores, Target, or online)
- Tea bags for Jar 1: classic sun tea — four to six regular black tea bags per gallon produce a smooth, full-bodied brew; family-size bags reduce the string tangle inside the jar and brew slightly faster in direct sun (~$3–4 for a box)
- Tea bags for Jar 2: hibiscus blend — dried hibiscus tea bags or loose hibiscus flowers produce the most vivid deep pink color; raspberry hibiscus, berry hibiscus, or straight hibiscus all work beautifully (~$4–5 for a box of specialty tea)
- Fresh herbs and fruit — lemon slices and fresh mint sprigs for the black tea jar; fresh or frozen raspberries for the hibiscus jar. Fresh ingredients suspended in the jar add visual drama and subtle flavor layers that tea bags alone don't provide (~$4–6 total)
- Honey jar with dipper — for sweetening individual glasses; honey dissolves more readily in sun tea than granulated sugar and adds a flavor dimension that sugar doesn't (~$4–6 for a small jar)
- Ice bucket or insulated bin — for keeping glasses chilled and providing ice for serving; a galvanized tub from the dollar store works perfectly and adds to the visual aesthetic of the station (~$3–5)
- Small outdoor table or tiered plant stand — to elevate the jars for comfortable spigot access and create the station visual; the jar bottoms need to be at least twelve inches above the table surface so glasses fit under the spigot comfortably
- Glass or mason jar drinking glasses, qty 6–8 — displayed upside-down on the table beside the dispensers as part of the station visual; mason jar glasses complete the aesthetic and are inexpensive enough to use outdoors without concern (~$8–12 for a set)
How to Set It Up
- Start brewing three to four hours before guests arrive — sun tea requires a minimum of three hours in direct sunlight to develop its characteristic smooth, full flavor, and starting the brewing process first thing in the morning for an afternoon gathering or midday for an evening party ensures both jars are at their peak when the first guest reaches for a glass.
- Fill each clean jar with cold tap water to within two inches of the jar's capacity — leaving headspace for the tea bags, herbs, and fruit that will be added without overflow. Cold water is correct for sun tea; the solar heating of the water is what brews the tea gradually over hours, and starting with cold water ensures the final tea has the smooth, mellow flavor profile that distinguishes sun tea from conventionally brewed hot tea.
- Add four to six regular tea bags to each jar, draping the strings over the jar rim so the bags hang freely in the water rather than resting on the jar bottom where they can produce uneven extraction. For family-size tea bags, use two to three per gallon. Tie the strings together loosely at the jar rim if multiple bags are used, so all bags can be removed in a single motion rather than fishing for individual strings after brewing is complete.
- Add the visual and flavor ingredients to each jar — lemon slices and fresh mint sprigs to the black tea jar, fresh or frozen raspberries to the hibiscus jar. Drop them in gently so they distribute throughout the jar rather than floating in a cluster at the top; raspberries that have been lightly muddled before adding release more color and flavor into the tea during the brewing period than whole berries left intact.
- Position both jars in the sunniest available location on the porch or patio — direct unobstructed sun is what differentiates properly brewed sun tea from tea that sits for hours and never quite develops. A south-facing surface in full afternoon sun produces the best results; partial shade extends the required brewing time significantly and can leave the tea under-developed even after four or more hours.
- Monitor the color development rather than strictly watching the clock — black tea sun tea is ready when it reaches a rich amber tone similar to conventionally brewed iced tea; hibiscus tea is ready when it achieves a deep, vibrant pink-red that is fully saturated with no transparency remaining. Both jars typically reach their target color within three to four hours in direct summer sun, and either can be removed from the sun when the color indicates readiness rather than waiting for a fixed time.
- Remove the tea bags from both jars when brewing is complete by pulling the tied strings in a single motion — leaving tea bags in the jar beyond the brewing period can produce a slightly bitter or astringent flavor note as the tannins continue to extract, particularly in black tea. Leave the lemon, mint, raspberries, and other visual ingredients in the jar for serving; they continue to contribute subtle flavor and remain the most visually compelling element of the station display.
- Style the station table in the twenty minutes before guests arrive — position both dispensers at the back of the table with the spigots accessible from the front, arrange mason jar glasses upside-down in front of them, place the ice bucket to one side with a small scoop or tongs, and set the honey jar with its dipper beside the glasses. Add a small handwritten card in front of each dispenser describing its flavor combination — "Black Tea · Lemon · Mint" and "Hibiscus · Raspberry" — which gives guests the information they need to choose and adds the finishing visual touch that elevates the station from functional to genuinely styled.
Catering stylists who design beverage stations for outdoor events always add a third visual tier to the station by elevating one jar on a small wooden crate, brick, or stack of cutting boards — the height difference between the two dispensers creates a sense of depth and visual interest that two jars at the same level never achieves, and it makes the station photograph dramatically better from every angle, which matters at summer gatherings where guests inevitably document the most visually appealing details. They also always add fresh herbs in a small bud vase or mason jar of water beside the dispensers rather than only inside the brewing jars — loose mint sprigs or a small sprig of lavender in a bud vase beside the station signals freshness and care in the same way a small flower arrangement does, at essentially no additional cost.














