Planter Box with Trellis: Cedar Build, $25
A 24-inch cedar box, two tall posts, a grid of crosspieces, and climbing plants that turn a bare deck corner into a living vertical garden.
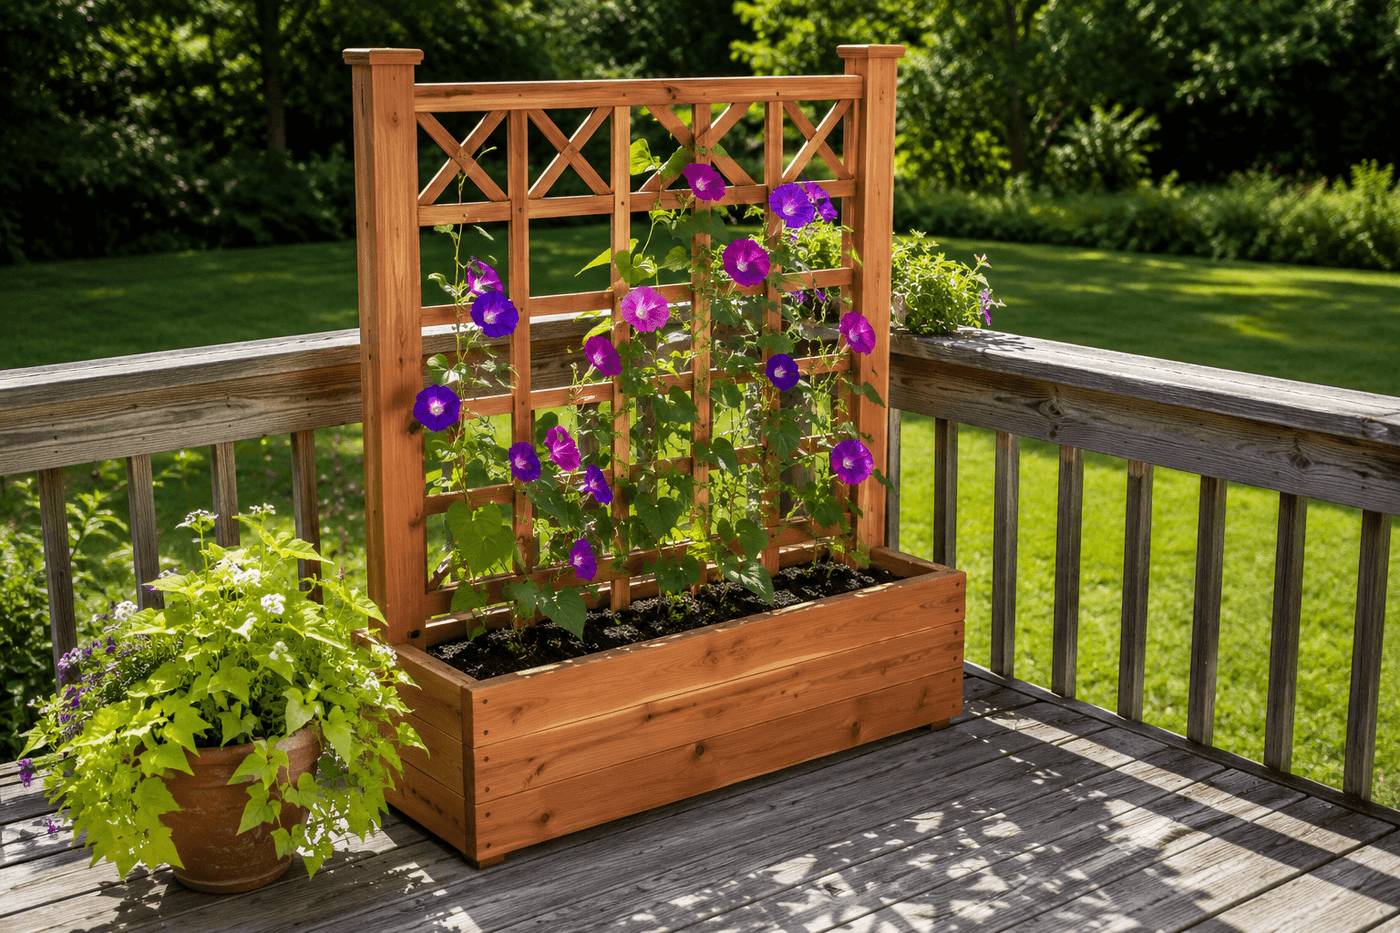
A bare deck corner or blank patio wall is one of those outdoor spaces that a single well-placed vertical element transforms completely — and a cedar planter box with an integrated trellis is the most functional and visually satisfying version of that vertical element available at any price point. The planter and trellis work as a single unit: the box provides the root space and soil volume that climbing plants need to establish strongly, while the trellis rises four to five feet above the box and gives those plants a structure to climb that is sized and positioned correctly from the day they go in the ground rather than retrofitted later when the vine is already sprawling. Morning glories, clematis, climbing nasturtiums, and pole beans all establish quickly on a properly positioned trellis and reward the builder with vertical growth that covers the structure within a single season. The whole build — box and trellis together — costs $20–30 in cedar lumber, takes about two hours, and produces something that functions as a privacy screen, a vertical garden, a focal point, and a weekend woodworking project all at once. Small patio or apartment deck especially: this is the project that makes a 6x8 foot outdoor space feel like it has room to grow.
What You'll Need
- 1x8 cedar boards, 8 feet — two boards yield all four planter box sides; cedar is the correct species for any planter that will hold soil — it resists rot naturally without chemical treatment (~$8–10 each, two needed)
- 1x6 cedar boards, 4 feet — for the planter box bottom; two boards laid side by side with small gaps for drainage cover the full 10-inch interior width (~$5–6 each, two needed)
- 1x2 cedar boards, 8 feet — two boards for the vertical trellis posts at 4–5 feet tall, plus additional boards for horizontal and diagonal crosspieces; one board makes all the crosspieces for a standard 24-inch wide trellis (~$3–4 each, three needed)
- Exterior wood screws, 1¼" and 2" — stainless or coated; 2" for box assembly and post attachment, 1¼" for crosspiece attachment; pre-drilling all pilot holes prevents cedar splitting at edges (~$6–8 per box of each size)
- Exterior wood glue — Titebond II or similar water-resistant formula; applied at all box corner joints before screwing for a connection that outlasts screws alone in outdoor conditions
- Sandpaper, 120- and 220-grit — for smoothing all cut ends and surfaces before finishing; pay particular attention to the trellis crosspiece ends where rough cuts snag plant tendrils rather than allowing them to weave freely
- Exterior stain or danish oil — two coats on all surfaces before assembly; natural cedar weathers to a beautiful silver-gray without treatment, or a clear or tinted exterior oil deepens the grain and slows the weathering process (~$8–10)
- Landscape fabric — cut to line the interior of the box before adding soil; prevents soil from washing out through the drainage gaps in the bottom boards while allowing water to drain freely (~$3–5 for a small roll that lines several boxes)
- Quality potting mix — not garden soil, which compacts in containers; a mix formulated for containers maintains the drainage and aeration structure that confined roots require to stay healthy through a full growing season (~$8–12 for a 2 cubic foot bag)
- Circular saw or miter saw — for accurate crosscuts on box sides and trellis components; consistent cut length across all four box sides is what produces a box that assembles square
- Drill and impact driver — for pilot holes and driving screws; drill pilot holes with a bit slightly smaller than screw diameter to prevent cedar splitting, particularly at board ends
- Speed square and clamps — for confirming box assembly is square before glue sets and holding components in position during drilling
How to Build It
- Cut all lumber to final dimensions before any assembly — planter box front and back at 24 inches from 1x8 cedar, box sides at 10 inches, bottom boards at 10 inches with two boards side by side covering the full interior, trellis posts at 48–60 inches from 1x2 lumber, and crosspieces at 22 inches (to span the 24-inch box width with one inch inset on each side). Cutting everything first and laying it out by assembly group confirms all pieces are present and correct length before any glue is opened.
- Sand all cut pieces through 120- and 220-grit before any assembly or finishing — flat individual boards sand quickly and thoroughly on all faces and edges; the same surfaces after assembly require working around screws and into corners where sandpaper cannot reach consistently. The trellis crosspiece ends specifically benefit from thorough sanding at this stage, because rough-cut ends catch and abrade the plant tendrils that will weave through the trellis grid throughout the growing season.
- Finish all sanded pieces with exterior stain or danish oil before assembly — two coats applied to flat individual boards reaches every surface completely including the faces that will become interior box walls, which are the most moisture-exposed surfaces in the finished planter and the ones least accessible after assembly. Allow full cure between coats and before assembly, typically 24 hours for danish oil.
- Assemble the planter box by gluing and screwing the front and back panels between the two side panels — the front and back pieces are captured between the side pieces in this assembly, which means the box width is determined by the front and back board length rather than the combined side-plus-front dimension. Apply wood glue to the mating surfaces, clamp or hold square, and drive two 2-inch screws through pilot holes at each corner joint from the side panels into the front and back panel ends.
- Check the assembled box for square by measuring diagonally corner to corner in both directions before the glue fully cures — equal diagonal measurements confirm a square box; unequal measurements mean one corner is racked, which produces a box that rocks on a flat surface and makes the trellis lean rather than stand vertically. Apply gentle pressure to the long diagonal to bring it into square and hold until the glue sets sufficiently to maintain the correction.
- Attach the bottom boards by laying two 1x6 cedar boards across the box bottom with a ¼-inch gap between them for drainage, then screwing up through the bottom boards into the front, back, and side panels from below — driving screws from below keeps the fastener heads on the exterior bottom face where they are not visible from inside the box and do not interfere with the landscape fabric lining. Confirm the gap between bottom boards runs front-to-back rather than side-to-side, which positions the drainage gap over the deck boards below rather than directly over a deck board where drainage would be blocked.
- Attach the trellis posts to the interior back wall of the planter box before adding any crosspieces — position each post flush against the interior back panel, centered one inch from each end of the box, and drive 2-inch screws through the exterior back panel into the post face at three evenly spaced points along the post's interior height. The post-to-box connection is the structural joint that the entire trellis load transfers through; three screws per post rather than two provides the resistance to the leverage force that a fully planted, wind-loaded trellis applies to this connection.
- Install horizontal crosspieces across the trellis posts beginning at 12 inches above the box rim — space additional crosspieces every 10–12 inches up the post height, driving one 1¼-inch screw through each crosspiece end into the post face through a pre-drilled pilot hole. Consistent spacing between crosspieces produces the even grid pattern that climbing plants navigate most efficiently; irregular spacing creates zones where growth clusters and zones where the trellis appears sparse even on a fully planted structure.
- Add diagonal crosspieces within the grid panels if desired — cut pieces to span each grid opening at 45 degrees and attach with a single screw at each end. Diagonals add significant lateral rigidity to the trellis structure against the wind loading that a fully covered trellis experiences, and the X-pattern they create within each grid opening gives climbing plants more attachment points that reduce the training work required during the early growth weeks when tendrils are still finding their way up the structure.
- Line the box interior with landscape fabric cut to fit, pressing it into the corners and up the sides approximately two inches before filling with potting mix — the landscape fabric is what prevents fine potting mix from washing through the drainage gap in the bottom boards during every watering, which would otherwise deposit soil on the deck surface below the box and require frequent cleanup throughout the growing season.
Garden designers and horticulturists who specify vertical planting structures for small-space urban gardens use one planting technique that dramatically accelerates trellis coverage and produces a fuller, more visually complete structure from the first month rather than the first season: plant three to five individual climbing plants per box rather than one, spaced evenly along the front of the box interior. A single climbing plant on a 24-inch wide trellis covers the full width eventually but requires most of a growing season to do so, during which the trellis reads as a mostly empty wooden structure with some vines. Three plants of the same or complementary species planted 6 inches apart establish independently, grow upward simultaneously across the full trellis width, and produce the lush, covered look within 4–6 weeks that a single plant requires 12–14 weeks to achieve. Garden designers call this "mass planting for structure coverage" — it costs the price of two extra seedlings and produces a result that makes the trellis look fully intentional from midsummer rather than a project still in progress.