Plant a Shallow Bowl Succulent Garden for $22
Five succulents, a wide bowl, and thirty minutes — the arrangement that looks like a garden boutique piece and asks almost nothing of you all season
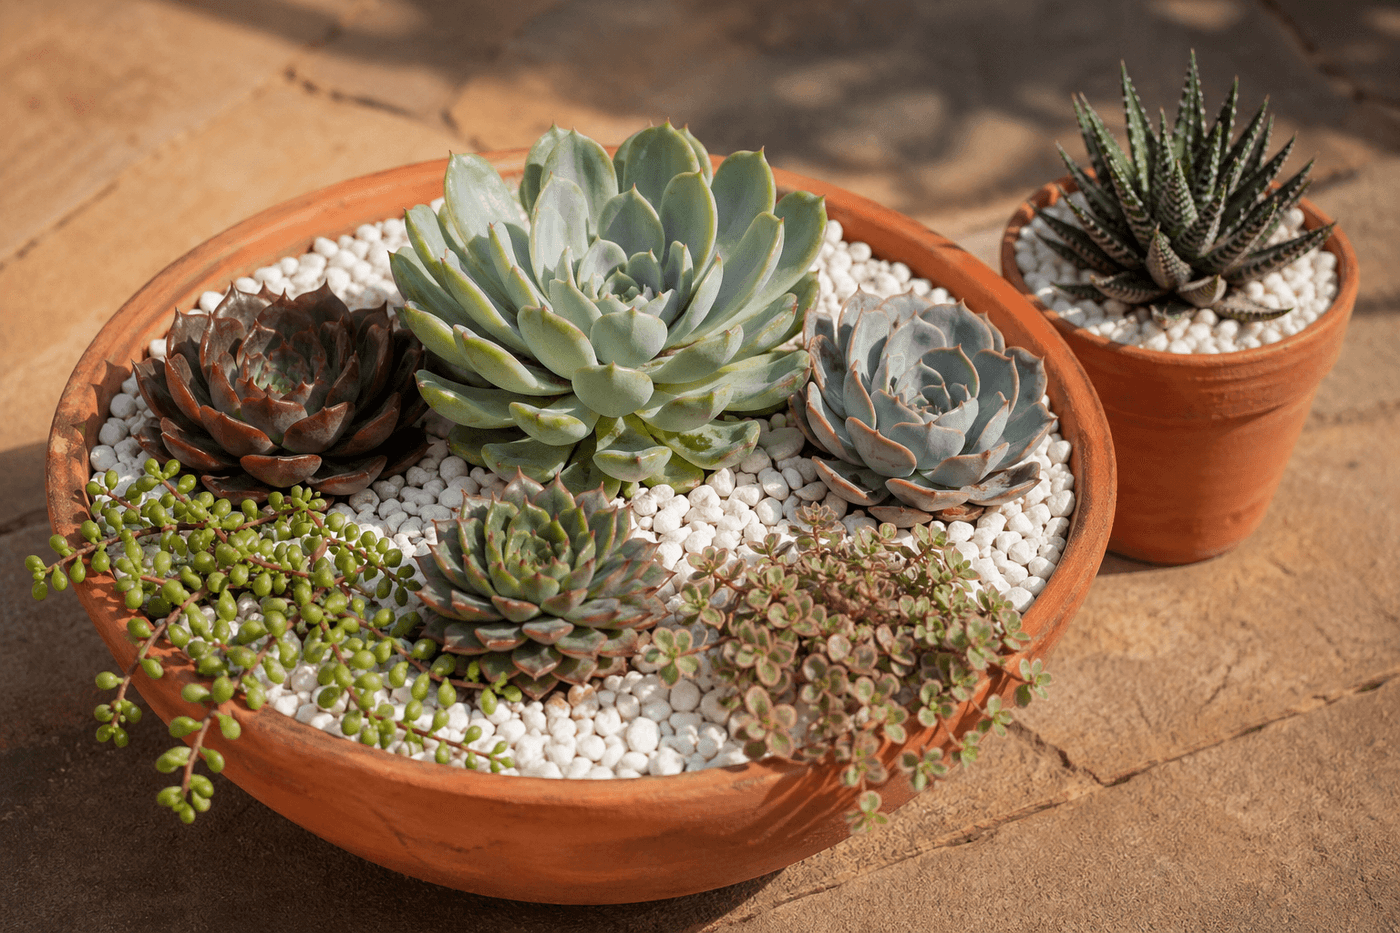
Succulents in a shallow bowl are the arrangement that finally makes container gardening feel accessible rather than aspirational — because the plants that look the most impossibly beautiful and curated in boutique garden shops are also the ones that genuinely thrive on neglect, that ask for water once every ten days in summer and even less in winter, and that produce more color and texture variation per dollar of plant material than almost anything else you can put in a pot. A wide terracotta bowl, five small succulent varieties chosen for height and color contrast, cactus mix, and a top-dressing of white pebbles comes together in thirty minutes for $22 and produces a finished arrangement that holds its beauty through an entire season without deadheading, fertilizing, or any of the ongoing attention that most container plantings demand. This is the plant project for people who love beautiful growing things but have had genuinely bad luck keeping them alive — and who are ready for a garden success that earns compliments from the very first day.
What You Need
- Wide shallow bowl, 12–16" diameter — terracotta, ceramic, or concrete all work; wider is better than deeper for succulent arrangements, which need horizontal spreading room more than root depth. A bowl without drainage holes works with a proper gravel layer underneath the soil (~$6–10 at garden centers or thrift stores)
- Succulent varieties, qty 5 — choose one tall upright variety (Echeveria, Aeonium, or a columnar cactus), two medium mounding varieties in contrasting colors, and two small trailing or spreading varieties for the bowl edges. Color variety — blue-gray, deep burgundy, soft green, and silver — creates more visual interest than five plants of similar tone (~$2–3 per small plant, ~$10–12 total)
- Cactus and succulent potting mix — not standard potting soil, which retains too much moisture for succulents and causes the root rot that is responsible for the vast majority of succulent failures in container arrangements (~$4–6 for a small bag)
- Coarse gravel or pea gravel, 1 cup — for the drainage layer at the bowl base beneath the soil; creates a reservoir space below the root zone where excess water collects rather than remaining in contact with roots (~$2–3 for a small bag)
- Decorative white or light-colored pebbles — for the top-dressing layer around each plant; keeps soil from splashing during watering, reflects heat away from the soil surface, and gives the arrangement the clean, considered finish that distinguishes a planted bowl from a boutique garden display (~$3–4 for a small bag)
- Chopstick or pencil — for making planting holes in the succulent mix and for gently positioning roots without damaging the compact root systems that most small succulents develop in nursery cells
How to Plant It
- Layer one inch of coarse gravel evenly across the bowl base before adding any soil — this drainage layer is the single most important structural element in a bowl succulent garden, and it is what allows you to water without causing root rot in a vessel without drainage holes. The gravel creates a distinct reservoir zone below the soil column where excess water collects and gradually evaporates rather than remaining in the root zone, and its presence is what makes the difference between a succulent arrangement that thrives for months and one that mysteriously declines within weeks despite careful watering.
- Fill the bowl with cactus and succulent mix to within one inch of the rim, spreading it evenly across the gravel layer and pressing it down lightly to eliminate air pockets without compacting it. Leaving one inch of headspace below the bowl rim is the planting detail that prevents soil and water from spilling over the edge during watering and that leaves room for the decorative pebble top-dressing to sit level with the rim rather than mounding above it.
- Arrange your succulent plants in their nursery pots on top of the soil surface before removing any of them from their cells — move them around freely until the composition reads well from all viewing angles. The most visually satisfying succulent bowl arrangements place the tallest plant slightly off-center rather than at the exact middle of the bowl, group plants of similar color on opposite sides of the arrangement for visual balance, and position smaller trailing varieties at the bowl edges where they will eventually spill over the rim.
- Plant the tallest centerpiece variety first by making a planting hole with your chopstick or pencil slightly off-center in the soil, removing the plant from its nursery cell by gently squeezing the base, and settling the root ball into the hole so the crown sits exactly at soil level — not buried below it, which causes crown rot, and not elevated above it, which exposes the base roots and causes the plant to dry out faster than the surrounding soil. Firm the mix gently around the root ball to anchor the plant without compressing the soil.
- Plant the remaining four varieties working outward from the center plant, fitting each root ball into the available space and adjusting the positions of already-planted varieties slightly if needed to achieve the arrangement you visualized during the dry-layout phase. Succulent root balls are compact and forgiving — they can be repositioned multiple times during planting without damage, which makes bowl arrangements considerably more adjustable during installation than other container gardens where repositioning disturbs more delicate root systems.
- Fill any gaps between plants with additional cactus mix, pressing it gently into the spaces between root balls until the soil surface is even and no root material is exposed above the surface. A smooth, even soil surface between plants is what the decorative pebble top-dressing rests on — an uneven surface with ridges and depressions causes the pebbles to distribute unevenly and collect in low spots rather than spreading uniformly across the bowl.
- Top-dress the entire soil surface with decorative white pebbles, pouring them carefully around each plant and nestling them between the leaves and stems without covering any of the plant crowns. Work the pebbles into contact with the soil surface so they lie flat and stable rather than sitting loosely on top — a firmly settled pebble layer stays in position through watering and light wind, while a loosely poured layer shifts and exposes soil after the first watering.
- Water the finished arrangement once lightly by drizzling water slowly around the base of each plant until you can see moisture reaching the pebble drainage layer at the bowl base — then do not water again for ten to fourteen days. This first watering settles the roots into their new soil environment and initiates the establishment process; subsequent watering on a ten-to-fourteen-day cycle in warm weather and a three-to-four-week cycle in cooler months is all the ongoing care this arrangement will ever require to maintain its beauty across seasons.
Succulent designers who create arrangements for professional display and sale always select plants from at least three distinct leaf form categories rather than choosing varieties purely by color — they combine rosette-forming succulents (Echeveria, Graptoveria) with upright or columnar forms (Haworthia, pencil cactus) and spreading or trailing forms (Sedum, Senecio). The combination of three distinct growth habits within a single bowl creates the layered, three-dimensional composition that makes a succulent arrangement look professionally designed rather than casually assembled, and it ensures the arrangement maintains visual interest through multiple seasons as each growth form develops differently over time. Color variation within each form category provides the palette variation, but form variety provides the structural foundation that makes the arrangement beautiful from every angle and viewing distance.