
Painted Picnic Table: Bold Design for $18
Three sample-size paint cans, a roll of painter's tape, and one afternoon — and a gray defeated picnic table becomes the reason people want to eat outside.
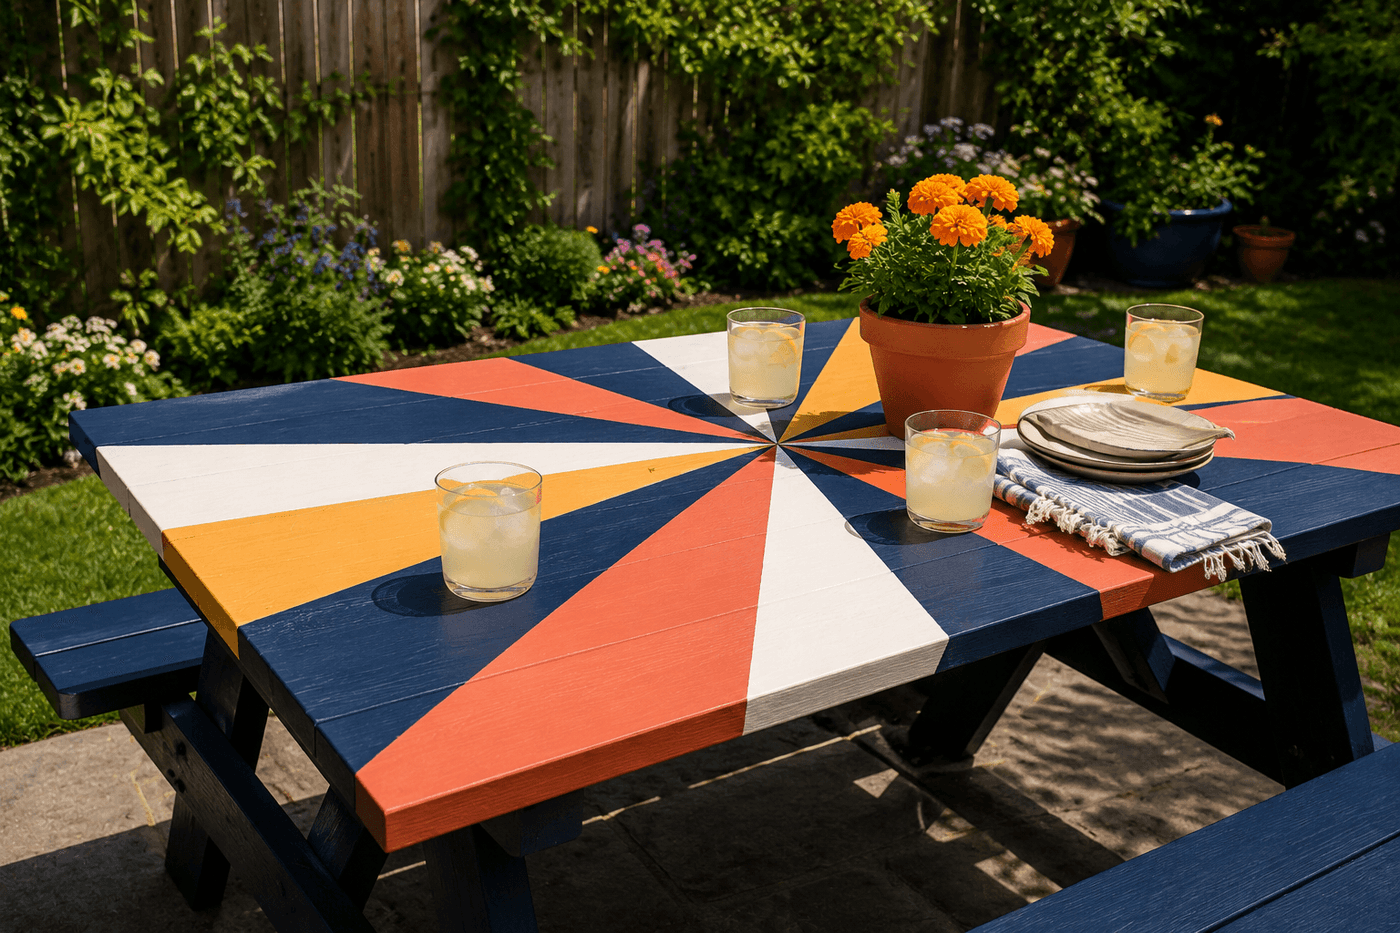
A weathered gray picnic table is one of those backyard features that stops being seen entirely after a few summers — it just becomes part of the background, neither inviting nor particularly useful as a design element, and the idea of doing something about it sits on the mental to-do list indefinitely because it feels like more of a project than it actually is. Three sample-size cans of exterior paint and a roll of painter's tape is the complete supply list. A geometric pattern taped off in straight lines and painted in bold, deliberate color choices is the technique — no artistic ability required, because the tape does the precision work entirely on your behalf. Three hours and $18 later, the picnic table becomes not just usable outdoor furniture but the specific reason people gravitate to the backyard and choose to eat outside rather than in. The sunburst radiating from the table center is the most graphic and forgiving pattern for a first attempt — bold enough to look intentional from across the yard, straightforward enough to tape and paint in a single afternoon, and cheerful enough that it earns a compliment from literally every person who sees it. Two coats of exterior sealant over the finished design and the whole thing survives a full summer of heavy use without chipping or fading.
What You'll Need
- Exterior paint in a base color — deep navy, forest green, or charcoal read as the most sophisticated base for geometric patterns; sample size (8 oz) covers a standard picnic table top in two coats (~$4–5 per sample)
- Exterior paint in two accent colors — coral and mustard against navy, or turquoise and white against charcoal; choose colors that are at least two values apart from each other in lightness for maximum graphic impact (~$4–5 per sample, two needed)
- Painter's tape, 1-inch width — FrogTape produces sharper geometric edges than standard blue tape on wood surfaces; one roll covers a full sunburst pattern with tape to spare (~$5–6)
- Exterior clear coat sealer — two coats of satin or semi-gloss exterior sealer protect the finished design through weather and heavy use; without sealer the design chips visibly within weeks (~$8–10 for a small can)
- Sandpaper, 80- and 120-grit — for sanding the existing table surface before painting; paint applied to an unsanded weathered wood surface peels in sheets within one season
- Exterior wood primer — one coat on bare or heavily weathered wood before the base color dramatically improves paint adhesion and color vibrancy (~$6–8 for a small can)
- Foam rollers and brushes — foam rollers produce smoother coverage on flat tabletop surfaces than bristle brushes; small detail brushes for touching up tape edges
- Chalk or pencil — for marking the sunburst center point and radiating line positions before taping
- Measuring tape and straightedge — for marking consistent sunburst wedge angles; a protractor or printed angle template speeds this step significantly
- Tack cloth — for wiping sanding dust before priming and between paint coats
How to Paint It
- Sand the entire tabletop surface with 80-grit to remove loose weathered wood fiber and gray oxidation, then follow with 120-grit to smooth the surface for paint adhesion — weathered outdoor wood has a degraded surface layer that paint cannot bond to properly, and sanding through it to fresh wood underneath is what separates a paint job that lasts a full season from one that begins peeling within weeks. Wipe thoroughly with a tack cloth after each grit.
- Prime the sanded tabletop with one even coat of exterior wood primer and allow to dry fully — at least two hours, or per product instructions. Primer on bare wood is what makes the base color go on evenly and appear vibrant rather than dull and streaky; unpainted wood absorbs the first coat of color paint unevenly, producing patchy coverage that requires three or four coats to correct rather than the two that primed wood needs.
- Paint the entire tabletop surface in your chosen base color using a foam roller, applying two thin even coats and allowing full drying time between them. The base color is the background that all geometric pattern sections will be read against, and even, consistent coverage across the full surface is what makes the finished pattern look graphic and intentional rather than painted over a patchy base that shows through in the lighter accent sections.
- Find the center of the tabletop by measuring and marking where the diagonals cross, then use a chalk line or straightedge to mark the sunburst radiating lines outward from that center point — for a 12-wedge sunburst, mark lines every 30 degrees using a protractor or printed angle guide. Consistent wedge angles are what produce the graphic, balanced sunburst that reads as designed; eyeballed angles produce a lopsided result that looks accidental rather than bold.
- Tape along the marked lines using painter's tape pressed firmly at the tape edge with a fingernail or credit card to seal it fully against the painted base — the tape edge seal is what determines whether your geometric lines are crisp and sharp or fuzzy and bleedy. For the sunburst pattern, tape one side of alternating wedges to create the section boundaries, and apply a second layer of tape masking the sections you are not currently painting to protect the base coat.
- Paint the first accent color into the taped wedge sections using a small foam roller or brush, applying two thin coats rather than one heavy one — thin coats dry faster, produce less bleed under tape edges, and cover more evenly on the relatively small wedge sections of a sunburst pattern. Paint from the tape edge inward rather than toward it, which pushes paint away from the potential bleed point rather than into it.
- Remove the tape for the first accent color while the second coat is still slightly tacky — pulling tape from fully cured paint risks lifting the base coat underneath, while pulling from tacky paint releases cleanly at the tape edge and reveals the crispest possible geometric line. Pull slowly at a consistent 45-degree angle back over itself rather than straight up, which is the motion that prevents the paint film from tearing rather than separating cleanly at the tape boundary.
- Repeat the taping, painting, and tape-removal sequence for the second accent color in the remaining alternating wedges, then allow the complete design to cure for a full 24 hours before applying sealer. Apply two coats of exterior clear coat in satin or semi-gloss finish, letting the first coat dry fully before the second — the sealer is what locks every color in place through rain, sun, and the full weight of outdoor summer use, and skipping it or applying only one coat is precisely how a beautiful painted table becomes a chipping, fading disappointment by the end of its first season.
Exterior furniture painters and decorative paint artists who work on high-traffic outdoor surfaces use one color selection principle for geometric table designs that produces visually sophisticated results regardless of which specific colors are chosen: limit the palette to one dark anchor color, one medium accent, and one light or near-white highlight, and never use two colors of similar value side by side in adjacent pattern sections. Value — the relative lightness or darkness of a color — is what creates the visual separation between geometric sections that makes a pattern read as crisp and graphic rather than muddy and indistinct, and two medium-value colors placed against each other (teal next to coral, for example) produce far less visual contrast than a dark-medium-light sequence regardless of how different the hues appear on the paint chip. Decorative painters who use this dark-medium-light value structure consistently produce geometric furniture designs that photograph beautifully and read as intentionally designed from across a yard — because the contrast is doing the graphic work that makes the pattern visible and compelling at a distance, rather than only at close range.














