
Painted Outdoor Rug: Bold Pattern for $30
A plain outdoor rug, painter's tape, outdoor acrylic paint, and a Saturday morning — and the patio gets a designer-worthy statement piece that costs $170 less than the real thing.
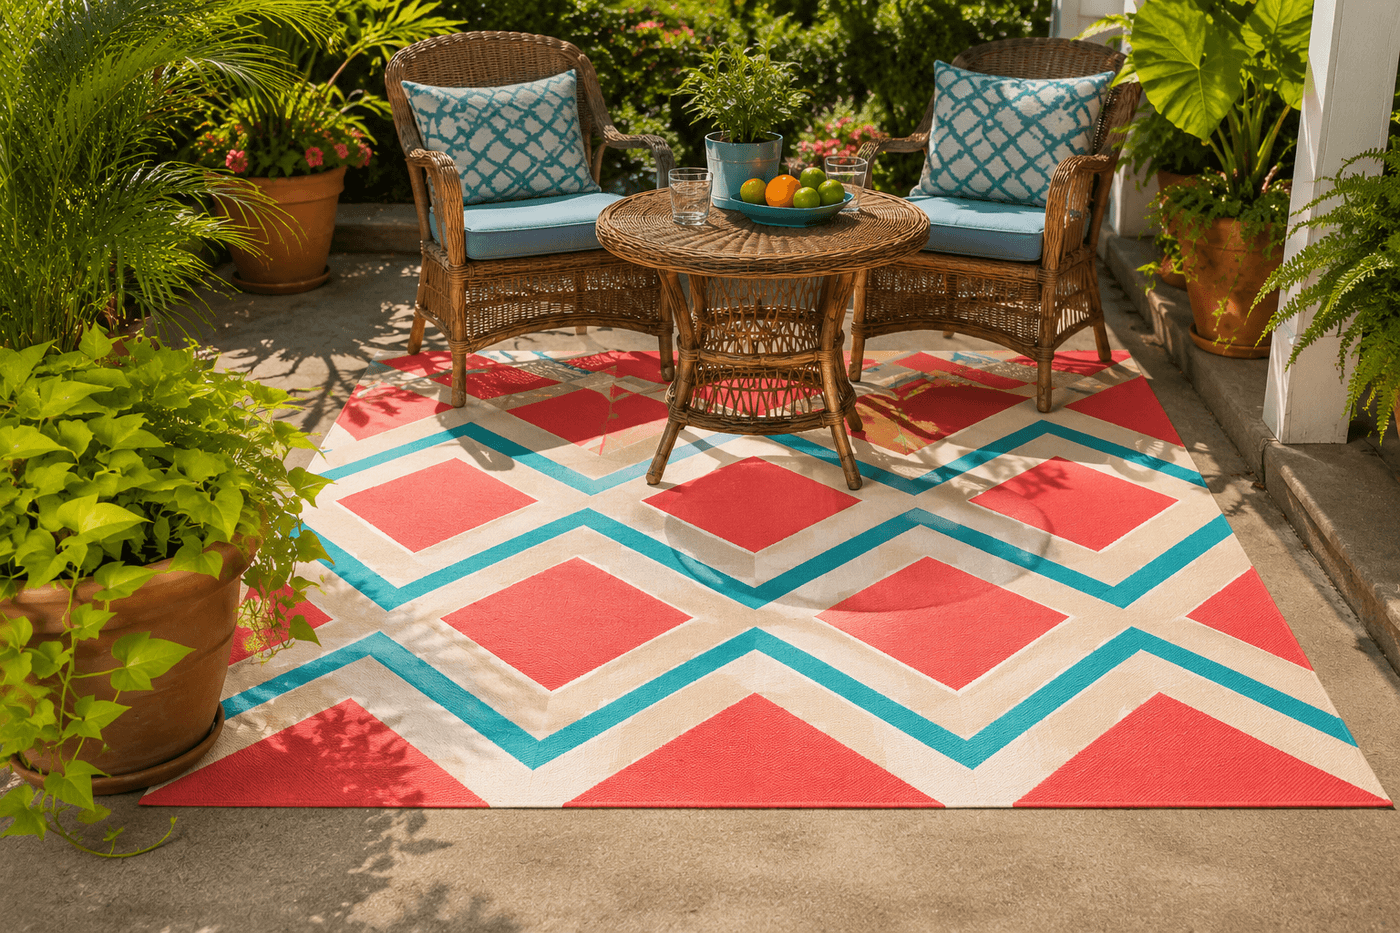
Designer outdoor rugs with bold geometric or tropical patterns cost $100–200 and are available in whatever colors the manufacturer decided to produce this season, which may or may not be the colors your patio actually needs. A painted version costs $25–40 in a plain rug base and outdoor acrylic paint, is available in exactly the colors you choose, and carries the specific category of compliment that store-bought décor rarely earns — the one where guests refuse to believe you made it. The technique is accessible to anyone who can apply tape in a straight line and paint between borders: chalk or tape marks the design, outdoor acrylic goes on in two to three coats per color section, the tape peels at the tacky-not-dry stage to reveal crisp edges, and two coats of outdoor sealer lock everything in place through foot traffic, sun, and rain. A bold oversized geometric is the most graphic and forgiving pattern for a first attempt — the scale means fewer tape lines to manage, the strong color contrast reads from across the patio, and the finished piece anchors the outdoor seating arrangement in the same way a $200 rug would at a fraction of the cost and with the specific distinction of being entirely yours.
What You'll Need
- Rug base — choose one:
- Plain indoor-outdoor rug in natural or neutral color — a flat-weave polypropylene or natural fiber rug in solid cream, tan, or gray; flat-weave surfaces accept paint significantly more evenly than looped or pile rugs where paint sinks between fibers and produces uneven coverage; most home improvement and discount stores carry plain flat-weave rugs in 5x7 or 5x8 sizes (~$15–25)
- Canvas drop cloth — 9x12 or 12x15 painter's drop cloth hemmed to size; the most economical base option and one that produces a beautifully flat, even painting surface; hem by folding 2 inches under on all four sides and securing with fabric glue or iron-on hem tape (~$10–15 for the drop cloth)
- Outdoor acrylic or fabric paint in 2–3 bold colors — choose colors at least two values apart in lightness for maximum graphic contrast; the most compelling outdoor rug palettes use one neutral base with two bold accents rather than three equally saturated colors that compete rather than compose:
- Graphic palette: crisp white base, hot coral and turquoise accents
- Coastal palette: navy base, white and sandy yellow accents
- Tropical palette: cream base, deep coral and forest green accents
- DecoArt Outdoor Living or Rust-Oleum Fabric Paint in 8 oz bottles (~$3–5 per color)
- FrogTape painter's tape, 1-inch and 2-inch widths — 2-inch for blocking large areas of the base color during accent color application; 1-inch for precise geometric boundary lines; FrogTape on a flat rug or canvas surface produces sharper edges than standard blue tape, which bleeds on textile surfaces
- Chalk or chalk line — for marking the geometric design directly on the rug surface before tape is applied; chalk marks are covered entirely by paint and disappear completely in the finished rug
- Foam rollers, 4-inch — for applying paint to large rug sections; foam rollers produce more even coverage on flat textile surfaces than brushes, which leave visible stroke marks in the finished paint layer
- Small foam brushes — for cutting in at tape edges where the roller cannot reach without risk of rolling over the tape boundary
- Clear outdoor sealer — two coats over the fully cured design; a sealer specifically rated for outdoor fabric use rather than a general craft sealer; Plaid Mod Podge Outdoor or a dedicated outdoor fabric protector (~$8–10)
- Non-slip rug pad — a rug pad cut to size for under the finished rug prevents sliding on smooth patio surfaces and adds cushioning that makes the canvas or flat-weave base significantly more comfortable underfoot (~$10–15 for an outdoor-rated pad)
How to Paint It
- Prepare the rug base by laying it flat on a clean hard surface — a driveway, garage floor, or smooth patio surface; the rug must be completely flat with no wrinkles or raised areas during painting, which would produce inconsistent paint coverage and tape bleed at any point where the tape bridges over a wrinkle rather than lying flush against the rug surface. Tape the rug perimeter to the floor surface with masking tape to prevent shifting during the painting and tape application process.
- Apply the base color to the full rug surface first if the rug is not already the intended base color — one or two thin coats of the lightest color in the palette applied with a foam roller across the full surface, with full drying time between coats. A painted base coat on a canvas drop cloth also primes the canvas fibers so subsequent paint layers adhere more evenly and require fewer coats to achieve full, opaque coverage.
- Plan and chalk the geometric design before applying any tape — for oversized diamonds, measure and mark the diamond center points at consistent intervals across the rug using a chalk line snapped between two corner marks; for chevrons, measure and mark the peak line across the rug width and the valley lines at consistent intervals; for large polka dots, trace circles from a round object (a dinner plate, large bowl, or paint can lid) in a grid or staggered arrangement. Having the full design marked in chalk before any tape goes down allows the complete layout to be assessed and adjusted before the irreversible taping step begins.
- Apply FrogTape along the chalked design lines, pressing every centimeter of tape edge firmly against the rug surface with a fingernail or credit card edge — on a textured rug or canvas surface, any section of tape edge that does not fully contact the fiber produces a bleed path that softens or eliminates the crisp geometric boundary. On canvas drop cloth, apply a thin coat of the base color paint along the tape edge before applying the accent color; this "seals the tape" technique causes any bleed to be base-colored rather than accent-colored, making it invisible in the finished rug.
- Paint each accent color section with a foam roller in two to three thin coats — work from the tape edge outward rather than toward it on each pass, which pushes paint away from the potential bleed zone rather than into it. Allow each coat to dry fully — at least 30 minutes in warm outdoor conditions — before the next; wet-on-wet coats on textile surfaces produce texture from the roller lifting the partially dried lower coat rather than the smooth, even coverage of dry-on-dry application.
- Remove tape from each completed color section while the final coat is still slightly tacky — the same 45-degree slow peel technique that produces crisp edges on any taped paint project is particularly critical on rug and canvas surfaces where the paint film is embedded in the fiber rather than sitting on a smooth surface and tears rather than separates cleanly if the tape is pulled from fully cured paint. Pull in one slow, continuous motion and inspect each revealed edge immediately; touch up any bleed spots with a fine brush and the base color while the accent paint is still slightly workable.
- Allow the completed design to cure for a full 24 hours before applying any sealer — outdoor acrylic paint on textile surfaces requires the complete cure time to bond to the individual fibers throughout the paint layer depth, and sealer applied before full cure traps solvents that cause the paint to lift from the fiber surface under foot traffic within the first week of use. The 24-hour cure is also the window when any touch-up painting should be completed; touching up after the sealer is applied requires sanding the sealer off the touch-up area, which damages the surrounding paint.
- Apply two coats of outdoor fabric sealer — a thin, even coat applied with a foam brush or roller across the full rug surface, working in the direction of the rug fiber rather than across it to push the sealer into the fiber rather than lifting it. Allow the first coat to dry fully per the sealer label before the second; two sealer coats produce the protective film that handles foot traffic, rain, and UV exposure through a full outdoor season without the paint cracking, peeling, or fading at the rate an unsealed painted textile would.
Interior designers and prop stylists who create custom rugs for editorial shoots and high-end residential staging use one design scale principle that the majority of first-time rug painters get wrong and that produces a finished rug that reads as amateur rather than designer from across the room: make every geometric element at least three times larger than it instinctively feels correct when the design is being planned on paper or on the floor beside the rug. A diamond that seems generously large during the planning phase at close range reads as a small, busy pattern from the standing viewing distance where a rug is actually seen — which is approximately 6–10 feet away across the seating area. Designers who create floor coverings and large-scale surface patterns work with a consistent scale rule: any pattern element smaller than 12 inches across on an outdoor rug disappears into visual texture rather than reading as the bold, graphic statement that makes the rug the anchor piece it is intended to be. Step back 8 feet and assess every design element at standing viewing distance before committing any tape to the surface — and when the pattern looks slightly too large from that distance, it is exactly the right scale for the finished piece in its actual context.














