Nightstand Cooler Table: Patio Upgrade for $25
A thrift store nightstand, a galvanized bucket that drops into the top, exterior paint, and casters — and your patio has a side table, a built-in drink cooler, and a drawer for the bottle opener all in one piece.
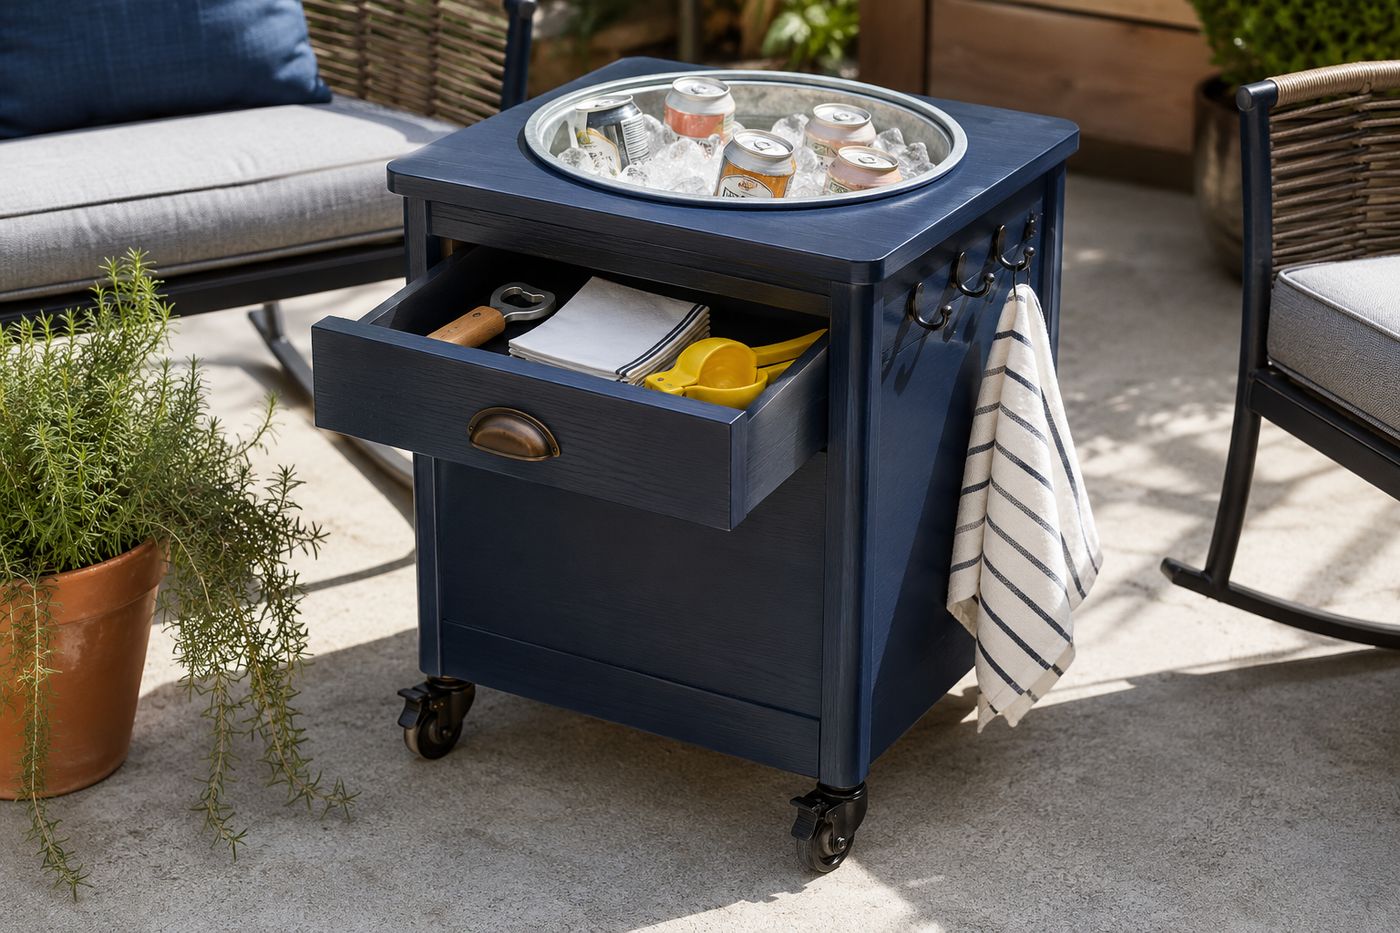
The outdoor entertaining problem of keeping drinks cold, essentials accessible, and the patio surface clear of clutter typically requires three separate objects — a cooler, a side table, and some kind of storage — each of which takes up space and needs to be set up, moved, and put away individually. A thrift store nightstand converted with a cut hole in the top surface, a galvanized bucket that drops in and out, a coat of bold exterior paint, and four casters on the base solves all three problems in a single rolling piece that costs $15–35 and generates the specific reaction that genuinely clever solutions always produce — the moment when a guest notices what it actually is and has to explain it to everyone else at the party. The nightstand already has everything needed: a flat top surface that accepts a dropped-in bucket, a drawer for bottle openers and napkins, and the structural depth that accommodates casters without making the piece too tall for comfortable side table use. The conversion adds the cut hole, the bucket, the weatherproofing, and the casters — about two hours of work that produces the most commented-on piece of furniture on the patio from the first party it attends.
What You'll Need
- Small wooden nightstand with drawer — thrift stores, yard sales, and Facebook Marketplace; solid wood construction rather than particle board which swells and fails outdoors; look for a nightstand where the top surface is at least 14x14 inches to accommodate a standard galvanized bucket without the cut hole compromising the structural integrity of the top; confirm the drawer opens and closes smoothly and the base structure is rigid with no racking (~$0–15 at thrift stores or curbside)
- Galvanized metal bucket, 5-quart or 7-quart — the specific bucket size determines the hole size cut in the nightstand top; purchase the bucket first and trace the rim circumference on the nightstand top before cutting; a 5-quart galvanized bucket with a 9-inch rim diameter holds eight to ten canned drinks with ice comfortably; a 7-quart bucket holds twelve to fourteen; galvanized metal is the correct material — it does not rust, accepts ice directly, and looks intentionally designed in a way that a plastic tub does not (~$8–12 at hardware and farm supply stores)
- Exterior paint or marine sealant — bold patio-appropriate colors read best on a converted nightstand: deep navy, forest green, warm terracotta, or matte black; chalk paint in an outdoor formula adheres without primer and produces a flat, intentional finish; follow with two coats of exterior polyurethane over all surfaces for the moisture resistance that outdoor use requires (~$10–15 for paint and sealer)
- Jigsaw — for cutting the bucket hole in the nightstand top; a jigsaw is the correct tool for cutting a precise circle in a wood surface; a drill with a hole saw produces a cleaner circle for smaller diameters but most bucket rim sizes exceed standard hole saw capacities; drill a starter hole inside the traced circle before inserting the jigsaw blade
- Sandpaper, 80- and 120-grit — for smoothing the cut hole edges before painting and for the general surface preparation pass over all nightstand surfaces that opens the existing finish for exterior paint adhesion
- Waterproof silicone sealant — applied around the cut hole interior edge after painting to prevent water infiltration into the wood when the ice bucket drips during removal and replacement; a thin bead of clear silicone caulk pressed into the hole edge creates a waterproof barrier that protects the wood at the most water-vulnerable point in the whole piece
- Locking swivel casters, 2-inch, set of 4 — rated for the loaded nightstand weight including ice, bucket, and drinks; locking casters are essential — an unlocked side table with a full ice bucket rolls unexpectedly when guests set drinks on it; polyurethane wheel casters for use on deck boards and concrete without marking the surface (~$12–18 for a set of four quality locking casters)
- Cup hooks, 4–6 — for the nightstand side for hanging a hand towel, a bottle opener on a ring, or small utensils; stainless or brass cup hooks resist rust in an outdoor wet environment (~$3–5 for a pack)
How to Transform It
- Purchase the bucket before cutting any hole — the bucket rim circumference determines the hole diameter, and cutting the hole first and then finding a bucket that fits it is significantly more difficult than working in the correct order. Set the bucket on the nightstand top and trace around the rim interior with a pencil, which marks the cut line that produces a hole the bucket drops into while the rim rests on the top surface. Confirm the traced circle is centered on the top surface with equal margins on all four sides before committing to the cut; an off-center hole leaves a thin wood margin on one side that may crack during use.
- Assess the nightstand top thickness before cutting — most solid wood nightstand tops are ¾ inch thick, which is sufficient for a dropped-in bucket if the hole is cut to fit the bucket snugly; a top that is thinner than ½ inch may not provide enough rim support surface to hold the bucket securely under the weight of ice and drinks. If the top is thinner than desired, glue a ¾-inch frame of cedar or pine around the hole perimeter on the underside of the top surface to add support material for the bucket rim to rest on.
- Cut the bucket hole with a jigsaw — drill a ½-inch starter hole just inside the traced circle line, insert the jigsaw blade, and cut slowly along the traced line using even, consistent pressure. Cut slightly inside the line rather than on it, which allows final sizing with a sanding block after the rough cut; a hole that is cut too large cannot be made smaller and must be framed with an added rim piece to restore the snug bucket fit that the conversion depends on. Test-fit the bucket after the rough cut and sand the hole edge in small increments until the bucket drops in cleanly with the rim resting flat on the top surface.
- Sand all surfaces with 80-grit followed by 120-grit — the sanding pass opens the existing finish for exterior paint adhesion and removes the rough jigsaw edge from the cut hole interior. Pay particular attention to the hole edge, which should be smooth enough that the galvanized bucket slides in and out without catching on any rough wood fiber; a rough hole edge abrades the galvanized coating of the bucket over repeated removal cycles and eventually produces rust at those abrasion points.
- Paint all exterior surfaces including the hole interior edge in two thin coats of exterior paint — allow full drying between coats and confirm the hole edge and drawer interior receive the same coverage as the visible exterior surfaces. The hole interior edge is the surface most exposed to water contact during the bucket's use and is also the surface most often skipped during painting because it requires a small brush rather than the roller or larger brush used for the flat surfaces; an unpainted hole edge absorbs every drip from ice bucket removal and begins warping within the first season.
- Apply two coats of exterior polyurethane over the fully cured paint on all surfaces, then run a thin bead of clear silicone sealant around the full interior perimeter of the cut hole after the polyurethane is cured — press the sealant bead firmly into the corner where the hole interior edge meets the top surface underside, which creates the waterproof barrier that prevents ice melt water from wicking into the top surface during every use. Allow the sealant to cure per the product label before the bucket is installed.
- Install locking casters on the base by drilling pilot holes at each corner of the base bottom and driving the caster mounting screws through the caster plate into the base — confirm the caster plate screws do not penetrate through the base bottom into the interior of the nightstand, which would interfere with the drawer operation. Set the nightstand upright after caster installation and confirm all four casters contact the floor simultaneously without rocking; a rocking side table with a full ice bucket is a spill hazard at every party.
- Install cup hooks on the most accessible side of the nightstand at comfortable reaching height — drill a pilot hole for each hook slightly smaller than the hook shank diameter, which prevents splitting while providing enough wood engagement for a secure hold under the weight of hanging items. Stock the drawer with a bottle opener, folded napkins, a pack of cocktail picks, and whatever small entertaining essentials the drawer volume accommodates; the full conversion is not complete until the drawer is stocked and ready to open, because the moment a party guest discovers the drawer's contents is the second most satisfying reveal after the ice bucket itself.
Event designers and outdoor entertaining stylists who create bar and drink station setups for residential parties consistently recommend one bucket preparation technique that keeps drinks colder for significantly longer than standard ice-and-drinks loading: pre-chill the galvanized bucket for 30 minutes in the freezer before loading it with ice, and layer the ice and drinks in alternating horizontal bands rather than burying the drinks in a single ice mass. A room-temperature metal bucket acts as a heat sink that melts the first layer of ice rapidly before the thermal mass of the ice overcomes the bucket temperature; a pre-chilled bucket begins the ice retention process at the correct thermal baseline and preserves ice significantly longer through the first critical hour of a party when the bucket is opened most frequently. The alternating layer technique — a layer of ice, a layer of drinks, a layer of ice — distributes the cold contact surface evenly around every drink container rather than relying on conduction through whatever drinks happen to be at the ice surface; event stylists who use this loading method report ice lasting 30–40% longer in the same bucket at the same ambient temperature compared to the standard bury-in-ice approach.