Mosaic Stepping Stones: Custom Garden Art, $7
A dollar store plant saucer, a small bag of concrete, and a handful of glass gems — and your garden path has something no garden center sells.
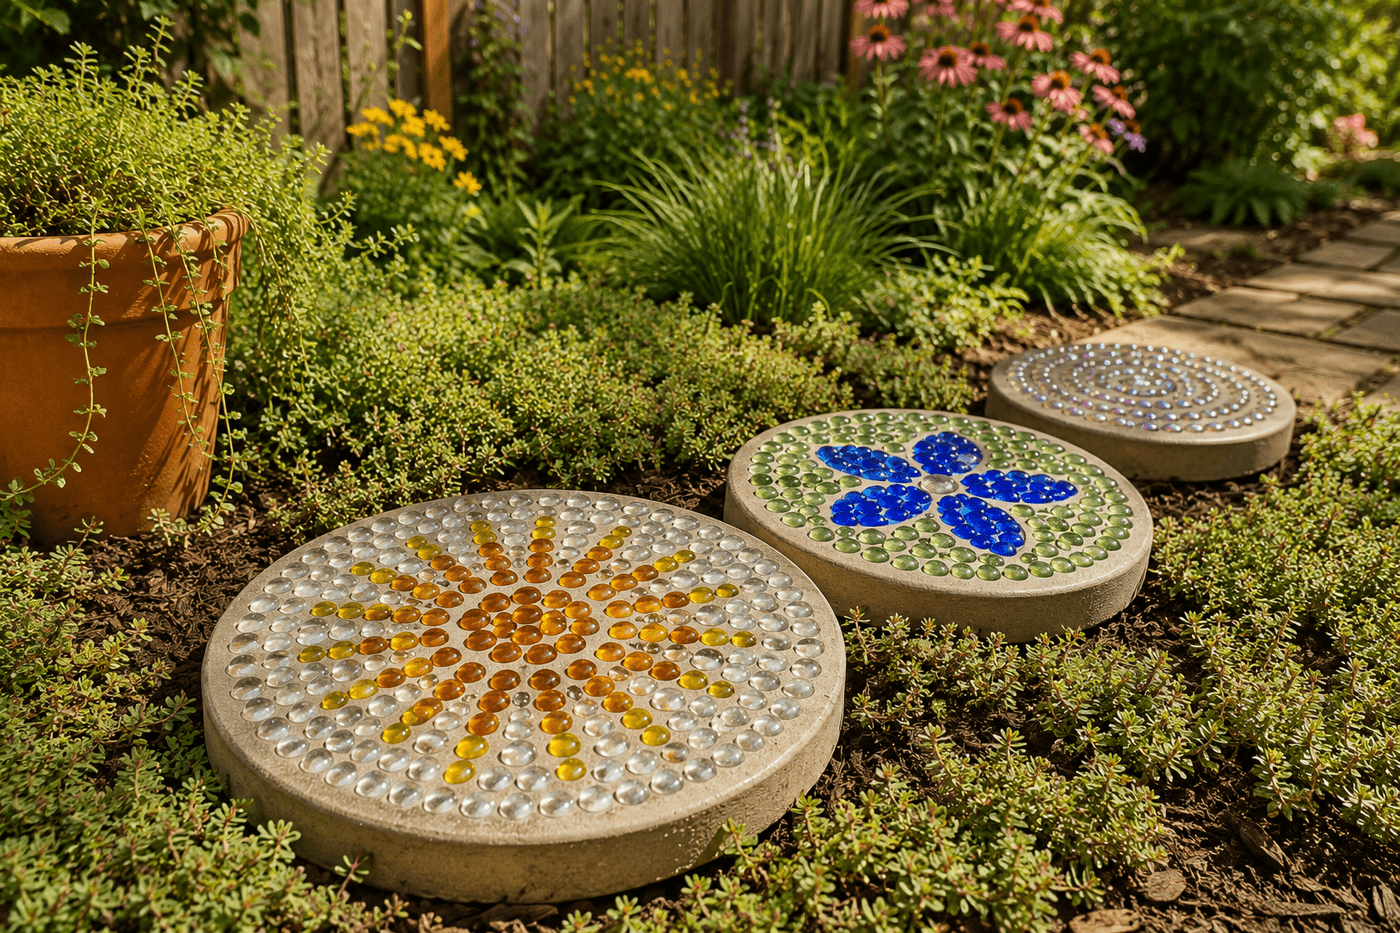
Decorative garden pavers at the garden center cost $15–25 each for designs that are mass-produced and identical across every garden that uses them — which is the specific quality that makes them feel generic rather than designed. A mosaic stepping stone made from a dollar store plant saucer mold, quick-setting concrete, and glass gems or flat-back stones pressed into the surface before the concrete cures costs $5–8 total and is the only one of its kind in the world, which is the specific quality that makes a garden path feel like it belongs to the person who made it rather than the catalog it came from. The concrete work is as accessible as crafts get — mix, pour, wait 15 minutes for partial set, press the decorative elements into the surface in whatever pattern feels right, wait 48 hours for full cure, and pop the stone out of the mold. The mosaic surface is sealed with concrete sealer for weather protection, and the finished stone goes into the garden path, the flower bed, or wherever a moment of visual surprise belongs in the outdoor space. Making a series with coordinating designs is one of the most satisfying garden projects available at this price point, and making them with children produces garden art that genuinely commemorates a specific moment in time.
What You'll Need
- Mold — choose one:
- Plastic plant saucer, 12–14 inch — the ideal mold; the slight taper of the saucer shape makes the cured stone release cleanly; dollar stores carry these reliably (~$1)
- Disposable foil cake pan — produces a rectangular stone rather than round; multiple stone shapes in a series adds visual interest to the finished path arrangement (~$1–2 for a pack)
- Plastic storage container lid — any rigid plastic lid with a shallow rim works as a free mold from the recycling bin
- Quick-setting concrete mix — Quikrete Quick-Setting Cement or similar; quick-setting rather than standard concrete is important for a project where the 15–20 minute window for decorative element pressing is the entire creative phase; standard concrete has a much longer working time but also a much longer wait before the surface firms enough to hold pressed elements in place (~$5–8 for a 10 lb bag that makes three to four stepping stones)
- Decorative elements — mix from dollar store offerings:
- Glass gems or flat-back marbles — the most versatile mosaic element; available in bags at most dollar stores; press flat face down for maximum adhesion and color transmission (~$1–2 per bag)
- Glass marbles — press in halfway for a dome surface effect that catches light beautifully
- Ceramic tile pieces — broken floor or wall tile from the dollar store or home improvement scrap bin; wear gloves when handling sharp edges
- Flat decorative stones — smooth river stones and polished flat stones press cleanly into concrete surface
- Colored glass beads — press in groups rather than individually for impact
- Concrete sealer — applied after full 48-hour cure; penetrating concrete sealer protects the mosaic surface and the concrete base from freeze-thaw cracking in cold climates and prevents the efflorescence (white mineral bloom) that appears on unsealed concrete after the first season outdoors (~$6–8 for a small can that seals multiple stones)
- Cooking spray or petroleum jelly — applied to the mold interior before pouring concrete; prevents the cured stone from bonding to the mold and allows clean release without cracking the stone edges
- Rubber gloves and dust mask — concrete is alkaline and causes skin and respiratory irritation with direct contact or dust inhalation; mix and pour in a well-ventilated area and wear gloves throughout the full process including decorative element pressing
- Mixing container and stir stick — a dedicated mixing bucket or a disposable container; concrete is difficult to fully clean from containers after curing and should be mixed in a disposable or dedicated vessel
How to Make Them
- Prepare the mold by coating the interior surface thoroughly with cooking spray or a thin layer of petroleum jelly — every surface that will contact the concrete must be coated, including the rim and any texture in the mold bottom, which becomes the stone's top surface. Insufficient mold release causes the cured stone to bond to the mold and crack during removal; a thorough coating allows the stone to pop out cleanly in one piece after curing.
- Lay out the planned decorative design on a flat surface beside the mold before mixing any concrete — arrange the glass gems, marbles, and tile pieces in the pattern intended for the stone so the design is ready to transfer quickly once the concrete reaches the correct partial-set consistency. The working window for pressing elements into quick-setting concrete is approximately 15–20 minutes; having the design pre-planned and elements pre-arranged means the full window is available for pressing rather than for design decision-making while the concrete is setting.
- Mix the concrete according to package directions to a peanut butter consistency — stiff enough to hold the shape of a pressed finger indentation rather than flowing back to level, but moist enough that the surface is still workable and will accept pressed elements without cracking around the insertion point. Too much water produces concrete that is slow to set and allows pressed elements to sink or shift; too little water produces concrete that crumbles rather than accepting the smooth impression of a pressed element.
- Pour the mixed concrete into the prepared mold to a depth of approximately 1½ to 2 inches — deep enough for structural integrity as a stepping stone that will bear body weight, but not so deep that the stone becomes too heavy to reposition in the garden after curing. Tap the mold on a firm surface several times after pouring to settle the concrete and release any air bubbles that would appear as voids on the stone surface; air pockets near the stone surface produce weak spots that crack when stepped on.
- Wait 15–20 minutes before pressing any decorative elements — this partial-set window is when the concrete surface is firm enough to hold pressed elements in position without sinking or shifting, but not yet hard enough to resist the insertion pressure. Test the readiness by pressing a finger gently into an edge of the concrete surface; the correct consistency leaves a clean finger impression that holds its shape rather than flowing back to level or crumbling at the edge of the impression.
- Press decorative elements into the partially set concrete surface following the pre-planned design — press each element firmly enough that it is at least halfway embedded in the concrete surface, which is the minimum depth for the concrete to grip the element securely through years of outdoor use and foot traffic. Elements pressed only slightly into the surface bond weakly and pop out after the first freeze-thaw cycle or after being stepped on repeatedly; elements pressed to half depth or more are mechanically locked in the concrete and remain permanent.
- Smooth the concrete surface around each pressed element with a damp finger or a small tool if needed — the pressing motion sometimes displaces concrete upward around the element edges, leaving a rough raised ring that is visually distracting in the finished stone. A light smoothing pass around each element before the concrete fully sets produces a cleaner, more intentional mosaic appearance where the elements read as set into the stone rather than pushed into it.
- Cure the stone for a full 48 hours in a sheltered location before unmolding — quick-setting concrete reaches initial hardness within hours but full structural strength requires the complete cure time, and a stone removed from the mold before full cure is brittle at the edges and cracks easily during handling. After 48 hours, flex the mold gently to break the seal and pop the stone out; if the mold was properly coated with release agent the stone will release cleanly. Apply two coats of penetrating concrete sealer to all surfaces and allow to cure per sealer directions before placing in the garden.
Mosaic artists and concrete garden art instructors who teach stepping stone workshops consistently recommend one design approach for first-time stone makers that produces a more visually sophisticated result than the free-form random element placement that most beginners attempt: base the design on a single strong geometric shape — a spiral, a radiating sunburst, or a simple five-petal flower — and use element color to define the shape against a contrasting background of a second color. A cobalt blue glass gem spiral on a field of clear glass gems is immediately readable as a spiral from viewing distance; the same number of cobalt and clear gems distributed randomly across the stone surface reads as a speckled texture rather than a designed motif. Mosaic instructors who teach this shape-first approach report that first-time stone makers who use it produce results they are significantly more satisfied with than those who approach the stone as a free-form placement exercise — because the shape provides the visual anchor that makes the difference between a stone that looks designed and one that looks like a collection of pressed elements, regardless of how beautiful the individual elements are.