
Marbled Clay Dishes: Nail Polish Art for $10
Drop the polish on water, swirl, dip the dish through in one smooth motion, lift — and a pattern so beautiful it looks expensive transfers perfectly every single time.
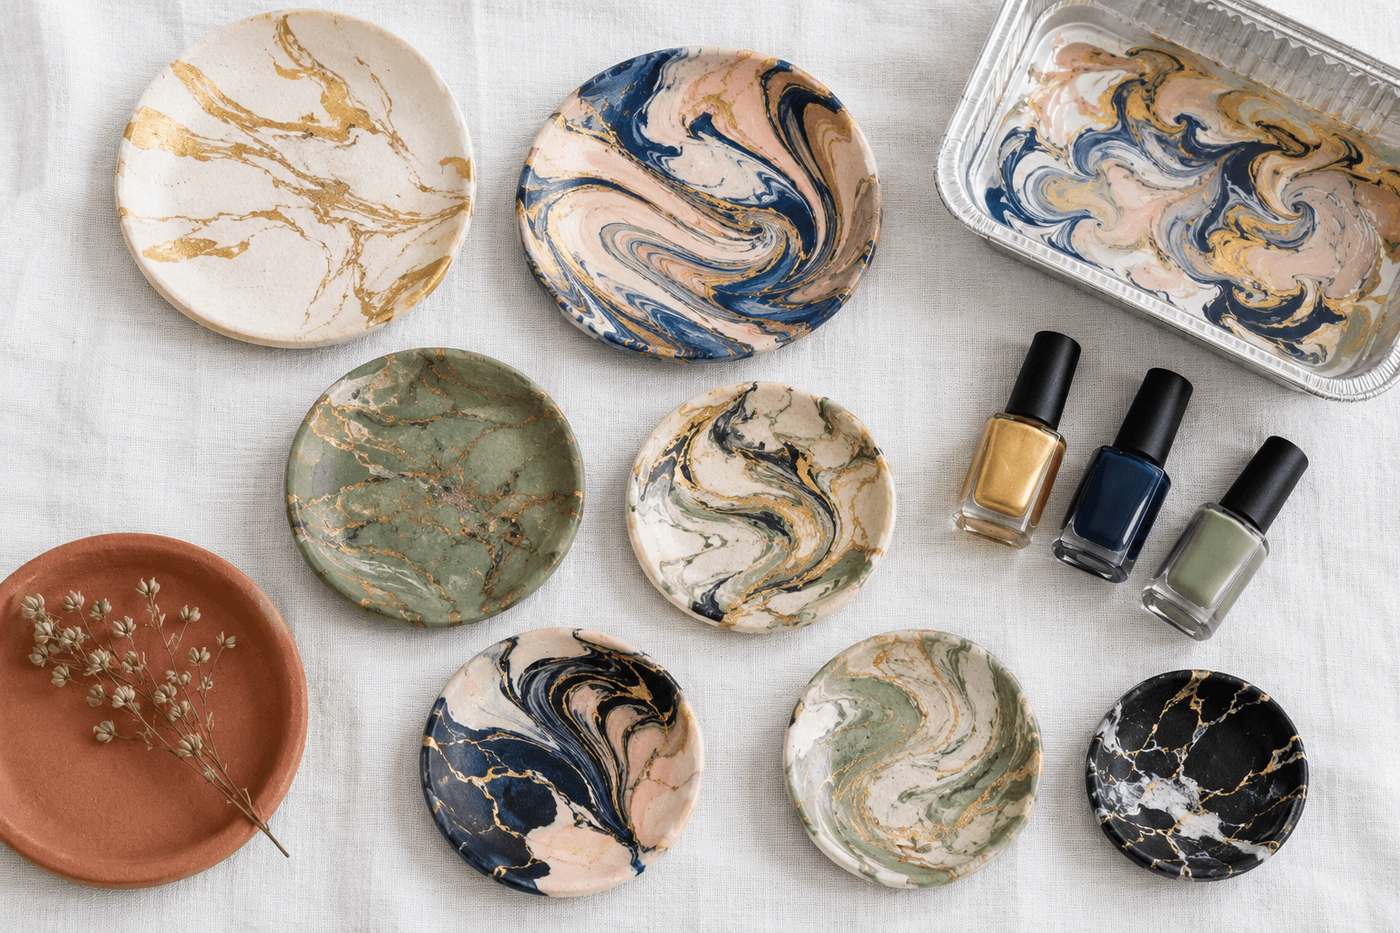
The nail polish marbling technique sits in a category of craft processes where the result is so dramatically more beautiful than the effort and cost involved that the finished pieces genuinely do not look homemade in any of the ways that phrase is sometimes used dismissively. Each dish comes out with a pattern that is completely unique — the stone-like veining, the color depth, the variation between pieces — and the finished collection has the specific quality of something purchased at a design shop rather than made in an afternoon at the kitchen counter for $10. The process itself is one of the most satisfying available in any craft project: drop the polish colors on water, swirl with a toothpick, dip the clay dish face-down through the surface film in one smooth motion, lift straight up — and a perfectly transferred marble pattern is on the dish before you have fully processed what just happened. Every batch makes eight to ten dishes, the color combinations are infinitely variable depending on what polish is on hand, and the finished pieces make gifts that recipients consistently and genuinely assume were purchased rather than made. A $10 afternoon that produces eight gifts and an equal number of home décor pieces that improve every flat surface they land on is the creative math that makes this project worth knowing about.
What You'll Need
- Air-dry clay — DAS, Crayola Air-Dry, or Amaco white air-dry clay; white clay produces the most vibrant marble pattern transfer because the nail polish colors read at full saturation against a white base; one 2.2 lb block makes eight to ten pinch pot dishes of varying sizes (~$8–10)
- Nail polish in 3–4 colors — old polish from the back of the drawer works perfectly; the colors most suited to marbling are those with good opacity rather than sheer formulas; metallic and glitter polishes produce spectacular effects; choose a palette of two to four colors that share an undertone:
- Luxe palette: gold metallic, ivory, deep navy, and blush
- Natural palette: sage green, terracotta, cream, and bronze
- Graphic palette: matte black, white, and a single bold accent
- Disposable container for water — a disposable aluminum tray, plastic food container, or old baking dish wider than the largest dish being marbled; the container becomes permanently nail-polish-stained and should not be a kitchen item returned to food use; fill with room temperature water to a depth of at least 3 inches
- Toothpicks — for swirling the nail polish colors on the water surface into the marble pattern before dipping; one toothpick per color prevents colors from contaminating each other during swirling
- Acetone nail polish remover — for wiping the water surface clean of residual polish film between dips; after each dish is dipped, the remaining surface film must be removed before fresh polish is dropped for the next dish; drag a cotton ball or paper towel across the water surface to collect the spent film
- Rubber gloves — nail polish stains skin immediately and persistently; wear gloves for the full marbling session and have extra cotton balls or paper towels for wiping the outside of gloves between dips
- Wire rack — for setting marbled dishes face-up to dry after dipping; the marbled surface must not contact any other surface while the polish film cures, which takes approximately 30 minutes
- Matte or gloss sealant spray — applied over the fully cured marbled surface for durability; nail polish alone is fragile and scratches easily in daily use as a trinket dish; a sealant coat protects the pattern permanently and adds a professional finished quality (~$5–8 for a can)
- Ventilation — nail polish and acetone produce significant fumes during the marbling session; work near an open window or outdoors on a calm day
How to Make Them
Day 1: Shape the Dishes
- Pinch small balls of white air-dry clay into simple bowl forms using the pinch pot technique — press the thumb into a ball of clay and pinch the walls upward and outward into a shallow dish shape approximately 3–4 inches in diameter and ½ inch deep. Vary the size across the batch so the finished collection has visual variety; some very shallow dishes, some slightly deeper bowls, some with a flared rim and some with a straight rim produce the most interesting final grouping.
- Smooth the interior and exterior surfaces with slightly damp fingers, eliminating fingerprints and rough patches that would interrupt the smooth marble pattern transfer during dipping. The smoother the clay surface at this stage, the more completely the nail polish film adheres during the dip and the more detailed and beautiful the final marble pattern.
- Dry the shaped dishes on a wire rack for a full 24–48 hours until completely hard throughout — air-dry clay that feels dry on the surface often retains moisture in the body that causes the clay to crack during the marbling dip or warp during subsequent drying. Confirm complete dryness by the weight of the piece (fully dry clay is noticeably lighter than partially dry clay of the same size) and by the color (fully dry white clay is bright white rather than slightly gray-toned).
Day 2: Marble the Dishes
- Fill the marbling container with room temperature water — cold water causes nail polish to skin over too quickly before a good swirl pattern can be developed; warm water thins the polish film too much and produces faint, washed-out color transfer. Room temperature water allows the polish to float and spread on the surface in a workable film that holds its pattern through the swirling and dipping process.
- Drop nail polish colors onto the water surface one at a time, holding the brush approximately 1–2 inches above the surface — each drop spreads into a circular film on the water surface that expands outward and then is contained by the previous colors already on the surface. Drop three to five drops of each color in a loose cluster rather than a grid, which produces more natural-looking marble veining during the swirl step than an evenly distributed pattern.
- Swirl the colors gently with a toothpick using long, curved strokes that pull the colors into each other without overblending — two to three swirl strokes produce beautiful marble veining; six or more strokes blend the colors into a muddy single tone that no longer reads as marble. The most spectacular marble patterns are produced by the least swirling; restraint here is the skill that produces the best results.
- Dip the clay dish face-down through the surface film in one smooth, confident motion — hold the dish by its bottom, lower it at a slight angle to the surface, and pull it through in a single fluid arc rather than pressing it straight down and lifting straight up. The angled dip-and-lift motion allows the polish film to wrap onto the dish interior in a single pass and produces better coverage than a perpendicular push-and-pull that can trap air bubbles between the dish and the film.
- Lift the dish straight up and out of the water in a single continuous motion — pausing mid-lift or changing direction allows the polish film to reattach to the water surface and pull away from the dish, leaving bare patches in the marble pattern. Set the marbled dish immediately on the wire rack face-up and do not touch the marbled interior surface for at least 30 minutes while the polish film cures.
- Clean the water surface between each dish by dragging a cotton ball or paper towel across it to collect the spent polish film — fresh polish dropped onto a surface with spent film from the previous dip produces muddied, unclear patterns rather than the crisp veining of a fresh surface. Replace the water entirely after every three to four dips if the water temperature or clarity has changed significantly from the initial condition.
- Seal all marbled dishes with two light coats of matte or gloss sealant spray after the polish has cured for a minimum of one hour — the sealant protects the nail polish pattern from scratching during daily use as a trinket and ring dish, and the choice between matte and gloss finish determines whether the piece reads as a natural stone aesthetic (matte) or a lacquered ceramic aesthetic (gloss). Allow the sealant to cure fully per the product label before the dishes are put into use or gifted.
Surface designers and craft instructors who teach nail polish marbling for ceramic and clay surfaces consistently recommend one color sequencing principle that produces the most sophisticated and authentic-looking marble patterns rather than the multicolor swirl that reads as obviously craft-made: choose one color as the dominant ground — typically white, cream, or a light neutral — and use it in a significantly larger quantity than the accent colors, which should be limited to one or two dramatic veining colors in much smaller amounts. Natural marble is predominantly one stone color with thin veins of one or two contrasting minerals; a marbled dish that uses equal quantities of four or five colors reads as a rainbow swirl rather than stone. Dropping the ground color first across the full water surface, then adding only a few drops of the veining colors and swirling sparingly, produces the specific depth and realism of natural marble that makes the finished pieces look genuinely expensive rather than crafted. Surface designers call this the "ground and vein" method, and it is the color ratio principle that separates marbled pieces that photograph as high-end ceramics from ones that photograph as school art projects — even when made with identical materials and technique.














