
Make Frozen Herb Butter Cubes in 30 Minutes for Almost Nothing
Softened butter, fresh herbs, an ice cube tray, and thirty minutes — the flavor upgrade that turns every weeknight dinner into something worth talking about
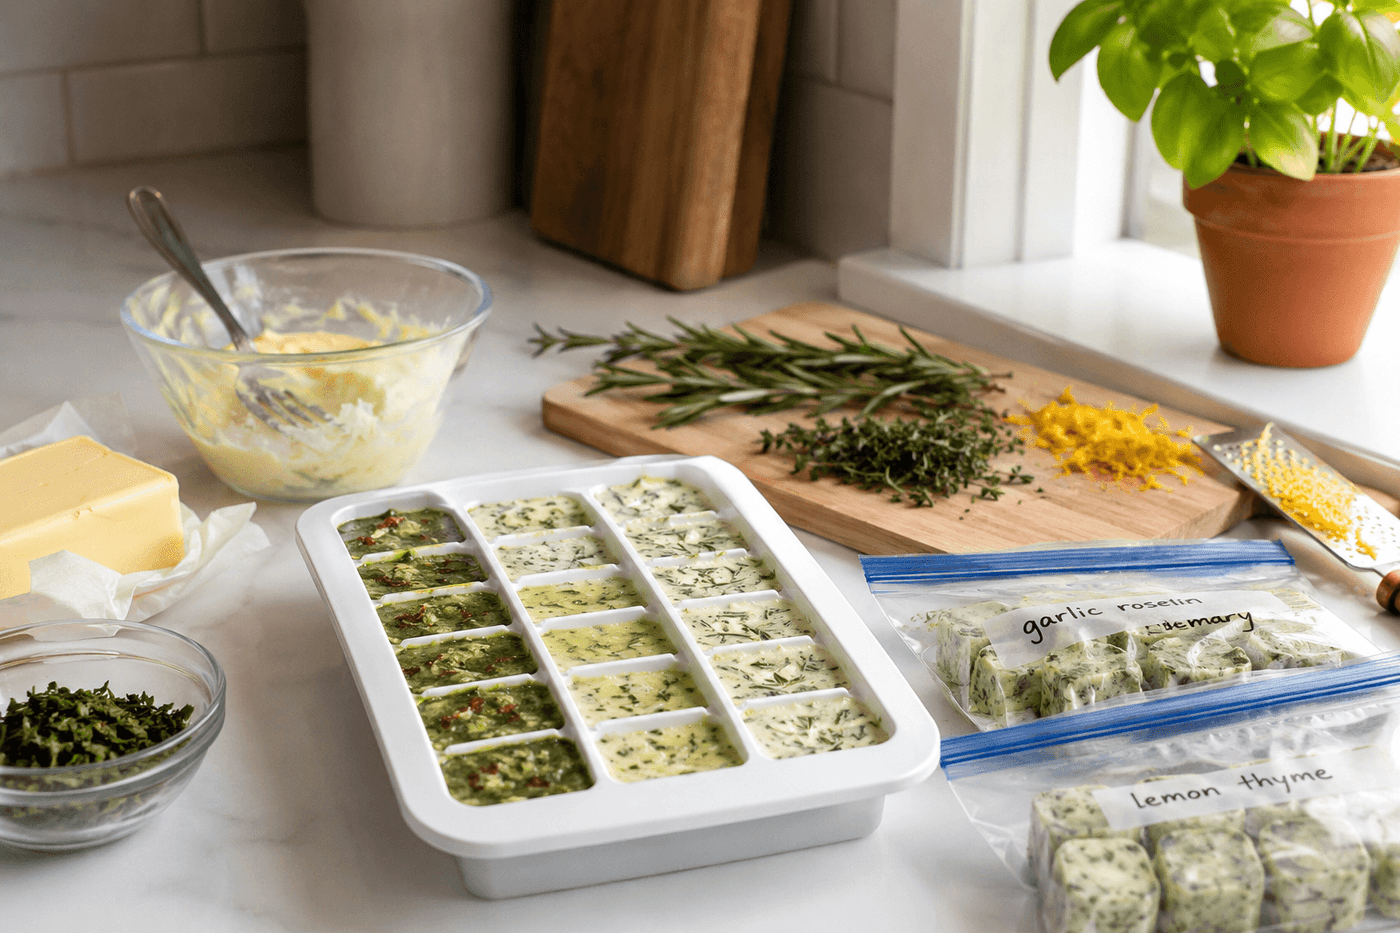
Compound butter — butter blended with fresh herbs, aromatics, and seasoning — is one of the professional kitchen's most effective flavor techniques, and freezing it in ice cube trays makes it available as a single-step flavor upgrade to any protein, pasta, or vegetable that comes off the grill or out of the pan on any given weeknight. Thirty minutes of prep at the height of the summer herb season produces enough frozen cubes to transform months of dinners, and the preservation process means the herbs that would otherwise bolt and go to waste in the garden instead become concentrated flavor that stores in the freezer for up to three months. A cube of garlic-rosemary butter melted over a grilled steak, a cube of lemon-thyme butter finishing a pan of chicken, a cube of basil-sun-dried tomato butter tossed through hot pasta — the difference in the finished dish is both immediate and dramatic, and the prep investment that produced it happened in a single thirty-minute session in the middle of July.
What You Need
- Unsalted butter, 2 sticks (1 cup) — unsalted allows precise seasoning control in the finished butter; salted butter can be used but produces a compound butter that may be too salty when a cube is used as a finishing element in already-seasoned dishes. Allow butter to soften at room temperature for one hour before beginning — properly softened butter incorporates herbs completely, while cold butter leaves herb pieces distributed unevenly through an incompletely blended mixture
- Fresh herbs, 2–4 tablespoons per stick of butter — from the garden or grocery store; the most versatile compound butter combinations are garlic and rosemary for red meat, lemon zest and thyme for poultry and fish, basil and sun-dried tomato for pasta, and chive and parsley for a classic all-purpose finishing butter that improves virtually anything
- Aromatics and flavor additions — minced garlic, lemon zest, finely grated Parmesan, capers, anchovy paste, or sun-dried tomatoes; additions that are finely minced or grated incorporate most evenly and melt cleanly from the frozen cube without leaving large pieces that cook unevenly in the pan
- Kosher salt and black pepper — for seasoning each butter blend; taste each mixture before filling the tray and season assertively, because freezing slightly mutes flavors and the butter will be used in small quantities as a finishing element rather than a primary seasoning
- Silicone ice cube tray — flexible silicone releases frozen butter cubes cleanly without requiring the twisting and force that rigid plastic trays use, which can cause butter cubes to break apart rather than releasing intact (~$8–10 for a good silicone tray if not already owned)
- Labeled zip-lock freezer bags — for storing the popped-out cubes after freezing; the label is essential — three months from now, garlic-rosemary and lemon-thyme look identical as frozen cubes and labeling at the time of making prevents the freezer mystery that turns a useful ingredient into an unknown quantity
How to Make Them
- Soften the butter completely at room temperature before beginning any herb preparation — butter that yields completely to a finger press without resistance is correctly softened for compound butter making. Cold butter that has been softened in the microwave develops a partially melted, greasy texture that prevents herbs from incorporating evenly and produces a compound butter with a separated, oily appearance in the finished cube rather than the smooth, fully blended texture that makes herb butter look and perform like a professional kitchen product.
- Prepare the herbs by washing, drying completely, and chopping finely — herb pieces that are too large don't distribute evenly through the butter and create pockets of concentrated herb flavor rather than the balanced blend that makes every bite of the finished dish taste equally good. Dry the herbs thoroughly after washing by spinning in a salad spinner and then pressing between paper towels; water in the herb preparation is the primary cause of the icy, separated texture that develops in compound butter cubes during freezing.
- Combine each herb blend with the softened butter in a small bowl, working the herbs through the butter with a fork or spatula until the mixture is completely uniform — no streaks of unmixed butter and no clumps of herb sitting on the surface of the mixture. The mixing is complete when a small taste from a spoon shows consistent herb distribution in every bite rather than alternating between plain butter and herb-heavy sections.
- Season each butter mixture assertively with kosher salt and black pepper before filling the tray — taste each blend and season until the flavor is noticeably more pronounced than you would normally use, because freezing mutes flavors measurably and the butter will be used as a single small cube finishing a whole portion of protein or pasta that needs that flavor impact to register through the other elements of the dish.
- Fill the ice cube tray by pressing each herb butter mixture into individual compartments with a spoon or small spatula, packing it firmly to eliminate air pockets and filling each compartment to level with the top of the tray. Overfilled compartments produce cubes that stick together after freezing; underfilled compartments produce cubes that are too small to deliver meaningful flavor impact when dropped into a hot pan or onto a piece of protein.
- Freeze the filled tray for a minimum of four hours before attempting to remove the cubes — butter requires longer to freeze solid than water, and cubes that are released from the tray before they are fully frozen deform and lose their cube shape in the storage bag, making it difficult to use a measured single cube when cooking. Overnight freezing is ideal; the cubes release most cleanly from silicone trays when they have been frozen completely through rather than partially.
- Release the frozen cubes from the silicone tray by flexing the tray base from underneath rather than pulling the cubes from above — the flexibility of silicone pushes the cubes upward out of the compartments in intact form, while pulling from above tends to break butter cubes that are firmly bonded to the tray walls. Transfer the released cubes immediately to labeled freezer bags, pressing out as much air as possible before sealing, and return to the freezer within five minutes to prevent any surface softening that causes cubes to stick together in the bag.
- Use the cubes directly from frozen — drop one onto a grilled steak or chicken breast in the last thirty seconds of cooking and allow it to melt over the surface as the protein rests, drop one into a hot pan with vegetables or pasta, or place one on top of a baked potato straight from the oven. The frozen cube melts in thirty to sixty seconds of contact with hot food, distributing the herb and aromatic flavors evenly across the dish surface in exactly the way that a professional kitchen relies on compound butter to finish and elevate proteins before they leave the pass.
Professional chefs who make compound butter for restaurant service always add a small amount of neutral oil — about one teaspoon of grapeseed or avocado oil per stick of butter — to the mixture before filling the tray. The added oil lowers the freezing point of the compound butter slightly, which produces cubes that melt and spread more quickly over hot food than pure butter cubes that can take thirty to sixty seconds to begin melting on a protein surface. The oil also prevents the cubes from becoming so hard in the freezer that they crack rather than release cleanly from the tray, and it contributes to the glossy, sauce-like finish that melted compound butter produces on a plated protein — the visual quality that distinguishes a restaurant-finished dish from a home-cooked one at the moment of serving.














