Grow a Mason Jar Windowsill Herb Garden for $10
Six jars, six herbs, one sunny windowsill — fresh basil and thyme within arm's reach every time you cook for under $10
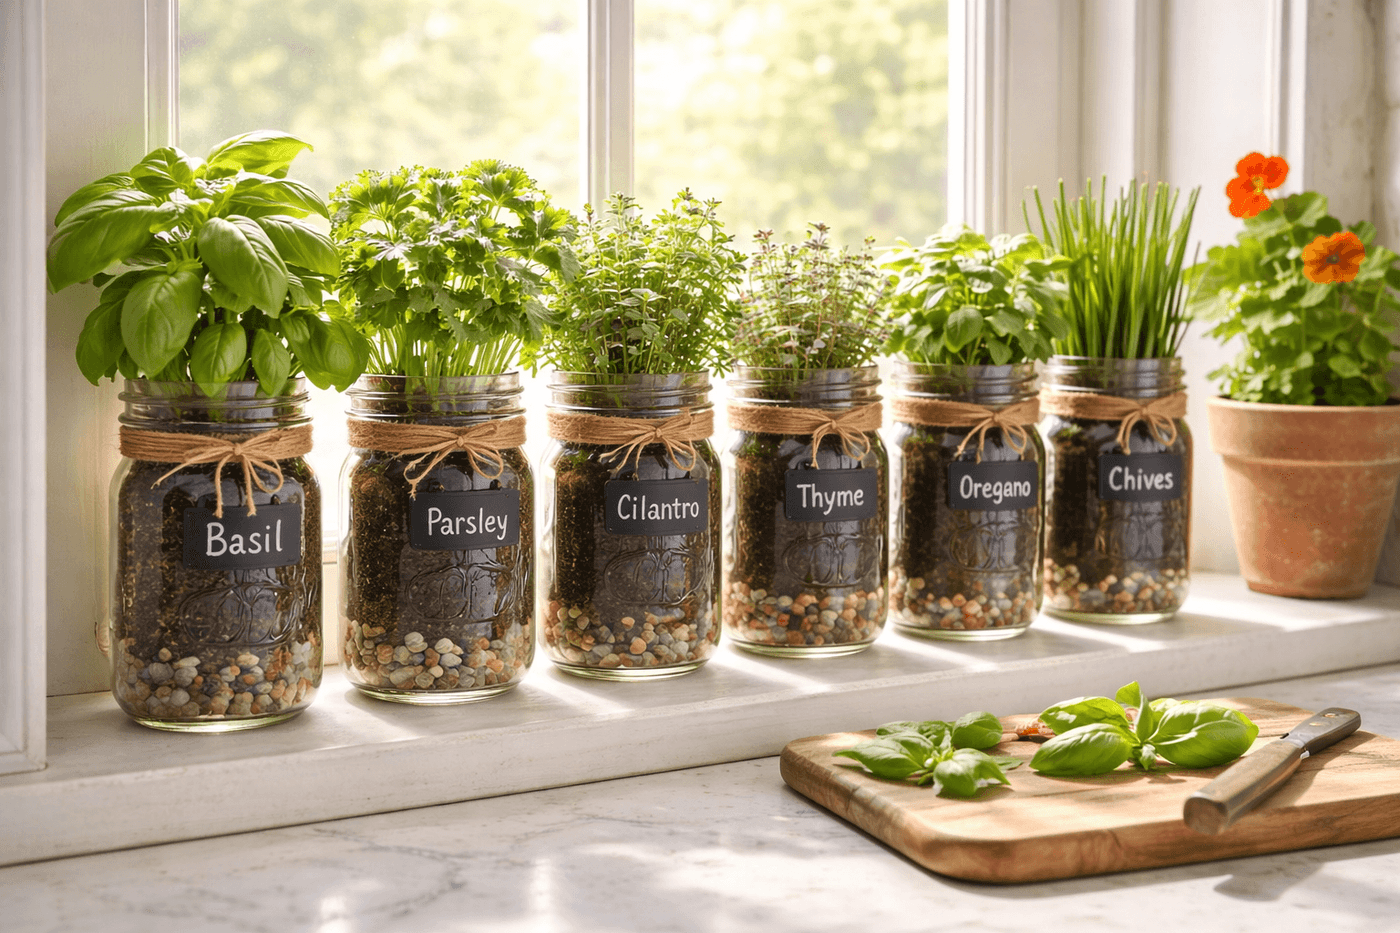
The difference between cooking with fresh herbs and cooking with dried herbs from a jar is the difference between a dish that tastes like you made it and one that tastes like you assembled it — and a six-jar windowsill garden sitting twelve inches from your stove makes fresh herbs so immediately accessible that you actually use them rather than planning to use them and then reaching for the dried version because the fresh ones are in the other room. Mason jars from the dollar store, a layer of pebbles for drainage, potting soil, and one herb starter per jar build into a complete kitchen herb garden for about $10 — a fraction of the pre-planted herb kit prices at garden centers, and with the specific herbs you actually cook with rather than whatever the kit happened to include. The glass jars let you monitor soil moisture at a glance without digging, the row of different green textures and heights on a windowsill is genuinely beautiful, and snipping what you need directly into the pan while something is on the stove is a kitchen experience that changes how you cook every day from that morning forward.
What You Need
- Mason jars or glass jars, wide-mouth, qty 6 — wide-mouth quart jars give roots the most growing room; standard mason jars, pasta jars, and large pickle jars all work. Wide-mouth openings make planting and maintenance significantly easier than narrow-mouth jars where the opening restricts access to the soil (~$1–2 each at dollar stores)
- Small pebbles, gravel, or coarse sand, 1–2 cups — for the drainage layer at the jar base; without drainage holes, a pebble layer creates a reservoir space below the root zone that prevents roots from sitting in standing water after watering (~$1–2 for a small bag)
- Potting mix, small bag — not garden soil, which compacts in containers and drains poorly in an enclosed jar; a quality potting mix with perlite maintains the loose, well-aerated structure that herb roots need in a confined space (~$4–6 for a small bag that fills all six jars)
- Herb starter plants, one per jar — basil, parsley, cilantro, thyme, oregano, and chives are the most useful kitchen herbs; keep mint in its own jar as it spreads aggressively and will dominate any pot it shares (~$2–3 per starter from a garden center, or check dollar stores in spring)
- Chalkboard labels or painter's tape and a marker — for labeling each jar; herbs look similar enough as young plants that unlabeled jars become a guessing game within the first week (~$2–3 for chalkboard label stickers)
- Natural twine — for wrapping jar necks as a decorative finish that gives the windowsill collection a cohesive, styled look (~$2 for a small roll)
- Activated charcoal, small amount — optional but beneficial; a thin layer of activated charcoal between the pebble drainage layer and the potting soil absorbs the bacterial byproducts that cause sour soil smell in containers without drainage holes over time (~$4–6 for a small bag that lasts through many plantings)
How to Plant Them
- Layer one inch of pebbles or coarse gravel in the base of each clean, dry jar before adding any soil — the pebble layer creates a drainage reservoir below the soil column where excess water collects rather than remaining in the root zone. Without this layer, overwatering in a drainage-free container saturates the entire soil column and keeps roots in standing water long enough to cause the root rot that is the most common cause of herb failure in jar gardens.
- Add a thin layer of activated charcoal over the pebbles if using it — approximately a quarter inch is sufficient to provide the bacterial filtering benefit without reducing the available soil depth significantly. This optional step extends the functional life of a jar planting from one to two seasons by preventing the anaerobic bacterial buildup that causes the sour smell that develops in enclosed containers over time, especially in kitchens where ambient temperatures accelerate bacterial activity.
- Fill each jar with potting mix to within two inches of the rim — leaving headspace above the soil for watering without overflow and for the root ball of the starter plant that will be settled into the soil. Pack the potting mix lightly rather than firmly; dense, compacted potting mix in a jar restricts root growth and drainage in the same way garden soil does, while loosely settled mix allows roots to spread and water to percolate through the soil column toward the drainage layer below.
- Plant one herb starter per jar by pressing a depression in the center of the potting mix, removing the starter from its nursery cell by gently squeezing the base, and settling the root ball into the depression so the crown of the plant — where stem meets root — sits at soil level rather than buried below it or elevated above it. Firm the potting mix gently around the root ball to eliminate air pockets while keeping the mix loose enough that the first watering can percolate through rather than sitting on the surface.
- Water each planted jar carefully and sparingly — drizzle water slowly around the base of the plant stem and stop when you see water beginning to pool at the soil surface before it percolates down. Jar gardens without drainage holes require significantly less water than pots with drainage because there is no outlet for excess moisture; the correct watering amount is enough to moisten the full soil column without adding enough to fill the drainage reservoir completely, which is visible through the glass as water collecting around the pebbles at the jar base.
- Label each jar immediately after planting with a chalkboard label or tape flag marked with the herb name — do this before moving the jars to the windowsill, while you can still clearly remember which herb went where. Young herb starter plants look remarkably similar across species for the first two to three weeks before the foliage character of each herb becomes distinctive, and unlabeled jars of similar-looking seedlings become genuinely difficult to identify correctly within days of planting.
- Wrap twine around the neck of each jar below the threads for a finished, cohesive look — wind the twine three or four times around the jar neck and tie it off with a simple knot, cutting the tails to a uniform short length across all six jars. The twine detail unifies jars of different original sizes and origins into a collection that reads as intentionally styled rather than assembled, which is the difference between a windowsill that looks designed and one that looks improvised.
- Position the finished jars on a south-facing windowsill where they will receive a minimum of six hours of direct sun daily — most culinary herbs are Mediterranean in origin and require substantial direct light to produce the essential oils that give them their flavor. A windowsill that receives fewer than four hours of direct sun produces leggy, flavorless herbs that stretch toward the light at the expense of the compact, bushy growth that makes a kitchen herb jar both productive and attractive. Rotate the jars a quarter turn every few days so all sides of each plant receive equal light exposure and the growth stays upright and even rather than leaning strongly toward the window.
Culinary herb specialists who supply fresh herbs to restaurant kitchens always harvest from the top of each plant rather than from the sides or lower stems, and they harvest frequently — every five to seven days — rather than waiting until the plant looks ready to be cut. Top harvesting removes the growing tip of each stem, which triggers the plant to branch below the cut and produce two new growing stems where one existed before. A jar herb plant harvested from the top every week becomes progressively bushier and more productive with each harvest cycle; the same plant harvested infrequently from the sides stays single-stemmed and eventually bolts to seed without ever achieving the dense, full growth that makes a windowsill jar garden look as lush and productive as the ones in food magazine photographs.