
Go With the Flow: Build a Rain Garden This Weekend
Stop fighting your yard's low spot and work with it instead — a shallow bowl of native plants that turns a drainage problem into the most beautiful garden feature you own
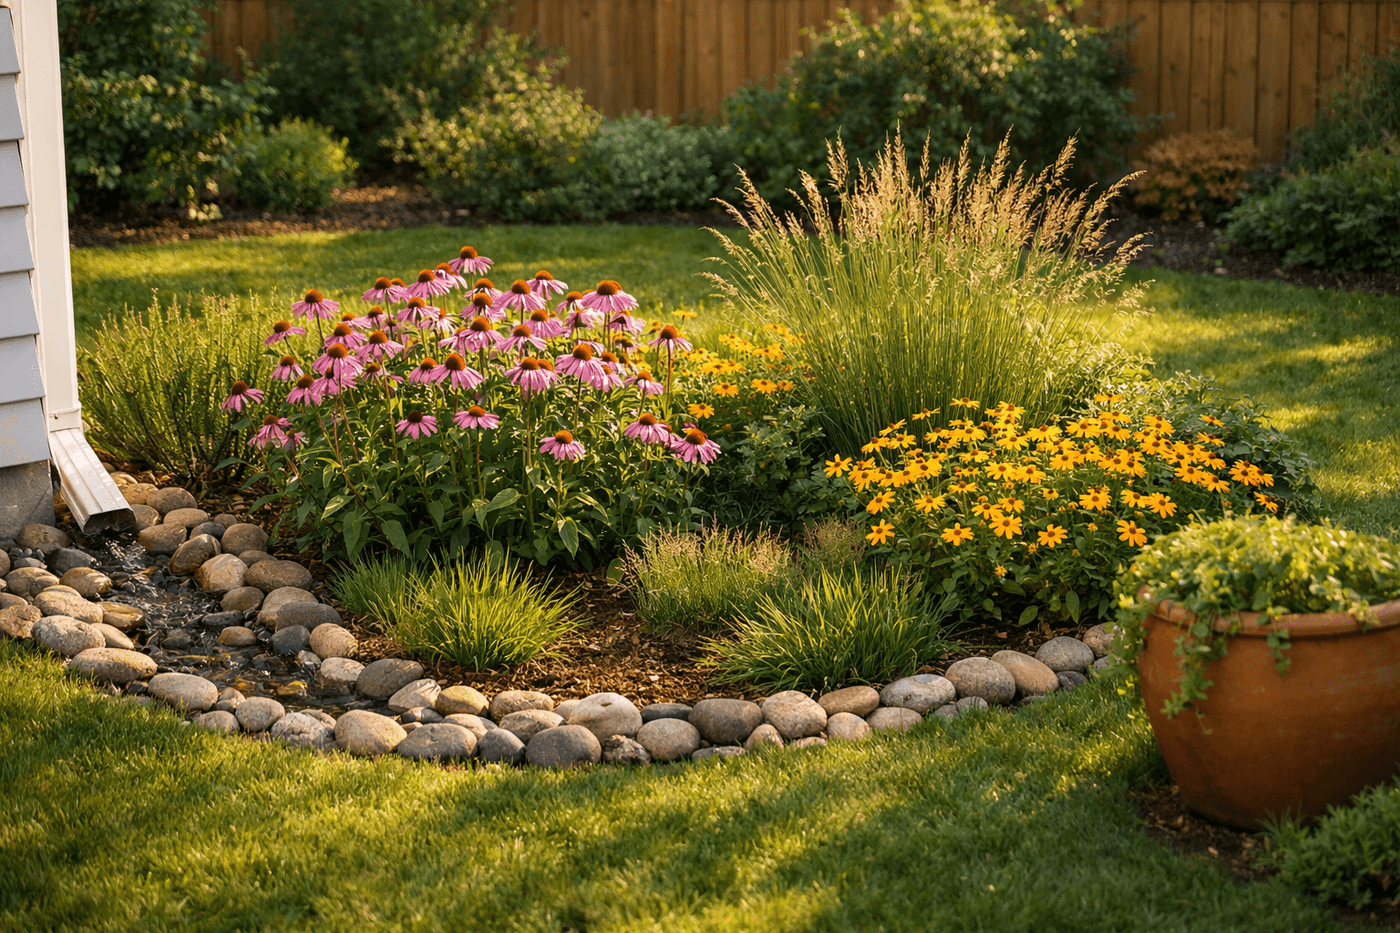
Most yard drainage problems get addressed by trying to move water somewhere else — extending downspouts, installing French drains, grading soil away from problem areas — and most of those solutions work adequately until the next heavy rain when the water finds the next low spot and the problem migrates rather than resolves. A rain garden takes the opposite approach: instead of fighting where the water naturally wants to go, you meet it there and give it something useful to do. A shallow bowl-shaped depression filled with amended, fast-draining soil and planted with native species whose deep root systems are specifically evolved to handle cycles of flooding and drought captures runoff, filters it naturally through the soil, and sends it into the groundwater system rather than across the surface into storm drains. The process takes a weekend, costs about $95 in plants and materials plus a sod cutter rental, and permanently converts your most frustrating drainage problem into what will become your favorite garden — full of native plants that attract pollinators all season and require almost no maintenance once established.
What You'll Need
- Equipment
- A sod cutter rental for removing the existing lawn from the garden footprint — ~$35–$50 for a half-day rental at a hardware store. A sod cutter makes clean work of what would otherwise be hours of mattock and shovel labor, and the cut sod can be composted or used to patch bare spots elsewhere in the yard
- A flat spade and a round-point shovel for shaping the bowl depression after the sod is removed — the flat spade cuts clean vertical edges while the round-point moves excavated soil efficiently
- A wheelbarrow for moving excavated soil and amended planting mix to and from the site
- A level and a long straight board for checking that the bowl is genuinely bowl-shaped rather than tilted — a rain garden that slopes toward one side drains unevenly and plants on the high side stay too dry while the low side stays too wet
- Soil Amendment
- A rain garden soil mix consisting of approximately 50–60% sand, 20–30% compost, and 20% existing native soil — this blend drains fast enough to empty the bowl within 24–48 hours after a rain event, which is the performance standard that keeps a rain garden functioning as a garden rather than a permanent pond — two to three bags of coarse sand (~$5–$7 each) and one to two bags of compost (~$6–$8 each) amend a standard 10x6 foot rain garden to the correct drainage profile
- Avoid pure topsoil or standard garden soil as the rain garden fill — both drain too slowly for the bowl to empty between rain events and subject plant roots to extended inundation that even native wetland plants can't tolerate indefinitely
- A 2–3 inch layer of shredded bark mulch for the planted surface — suppresses weeds during plant establishment, retains moisture between rain events, and gives the finished garden a polished, intentional appearance — ~$8–$12 for two to three bags
- Native Plants — Choose for Your Region
- Purple coneflower (Echinacea purpurea) — one of the most reliably rain garden-tolerant native perennials across most of North America, blooming midsummer through fall with deep tap roots that handle both flooding and dry periods equally well — ~$5–$8 per plant
- Switchgrass (Panicum virgatum) — a native grass with deep fibrous roots that filter runoff particularly effectively, dramatic fall color, and winter seed heads that feed birds through the cold season — ~$6–$10 per plant
- Black-eyed Susan (Rudbeckia hirta) — fast-establishing, drought-tolerant once rooted, and one of the most prolific pollinator plants available for a Midwestern or Eastern North American rain garden — ~$4–$6 per plant
- Blue wild indigo (Baptisia australis), Joe Pye weed (Eutrochium purpureum), and swamp milkweed (Asclepias incarnata) are excellent additions for regions with more prolonged wet periods — check with a local native plant nursery for species specific to your hardiness zone and soil type
- Budget approximately $50–$60 for enough plants to cover a standard 60 square foot rain garden at 18–24 inch spacing — buying small one-gallon plants rather than larger containers reduces cost significantly with only a minor difference in establishment time
- Edging & Drainage
- Natural stone, steel edging, or river rock border along the uphill edge of the garden to define the transition between lawn and rain garden clearly — river rock along the inlet channel where the downspout or driveway runoff enters the garden prevents soil erosion at the entry point — ~$10–$20 for a bag of river rock
- An overflow channel cut or shaped into the downhill edge of the bowl — a low point in the bowl rim that directs overflow away from the house foundation during exceptionally heavy rain events that exceed the garden's absorption capacity
How to Build It
- Test the drainage rate of your existing soil before any digging — dig a test hole 12 inches deep at the proposed rain garden location, fill it with water, and time how long it takes to drain completely. Soil that drains 12 inches of water in 24 hours or less is suitable for a rain garden with moderate amendment; soil that holds water for more than 48 hours has a hardpan or clay layer that requires more significant amendment or an alternative location. Skipping this test and discovering poor drainage after planting is the most common rain garden installation mistake.
- Mark and size the garden footprint before renting the sod cutter — a rain garden should be sized to handle the runoff from its contributing drainage area, with a rough rule of thumb of one square foot of rain garden for every ten square feet of impervious surface draining into it. For a standard residential downspout serving a typical roof section, a garden of 50–100 square feet handles most rain events without overflow. Mark the footprint with spray paint or a garden hose laid in an oval or kidney shape, and confirm the marked area is entirely downhill from the water source with no part of the perimeter closer than 10 feet to the house foundation.
- Remove the sod with the rented cutter on Day One — run the sod cutter across the marked footprint in parallel passes, roll the cut sod sections and stack them outside the work area for composting or relocation. A sod cutter makes cleaner, faster work of this step than any hand tool, and the rental cost is the most efficient labor investment in the entire project. Remove all sod roots from the excavated area before moving to the shaping step, since any surviving grass roots will establish through the amended soil and compete aggressively with your native plants during the establishment period.
- Excavate and shape the bowl to a depth of 6–8 inches at the center, tapering to grade level at the perimeter — the bowl shape is what creates the water-holding capacity that allows the garden to function. Check the bowl shape with your level and straight board by laying the board across the bowl opening in multiple directions to confirm the rim is level all the way around, with the exception of the intentional overflow channel cut into the downhill rim. A level rim means the garden fills evenly from the center outward; an uneven rim means all incoming water immediately flows to the low point and plants on the high side receive no runoff benefit at all.
- Loosen the bowl floor thoroughly with a fork or broadfork to a depth of 8–12 inches below the excavated surface — compaction at the bowl floor is what causes slow drainage even in soils that otherwise drain reasonably well, and loosening the subsoil before adding the amended fill mix dramatically improves the infiltration rate of the finished garden. This step is particularly important in yards with clay subsoil where heavy equipment or years of foot traffic have created a compacted layer just below the root zone.
- Mix and install the amended soil by combining your sand, compost, and native soil in the correct proportions and spreading the blend into the excavated bowl to bring the surface level back to approximately 4–6 inches below the surrounding grade — leaving this depression is what gives the garden its water-holding capacity after planting and mulching. Rake the amended mix smooth and firm it gently with the back of the rake rather than walking on it, which would recompact the soil structure you just created.
- Plant from the center outward with your moisture-tolerant species — plants that tolerate the most extended inundation go in the center of the bowl where water pools deepest and longest, with progressively more drought-tolerant species planted toward the bowl rim where the soil dries out more quickly between rain events. This zone planting approach matches each plant's water tolerance to the actual moisture conditions it will experience, which is why well-designed rain gardens establish quickly and require minimal supplemental watering once rooted — each plant is in its optimal moisture zone from day one.
- Mulch, edge, and establish the inlet — spread 2–3 inches of shredded bark mulch over the full planted surface keeping it away from plant crowns, lay river rock along the inlet channel where runoff enters the garden to prevent erosion, and install your chosen edging material along the uphill perimeter. Water the entire garden thoroughly on the day of planting and every three to four days for the first four weeks of establishment — after the first full season, native plants in a properly sited rain garden typically require no supplemental watering at all, which is the maintenance-free payoff for the weekend of installation work.
Landscape architects who design rain gardens for municipal and residential stormwater management projects use a plant selection principle that makes residential rain gardens dramatically more functional and more beautiful than the standard coneflower-and-switchgrass combination most DIY guides recommend — and it comes down to structural layering. A rain garden planted with only one height class of plants reads as flat and undifferentiated at every season; one that includes a tall back layer (6–8 foot grasses or Joe Pye weed), a mid-height flowering layer (coneflowers, black-eyed Susans, cardinal flower), a low edge layer (creeping Jenny, blue-eyed grass, wild ginger), and a ground cover layer (native sedges, Pennsylvania sedge) creates a layered garden structure that has visual interest at every height, filters runoff through multiple root depths simultaneously for better water quality, and provides habitat value for a far wider range of native insects and birds than a single-height planting. The practical tip that most homeowners miss when sourcing plants: contact your local cooperative extension office or state native plant society before buying — many regions have subsidized native plant programs that provide rain garden species at significantly reduced cost or even free of charge as part of stormwater reduction initiatives, and the extension office can also identify the specific native species that perform best in your soil type and hardiness zone rather than the generic national recommendations that may not be optimally suited to your specific conditions.














