
DIY Projects

Recent Content

Shoe Bench Build: The Cubby Depth That Keeps Pairs Upright

Shoe Bench Build: The Cubby Depth That Keeps Pairs Upright

Build a wooden entryway shoe bench for $35—the cubby depth is what keeps boots standing instead of toppling into a pile every morning.

Style a Layered Nightstand Vignette in 1 Hour for $35

Style a Layered Nightstand Vignette in 1 Hour for $35

Turn a cluttered nightstand into a cozy styled vignette with the height-rule trick—1 hour, $35, instant bedroom upgrade.

The Cafe Rod Trick for a Fake Built-In Vanity

The Cafe Rod Trick for a Fake Built-In Vanity

Fake a built-in bathroom vanity shelf with a tiny cafe rod and basket—zero drilling, zero suction cups, full deposit intact.

Tension Rod Shelf: The Rod Width That Won't Slip

Tension Rod Shelf: The Rod Width That Won't Slip

Build a hidden double-decker shelf under your sink for $6—the rod tension width is what keeps it from crashing down on cleaning day.

Mulch Perennial Beds for Winter in 1 Hour for $25

Mulch Perennial Beds for Winter in 1 Hour for $25

Tuck your perennials in right! A 3-inch mulch blanket now saves roots from winter heave for about $25.

logo
  • Home Improvement
  • DIY Projects
  • Interior Design
  • Gardening & Outdoor
  • Real Estate
  • Home Improvement
  • DIY Projects
  • Interior Design
  • Gardening & Outdoor
  • Real Estate
  • ​

Garden Color Pop: How to Create Eye-Catching Painted Pots

Transform plain planters into personalized works of art
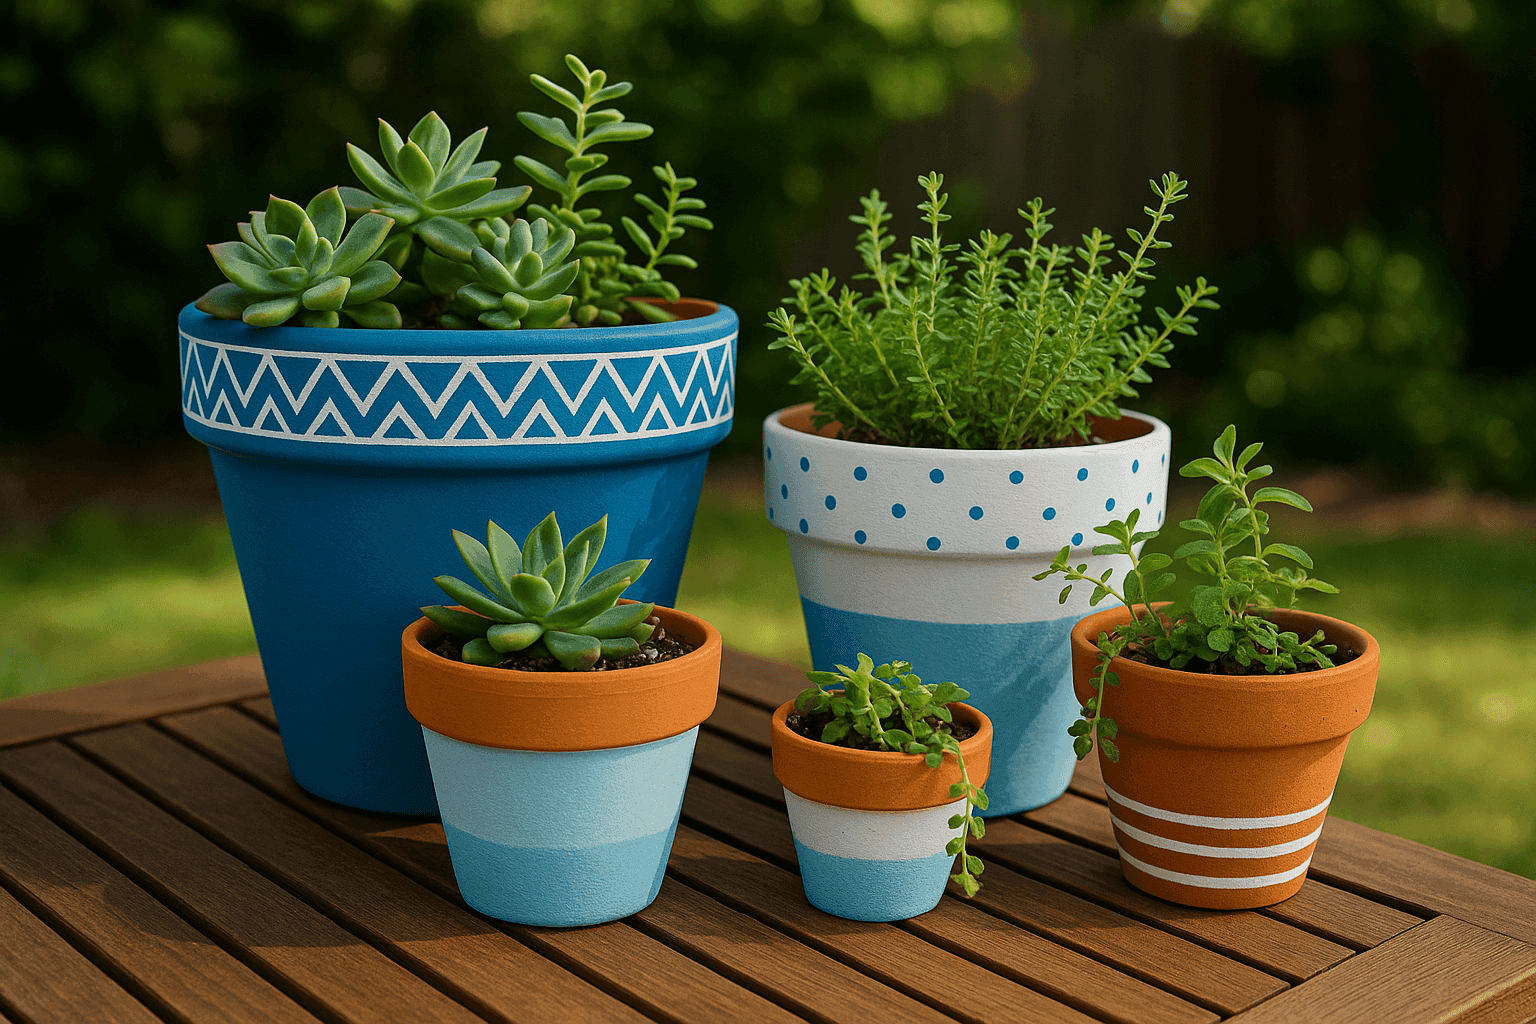
Colorful painted terracotta pots with plants
DIY PROJECTS

Plain terracotta or plastic pots are functional but often lack personality. With a little creativity and paint, you can transform ordinary planters into vibrant focal points that complement your plants and express your personal style. This simple weekend project allows you to coordinate containers with your outdoor color scheme, create themed collections, or simply add cheerful accents to your garden or patio—all without breaking the budget.

What You'll Need

• Terracotta or plastic pots (clean and dry)
• Sandpaper (medium grit)
• Outdoor acrylic paint in your chosen colors
• Primer suitable for your pot material
• Clear outdoor sealer/varnish
• Paintbrushes in various sizes
• Painter's tape
• Stencils (optional)
• Craft sponges (for dabbing/stippling)
• Small containers for mixing paint
• Drop cloth or newspaper
• Clean rags or paper towels

How To Do It

  1. Prepare your workspace: Cover your work surface with a drop cloth or newspaper. Ensure good ventilation, especially when applying sealers.
  2. Clean and prep the pots: Wash pots thoroughly and let dry completely (24 hours for terracotta). Lightly sand the surface to create texture for better paint adhesion.
  3. Apply primer: For terracotta pots, apply a coat of primer to seal the porous surface and provide a neutral base for your colors. For plastic pots, use a primer specifically designed for plastic surfaces.
  4. Plan your design: Decide on a pattern or color scheme before you begin. Simple designs often look most professional—consider color blocking, stripes, ombré effects, or geometric patterns.
  5. Create your design:
    • For color blocks: Use painter's tape to create clean lines between different colors.
    • For stripes: Wrap tape around the pot at measured intervals.
    • For polka dots: Use a round sponge dauber or the eraser end of a pencil.
    • For ombré effect: Blend colors while still wet, gradually transitioning from one shade to another.
    • For detailed designs: Use stencils or free-hand with a small brush.
  6. Apply paint in thin layers: Use thin, even coats rather than one thick layer. Allow each coat to dry completely before applying additional layers or adding details.
  7. Add finishing touches: Once your base design is dry, add any detailed elements, such as small floral designs, patterns, or hand-lettered words.
  8. Seal your work: Apply 2-3 coats of clear outdoor sealer to protect your design from moisture, UV rays, and soil. Pay special attention to the inside rim and outside bottom where moisture contact is highest.
  9. Allow to cure: Let the sealed pots cure for 2-3 days before planting. This ensures the sealer is fully hardened and waterproof.
  10. Plant and display: Add drainage material, potting soil, and your chosen plants. Arrange your painted pots in groups for maximum visual impact.
DESIGNER TIP

For a cohesive, designer look, create a collection of pots in varying sizes that share a color palette but feature different patterns. This creates unity while maintaining visual interest. Consider selecting colors that either complement your flowers (opposite on the color wheel for dramatic contrast) or match your home's exterior accents. For modern appeal, try color-blocking with crisp, geometric designs in bold colors with white accents. For a more bohemian look, embrace fluid patterns in earth tones with metallic gold details. Remember that the plant should still be the star—your pot design should enhance, not compete with, its natural beauty.


Related Content

DIY Projects

04 November 2026

Post

Shoe Bench Build: The Cubby Depth That Keeps Pairs Upright

Build a wooden entryway shoe bench for $35—the cubby depth is what keeps boots standing instead of toppling into a pile every morning....

DIY Projects

03 November 2026

Post

Tension Rod Shelf: The Rod Width That Won't Slip

Build a hidden double-decker shelf under your sink for $6—the rod tension width is what keeps it from crashing down on cleaning day....

DIY Projects

01 November 2026

Post

Sew Flannel Pajama Pants in 3 Hours for $25

Ditch store PJs! Sew cozy flannel pajama pants with an elastic waist in 3 hours for about $25 — perfect for chilly November nights....

DIY Projects

31 October 2026

Post

Build a Trick-or-Treat Bucket Lantern in 1 Hour for $15

Light up Halloween night with a glowing trick-or-treat bucket lantern—1 hour, $15, and way safer than a candle in a pumpkin....

DIY Projects

30 October 2026

Post

Pour Pumpkin Spice Candles in 1 Hour for $15

Ditch the $28 mall candle—pour your own pumpkin spice soy candles at home for $15 and fill your house with fall in an hour....

DIY Projects

29 October 2026

Post

Tabletop Zen Garden: The Sand Depth That Holds Lines

Build a calming tabletop zen garden for $15—the sand depth is the one thing that decides if your rake lines actually hold or vanish....

DIY Projects

28 October 2026

Post

Wooden Dish Rack: The Dowel Angle That Drains Right

Build a slatted wood dish rack for $18—the dowel tilt angle is what actually drains water into the tray instead of pooling on your counter....

DIY Projects

27 October 2026

Post

Pool Noodle Knife Block: The Slice Depth That Stops Wobble

Turn a $1 pool noodle into a safe knife block—the slice depth is what keeps blades from wobbling loose or slicing through the foam....

DIY Projects

27 October 2026

Post

Build a Wooden Pie Carrier in 2 Hours for $25

Never smash a pie in the car again! Build a snug wooden pie carrier in 2 hours for $25—perfect timing for fall potlucks....

DIY Projects

26 October 2026

Post

Make Herb-Infused Honey in 30 Minutes for $12

Turn raw honey into a cold-season secret weapon—infuse it with thyme and ginger in 30 minutes for about $12, no fancy gear needed....

DIY Projects

25 October 2026

Post

Make Homemade Fire Cider in 20 Minutes for $15

Steep this spicy apple cider vinegar tonic now so it's ready to fight off fall colds in 4 weeks—20 minutes, $15, zero cooking skills....

DIY Projects

23 October 2026

Post

Build a Freestanding Coat Rack in 2 Hours for $35

Sick of coats piled on chairs? Build a sturdy freestanding coat rack in 2 hours for $35 — no wall drilling, just solid joinery....

DIY Projects

22 October 2026

Post

Window Frame to Pet Gate: The Hinge Set That Holds

Turn an old wooden window frame into a swinging pet gate for $22 — the hinge mortise depth is what keeps it from sagging open over time....

DIY Projects

22 October 2026

Post

Make Spiced Homemade Applesauce in 1 Hour for $12

Turn a bag of fall apples into silky spiced applesauce in an hour for $12 — no peeling required if you've got the right tool....

DIY Projects

21 October 2026

Post

Floating Nightstand: The Bracket Depth That Holds Weight

Build a wall-mounted wooden nightstand for $25 — the bracket depth inside the wood is what stops it from sagging under a lamp and books....
Terms and ConditionsDo Not Sell or Share My Personal InformationPrivacy PolicyPrivacy NoticeAccessibility NoticeUnsubscribe
Copyright © 2026 DIY HomeBoost












