
Firework Welcome Mat: Bold Entry for $18
A plain coir mat, outdoor acrylic paint, and zero apology — and your front door announces the holiday before anyone even rings the bell.
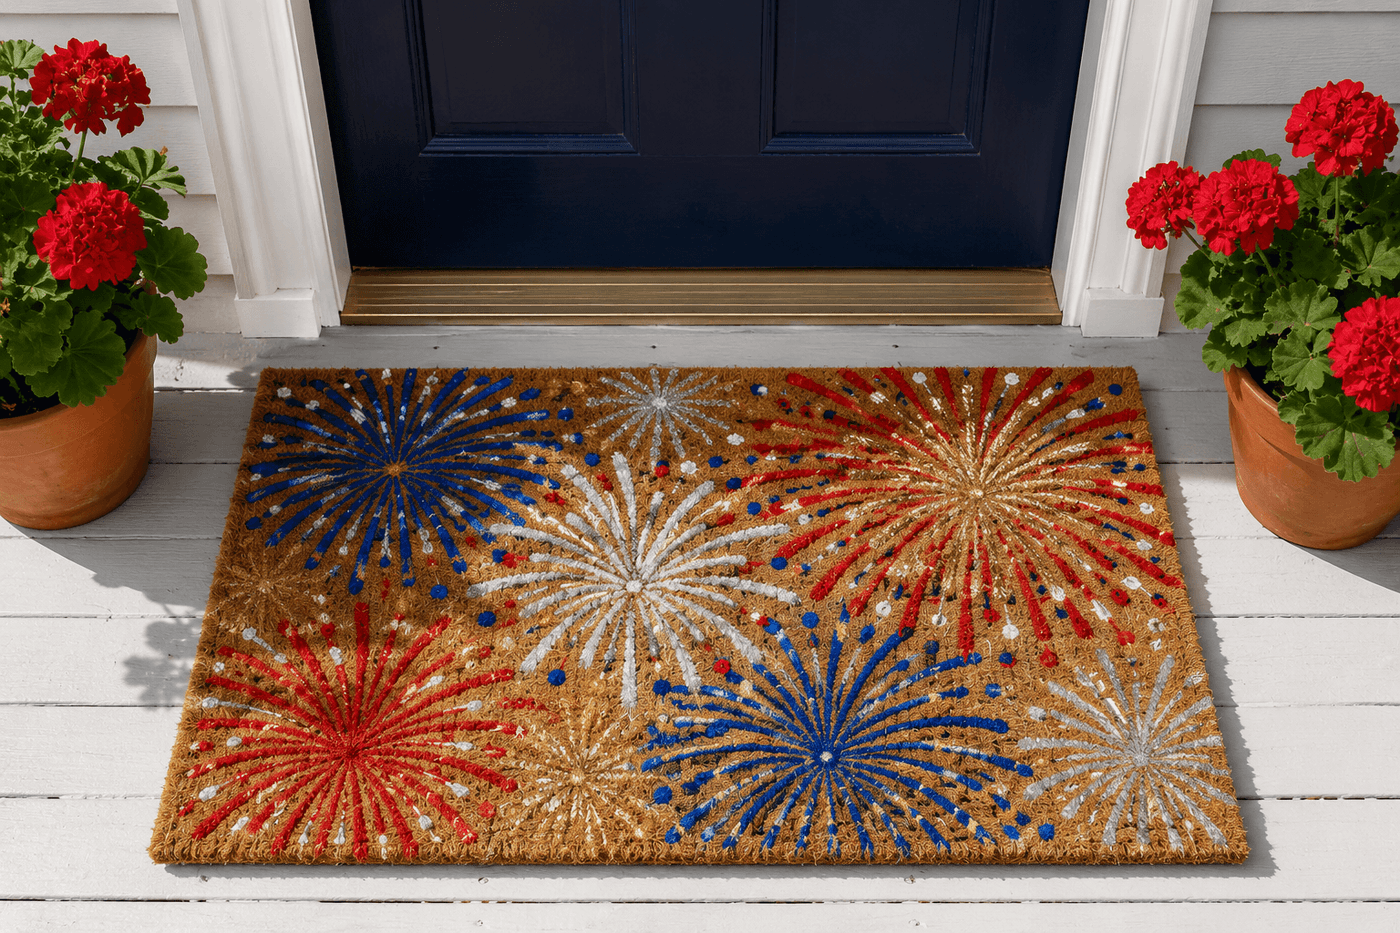
Seasonal designer doormats cost $30–40 for something mass-produced that your neighbors probably already have — and a hand-painted coir mat with explosive firework bursts across the full surface costs $15–20, takes a couple of hours, and is the only one on the street because you made it exactly the way you wanted it. The firework burst is one of the most forgiving decorative motifs available to a first-time mat painter: radiating lines from a center point with dots at the ends reads as firework at any level of precision, which means energetic and confident freehand brushwork produces results that look better than careful tentative lines. Go bold, go overlapping, add metallic gold and silver accents that catch the afternoon light on the porch, and cover enough of the mat surface that the design reads from the street rather than only up close. A clear outdoor sealer over the fully dried paint locks everything in place through foot traffic, summer rain, and the full July 4th entertaining season — and keeps the mat looking good through the rest of summer long after the holiday is technically over. Neighbors will ask. That is the intended outcome.
What You'll Need
- Plain coir doormat — natural fiber coir accepts outdoor acrylic paint far better than synthetic mats; look for a flat, tightly woven coir surface rather than a looped or heavily textured one, which makes brush control difficult; standard 18"x30" size works well for a full firework design (~$8–12 at hardware stores or Amazon)
- Outdoor acrylic paint — five colors:
- Bright red — DecoArt Outdoor Living or Folkart Outdoor in red (~$3–4)
- Crisp white — the highest-contrast color against natural coir; use generously for lines that read clearly (~$3–4)
- Cobalt or navy blue — deeper blue reads more boldly on coir than bright royal blue (~$3–4)
- Metallic gold — DecoArt Dazzling Metallics or similar; adds the accent shimmer that elevates the design from craft project to intentional statement (~$3–4)
- Metallic silver — same brand; pairs with gold for the starburst dot accents at firework line ends (~$3–4)
- Fan brush — the ideal tool for painting radiating firework lines in a single stroke; one loaded fan brush pass from center outward produces the splayed, energetic line cluster that defines the firework burst silhouette (~$2–4)
- Round brush, size 4–6 — for individual radiating lines and for the dot clusters at burst ends that read as exploding sparks
- Flat brush, ½ inch — for filling in larger burst center areas and for any background color blocking if desired
- Chalk or light pencil — for lightly marking burst center points across the mat surface before painting; chalk disappears under paint and prevents guesswork about burst placement once brushes are loaded
- Clear outdoor sealer spray — applied in two coats after full 24-hour paint cure; the sealer is what determines whether the design survives a summer of foot traffic or fades and flakes within two weeks (~$6–8)
- Palette or paper plates — for loading brush colors; keep a separate plate per color to prevent muddying the metallic accents with the primaries
How to Paint It
- Prepare the mat by laying it flat on a protected outdoor surface or garage floor — coir releases fine fiber dust during painting that stains indoor floors, and the outdoor sealer application at the end produces fumes that require ventilation. Press the mat flat with your hands to confirm it lies without curling at the edges, which causes uneven paint application if the surface isn't fully in contact with the work surface underneath.
- Plan your burst placement by marking five to seven center points across the mat surface with chalk — vary the positions asymmetrically rather than evenly spacing them in a grid, which reads as mechanical and template-produced rather than energetic and hand-painted. A large central burst, two medium bursts flanking it, and two to three smaller accent bursts toward the corners creates the asymmetric composition that reads as bold and intentional from the street rather than cautious and centered.
- Paint the largest burst first using the fan brush loaded with your primary color — position the brush tip at the chalk center point, press the fan bristles lightly against the mat surface, and pull outward in a single stroke away from the center in one direction. Rotate slightly and repeat, working all the way around the center point to build the full radiating burst. Each fan brush stroke produces a cluster of parallel lines that reads as a firework ray; eight to twelve strokes around a center point produces a full burst with the characteristic density of a real firework explosion.
- Layer a second color over the first burst while the first is still slightly wet — the colors blend at the overlap points and produce the smoky, luminous quality of real fireworks that a single flat color cannot achieve. Red over a white base, blue over red, or white over blue are the combinations that produce the most dramatic color contrasts; avoid layering the metallics wet-on-wet with the primaries, which muddies the metallic sheen and reduces its reflective quality.
- Add dot clusters at the ends of the burst lines using the round brush handle tip or the round brush itself loaded with paint — press firmly to produce a round dot rather than a smear, placing three to five dots in a tight cluster at each ray end to suggest the exploding spark shower at the tip of a real firework burst. These dots are the detail that most distinguishes a firework motif from a generic starburst, and spending an extra five minutes on generous, confident dot placement across all bursts produces a result that reads as deliberately firework-themed rather than generically celebratory.
- Apply metallic gold and silver accents after the primary colors have dried to the touch — approximately 20–30 minutes in warm outdoor conditions. Add metallic rays interspersed between the colored rays on each burst, metallic dot clusters alongside the painted dots at ray ends, and small satellite spark dots scattered in the space between major bursts to suggest the trail of sparks between firework explosions. The metallics are the element that catches afternoon porch light and makes the mat appear to shimmer when viewed from a slight angle — use them generously rather than sparingly.
- Fill any remaining natural coir surface visible between bursts with small single-dot sparks or short individual stroke lines in white or metallic gold — the finished mat should read as a firework-covered surface rather than a few isolated motifs on a plain background, and filling the negative space between major bursts with smaller accent marks is what produces the dense, celebratory effect that makes the mat read boldly from the street rather than only at close range.
- Cure the fully painted mat for a minimum of 24 hours in a flat, undisturbed position before applying sealer or placing it at the door — outdoor acrylic paint on coir fiber requires the full cure time to bond to the natural fiber surface, and foot traffic or sealer application on paint that has not fully cured produces smearing and adhesion failure that no amount of additional sealer corrects. Apply two light coats of clear outdoor sealer spray from 12 inches distance, allowing the first coat to dry fully before the second, and wait another 24 hours before the mat sees its first foot traffic.
Surface designers and decorative painters who create hand-painted floor and mat designs for retail and editorial use consistently apply one color sequencing principle to firework designs that produces maximum visual impact with the same number of paint colors: paint white as the first layer under every colored burst rather than directly on the natural coir base. Natural coir is a warm medium-brown that absorbs color significantly and shifts every painted hue toward brown — red on raw coir reads as brick, blue reads as navy gray, and metallic gold barely registers against the similar-toned fiber. White painted as a base layer at each burst center and along the primary ray lines before the colored layers go on top produces colors that read at their true hue intensity, making red genuinely vibrant, blue genuinely bold, and metallics genuinely reflective. Decorative painters call this "color foundation," and it is the technique that separates hand-painted mats that look professionally designed from ones that look hand-painted in the less complimentary sense — the difference is entirely in the white underpainting step that adds three minutes per burst and doubles the visual impact of every color applied on top of it.














