
Door to Outdoor Bar: Salvage Build for $45
A solid wood door from someone's trash pile, four hairpin legs, and a bottle of exterior sealant — and you have the most talked-about feature of every backyard party you host.
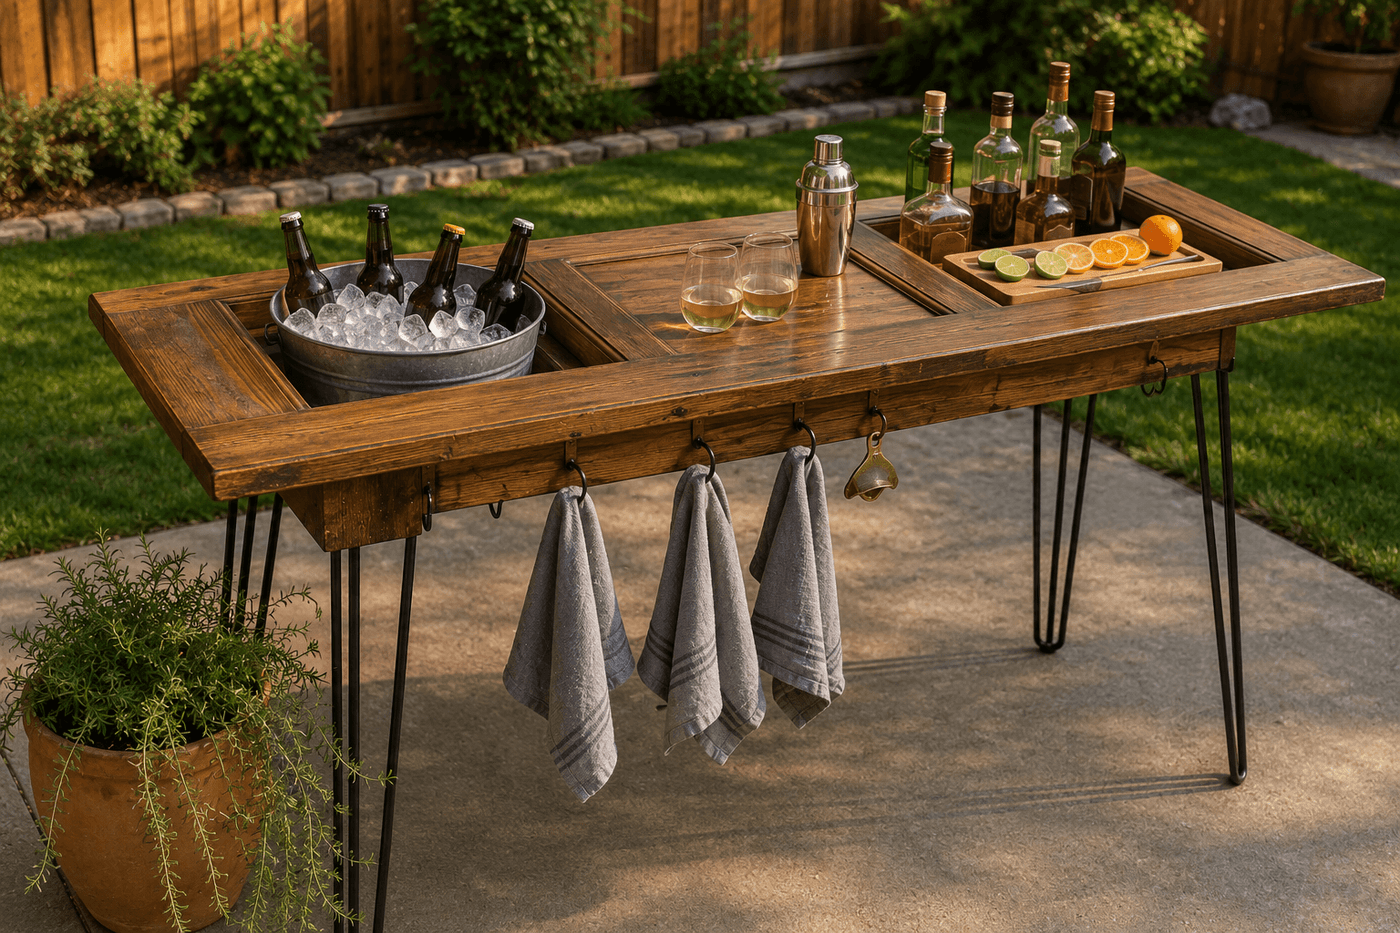
There is a category of furniture that stores sell for several hundred dollars under the label "rustic" or "reclaimed" that is, in practice, a piece of salvaged wood with legs attached to it and a coat of sealant — and the outdoor serving bar version of this category is perhaps the most egregious example of the markup, because the raw material is a solid wood panel door that people set at the curb for bulk pickup with some regularity and that does approximately ninety percent of the design work for you before you touch it. The existing panel recesses become natural corrals for bottles and garnishes, the flat rails become display surfaces for glasses, and the original hardware provides the character and patina that manufacturers charge extra to simulate. Four heavy-duty hairpin legs attached at bar height, two coats of exterior sealant, a galvanized ice bucket, and a few S-hooks along the bottom edge for a bottle opener and bar towels complete a piece that guests migrate directly to and ask about within the first ten minutes of every party. The total cost runs about $45 for the legs and sealant if the door is sourced for free — which is the price of roughly one bottle of the wine people bring to your parties to drink at the bar you built for $45 from someone else's trash.
What You'll Need
- Solid wood panel door — the panel recesses are the functional and aesthetic feature that makes a door specifically better than a plain board for this application; hollow-core doors are too light and flexible for bar use and will bow under the weight of bottles and ice; confirm solid core by knocking — hollow doors sound hollow, solid doors sound dense (~$0 from bulk pickup, or $20–40 from architectural salvage)
- Heavy-duty hairpin legs, 28–36 inches — bar height is 40–42 inches from floor to surface; measure your door thickness and subtract from your target height to determine leg length; purchase legs rated for at least 200 lbs per leg for a surface that will hold bottles, ice, and glassware (~$35–45 for a set of four from Amazon or hardware stores)
- Exterior penetrating sealant — danish oil, teak oil, or a dedicated exterior wood sealer; penetrating sealants protect without peeling, which is the critical property for an outdoor surface that will experience weather and condensation from cold glasses and ice buckets (~$10–15 per quart, covers the full door in two coats)
- Sandpaper, 80- and 120-grit — for smoothing any rough spots, raised grain, or paint drips on the door surface before sealing; do not skip sanding on a salvaged door that may have layers of old paint or varnish that need to be feathered smooth
- Wood screws, 1¼ inch — for attaching hairpin leg mounting plates to the door underside; confirm screw length does not penetrate through the door thickness to the top surface before driving
- Drill and bits — for pilot holes at leg mounting positions and for adding S-hook screw eyes along the bottom edge
- Screw eyes and S-hooks — installed along the bottom edge of the door for hanging a bottle opener, bar towels, and small utensils; a row of four to six evenly spaced screw eyes along one long edge creates a functional and visually appealing hanging system (~$3–5)
- Galvanized bucket or tub — for ice; a standard 2-gallon galvanized bucket sits perfectly in one of the door's panel recesses and becomes the ice and beverage station at one end of the bar (~$8–12 at hardware stores)
- Paint or stain — optional; the salvaged door's existing patina and original hardware are often the most compelling finish, but a coat of exterior paint in a bold color or a fresh stain that unifies an inconsistently finished door surface is a legitimate alternative (~$10–15 for a sample size)
How to Build It
- Assess the door thoroughly before any work — confirm solid core construction by lifting one end and feeling the weight (a hollow door is surprisingly light for its size), check that the panel sections are intact and not cracked or delaminated, and remove any remaining door hardware including hinges, strike plate, and knob mechanism. The holes left by removed hardware add to the character of the finished bar and do not need to be filled — a doorknob hole at bar height is a convenient pass-through for a bar towel or a small hanging hook.
- Sand the top surface and edges that will be visible and touched during use — work through 80-grit to remove any paint drips, raised grain, or rough patches, then follow with 120-grit to produce a surface smooth enough to accept sealant evenly. Focus particularly on the panel recess edges and the flat rail surfaces where hands, glasses, and bottles will make regular contact; rough edges on a salvaged door are charming in photographs and unpleasant in actual use.
- Decide on the door's orientation and final finish before applying any sealant — most panel doors read as more interesting and functional as bars when oriented horizontally with the long dimension running left to right, which produces the maximum bar length and places the panel recesses as pockets along the bar depth rather than the length. Confirm which face of the door will be the bar top — typically the cleaner or more interesting face — and which will face down toward the legs.
- Apply exterior sealant to the full door surface — top, bottom, and all four edges — with a rag or foam brush, working the product into the wood grain and allowing it to soak in for 15–20 minutes before wiping away the excess. Sealing all six faces of the door rather than just the top surface is the step that prevents moisture from entering through the unsealed bottom face and edges, which causes the wood to cup, warp, and eventually delaminate even when the top surface is perfectly sealed — outdoor furniture fails from the bottom up when only the visible surfaces are treated.
- Allow the first sealant coat to cure fully — typically 24 hours for penetrating oil sealants — then apply a second coat using the same method and cure time. Two coats of penetrating sealant applied with full cure between them produce a depth of protection that a single coat cannot achieve, and the second coat is visible as a richer, more even sheen across the wood surface that confirms complete penetration rather than surface pooling.
- Position the hairpin legs on the door underside at all four corners, set in approximately 3–4 inches from each edge to prevent the legs from being visible beyond the door perimeter when viewed from above — legs that extend to the very corners of the door protrude visually and reduce the clean, finished appearance of the completed bar. Mark the mounting hole positions through the leg plates with a pencil, drill pilot holes at each mark, and confirm pilot hole depth does not reach the top surface before drilling the full set.
- Attach all four legs using the provided mounting hardware or 1¼-inch wood screws, driving each screw firmly but not overtightening — overtightened screws in a salvaged door with potentially older, drier wood can crack the wood around the screw hole and compromise the leg connection that the full bar weight and contents will load. Snug and firm is the target; the leg plate should sit flush against the door underside with no gap at any edge before the bar is flipped upright.
- Stand the bar upright and confirm it is stable on a level surface before loading it with any weight — check for wobble by pressing firmly on all four corners and identifying any leg that does not make full contact with the ground. Hairpin legs have a slight adjustment range built into their mounting; loosening the mounting screws slightly and repositioning the leg plate by a fraction before retightening typically corrects minor wobble without shimming.
- Install screw eyes along the bottom edge of one long side — the side that will face outward toward guests rather than toward the house — spacing them evenly at 8–10 inch intervals and driving them into the door edge with needle-nose pliers for the final tightening after hand-starting. Hang S-hooks through each screw eye and load them with a bottle opener, folded bar towels, a cocktail strainer, or whatever bar tools suit your entertaining style. This hanging detail is the finishing touch that elevates the bar from a door-on-legs to something that looks fully considered and purpose-built.
Set designers and prop stylists who build bar installations for outdoor events and editorial photography use one styling principle for salvaged door bars that produces the most compelling and functional arrangement of bottles, glasses, and garnishes across the panel recess structure: treat each panel recess as a dedicated zone with a specific function rather than distributing items randomly across the full surface. Assign the deepest panel recess nearest one end as the ice and beverage station — where the galvanized bucket sits and wet items congregate — the central flat rail area as the active mixing surface where glasses and tools are used, and the panel recesses along the opposite end as the display and storage zone for bottles and garnishes. Event stylists call this "zone dressing," and it produces a bar surface that reads as curated and organized from across the party rather than cluttered and random, while also making the bar genuinely more functional because every item has a designated position that guests can navigate intuitively without asking where things are.














