
DIY Projects

Recent Content

Wooden Dish Rack: The Dowel Angle That Drains Right

Wooden Dish Rack: The Dowel Angle That Drains Right

Build a slatted wood dish rack for $18—the dowel tilt angle is what actually drains water into the tray instead of pooling on your counter.

Install a Fireplace Draft Stopper in 20 Minutes for $25

Install a Fireplace Draft Stopper in 20 Minutes for $25

Stop your chimney from sucking heat right out of the house—an inflatable draft stopper seals it in 20 minutes for about $25.

The Shower Rod Trick That Fakes a Walk-In Closet

The Shower Rod Trick That Fakes a Walk-In Closet

Steal spare closet space with a second shower-curtain rod—zero holes, zero fuss, and your full deposit stays safe.

Pool Noodle Knife Block: The Slice Depth That Stops Wobble

Pool Noodle Knife Block: The Slice Depth That Stops Wobble

Turn a $1 pool noodle into a safe knife block—the slice depth is what keeps blades from wobbling loose or slicing through the foam.

Build a Wooden Pie Carrier in 2 Hours for $25

Build a Wooden Pie Carrier in 2 Hours for $25

Never smash a pie in the car again! Build a snug wooden pie carrier in 2 hours for $25—perfect timing for fall potlucks.

logo
  • Home Improvement
  • DIY Projects
  • Interior Design
  • Gardening & Outdoor
  • Real Estate
  • Home Improvement
  • DIY Projects
  • Interior Design
  • Gardening & Outdoor
  • Real Estate
  • ​

Cookbook Stand: The Angle That Makes It Work

A perfect 90-degree stand looks correct on paper but leaves a book leaning too upright to read comfortably — the actual angle that makes this project function is a few degrees past square.
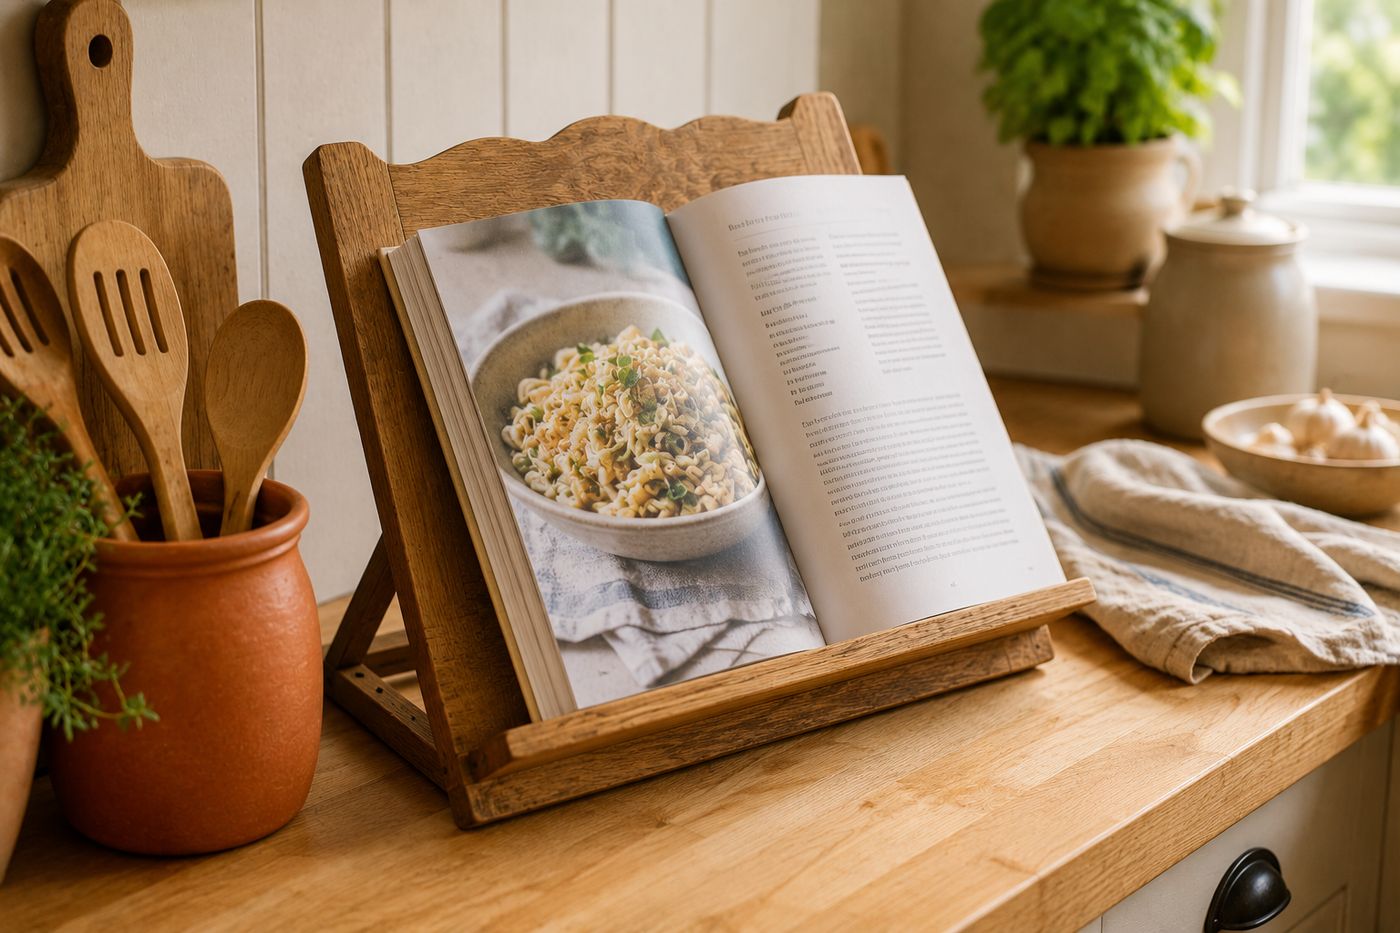
Wooden cookbook stand holding an open cookbook at an angle on a kitchen counter, with a scalloped top edge on the back support
DIY Projects

The instinct with any base-and-back-support build is to join the two pieces at a clean right angle, but a 90-degree cookbook stand holds a book almost vertically upright, which is uncomfortable to read from a normal counter height and puts unnecessary strain on the spine of an open book. The distinction between a stand that actually gets used and one that looks fine but sits in a drawer comes down to that joint angle: 100 to 110 degrees, just past square, tips the book back into a natural reading angle that matches how you'd hold a book by hand anyway. The second detail that determines whether this stand functions at all is the front lip — without something physically catching the bottom edge of the book, gravity pulls an open cookbook flat no matter how well-angled the back support is. Get both of those right and the rest is straightforward joinery: about $6-10 in lumber and roughly an hour of work for a stand that actually earns a permanent spot on the counter.

What You'll Need

  • 1x8 lumber, enough for a 10" base piece and a 12" back support piece — about $5
  • 1x2 lumber, for the front lip/ledge piece — about $2
  • Piano hinge (for a folding version) or corner brackets, wood glue, and screws (for a fixed permanent stand) — about $3-5
  • Wood glue
  • Sandpaper, progressive grits
  • Food-safe mineral oil, or wood stain and polyurethane, for finishing
  • Jigsaw (optional), for a decorative curved or scalloped top edge
  • Drill, for pilot holes, screws, and an optional tablet slot
  • Angle finder or protractor, for setting up the 100-110 degree joint accurately

How to Build It

  1. Cut your base piece from 1x8 lumber to about 10" long, and your back support piece from 1x8 lumber to about 12" long.
  2. Set an angle finder or protractor to 100-110 degrees before joining the two pieces — this is the single measurement that determines whether the finished stand reads comfortably or sits at an awkward, too-vertical angle.
  3. Join the base and back support at that angle, either with a piano hinge screwed into both pieces for a folding version, or with wood glue and corner brackets/screws for a fixed permanent stand.
  4. Cut a front lip piece from 1x2 lumber sized to the width of your base.
  5. Attach the lip along the front bottom edge of the base — this is the piece that physically catches the bottom of the book and holds pages open against gravity, and the stand won't function as intended without it.
  6. Cut a decorative curve or scallop into the top edge of the back support with a jigsaw if you want extra polish; this step is purely cosmetic and can be skipped without affecting function.
  7. Sand every surface and edge thoroughly, rounding all corners smooth so the stand is comfortable to handle and safe near food.
  8. Finish with food-safe mineral oil for kitchen use, or stain and polyurethane for a more durable, splash-resistant surface; drill an optional slot in the base lip if you also want to hold a tablet upright.
DESIGNER TIP

Woodworkers who build multiple stands as gifts often test the angle with an actual cookbook before finalizing any glue-up or permanent hardware, propping the two pieces together loosely at a few different angles between 100 and 110 degrees and opening a real book against each one. The "right" angle shifts slightly depending on how thick the books you're designing for tend to be, so a quick physical test catches a mismatch that a fixed measurement on paper can't.


Related Content

DIY Projects

28 October 2026

Post

Wooden Dish Rack: The Dowel Angle That Drains Right

Build a slatted wood dish rack for $18—the dowel tilt angle is what actually drains water into the tray instead of pooling on your counter....

DIY Projects

27 October 2026

Post

Pool Noodle Knife Block: The Slice Depth That Stops Wobble

Turn a $1 pool noodle into a safe knife block—the slice depth is what keeps blades from wobbling loose or slicing through the foam....

DIY Projects

27 October 2026

Post

Build a Wooden Pie Carrier in 2 Hours for $25

Never smash a pie in the car again! Build a snug wooden pie carrier in 2 hours for $25—perfect timing for fall potlucks....

DIY Projects

26 October 2026

Post

Make Herb-Infused Honey in 30 Minutes for $12

Turn raw honey into a cold-season secret weapon—infuse it with thyme and ginger in 30 minutes for about $12, no fancy gear needed....

DIY Projects

25 October 2026

Post

Make Homemade Fire Cider in 20 Minutes for $15

Steep this spicy apple cider vinegar tonic now so it's ready to fight off fall colds in 4 weeks—20 minutes, $15, zero cooking skills....

DIY Projects

23 October 2026

Post

Build a Freestanding Coat Rack in 2 Hours for $35

Sick of coats piled on chairs? Build a sturdy freestanding coat rack in 2 hours for $35 — no wall drilling, just solid joinery....

DIY Projects

22 October 2026

Post

Window Frame to Pet Gate: The Hinge Set That Holds

Turn an old wooden window frame into a swinging pet gate for $22 — the hinge mortise depth is what keeps it from sagging open over time....

DIY Projects

22 October 2026

Post

Make Spiced Homemade Applesauce in 1 Hour for $12

Turn a bag of fall apples into silky spiced applesauce in an hour for $12 — no peeling required if you've got the right tool....

DIY Projects

21 October 2026

Post

Floating Nightstand: The Bracket Depth That Holds Weight

Build a wall-mounted wooden nightstand for $25 — the bracket depth inside the wood is what stops it from sagging under a lamp and books....

DIY Projects

20 October 2026

Post

Foam Letter Wall Art: The Spacing Trick for $6

Turn dollar-store foam letters into custom nursery wall art for $6 — the spacing template is what keeps names looking store-bought, not crooked....

DIY Projects

19 October 2026

Post

Build a Tabletop Fire Bowl in 90 Minutes for $35

Turn a $35 metal bowl and lava rock into a tabletop fire feature perfect for crisp fall evenings and s'mores nights....

DIY Projects

16 October 2026

Post

Build a Pet Food Storage Bin in 1 Hour for $30

Stop losing the war against stale kibble and pantry moths—build an airtight pet food bin in an hour for $30....

DIY Projects

15 October 2026

Post

Whittling a Wooden Spoon

Try meditative spoon whittling for under $15—cutting with the grain (not against it) is the one rule that keeps your blank from splitting mid-carve....

DIY Projects

14 October 2026

Post

Wooden Pet Ramp: The Cleat Spacing That Stops Slips

Build a wooden pet ramp for $20 — the traction cleat spacing is what keeps your dog's paws from sliding on the incline....

DIY Projects

13 October 2026

Post

Build a Compost Sifter Box in 1 Hour for $18

Turn chunky compost into fine garden gold! Build a simple hardware-cloth sifter box in an hour for $18—no more rock-and-stick surprises....
Terms and ConditionsDo Not Sell or Share My Personal InformationPrivacy PolicyPrivacy NoticeAccessibility NoticeUnsubscribe
Copyright © 2026 DIY HomeBoost












