
Color-Block Plant Saucers: Bold Style for $6
Four colors of outdoor paint, painter's tape, and an afternoon — and a collection of plain terra cotta saucers becomes the most styled detail on the entire patio.
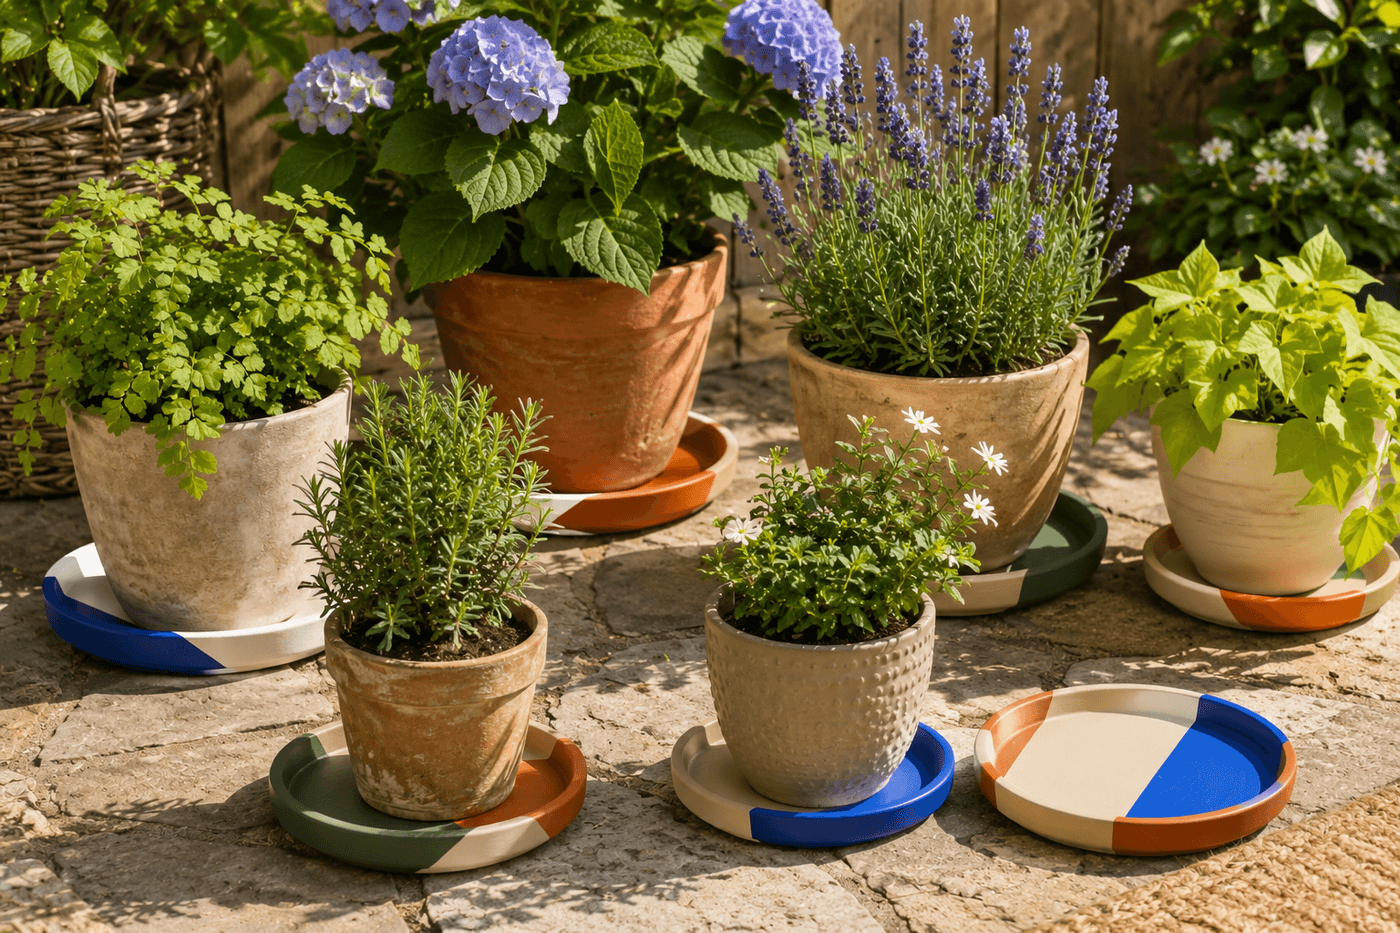
The plant saucer is one of the most overlooked surfaces in any outdoor space — it sits at the base of every pot, it is visible from every seated position on the patio, and in its natural state it contributes exactly nothing to the visual interest of the arrangement around it. Color-blocking with painter's tape and outdoor acrylic paint converts this overlooked surface into the design detail that makes the whole plant display read as curated rather than accumulated, and the cost is $6 in craft paint for a collection of saucers that looks like something from an expensive design shop when the finished set is arranged beneath a grouping of potted plants. The technique is completely achievable by anyone who can apply tape in a straight line and paint between borders: tape off your geometric division, paint each section in a deliberate color from a coordinated palette, let dry completely, and peel the tape at a 45-degree angle to reveal a color border so crisp it barely looks like it was painted by hand. Vary the geometric division across the set — some halves, some diagonal thirds, some center circles with contrasting rims — and the finished collection reads as a designed series rather than identical copies, which is the specific quality that makes the arrangement look intentional from across the patio.
What You'll Need
- Terra cotta plant saucers — 6–10 inch diameter; new saucers from garden centers or dollar stores are ideal; used saucers should be scrubbed clean and fully dry before painting; unglazed terra cotta accepts outdoor acrylic paint without primer if the surface is clean and dry (~$1–2 each)
- Outdoor acrylic paint in 3–4 colors — choose a coordinated palette of two to four colors that share an undertone for cohesion; the most effective color-block palettes for terra cotta pair:
- Cool palette: cobalt blue, sage green, cream, and soft white
- Warm palette: terracotta orange, warm yellow, forest green, and cream
- Graphic palette: matte black, warm white, and a single accent color in coral or cobalt
- DecoArt Outdoor Living or Americana Outdoor paint in 2 oz bottles (~$1.50–2.00 each, three to four bottles covers six to eight saucers in two coats)
- Painter's tape, ¾-inch or 1-inch width — FrogTape produces sharper color borders than standard blue tape on the slightly porous terra cotta surface; press the tape edge firmly onto the saucer with a fingernail or credit card edge to prevent paint from bleeding under the tape at the boundary line
- Foam brushes, ½-inch and 1-inch — foam produces smoother, more even coverage on flat terra cotta surfaces than bristle brushes which leave visible stroke marks in the finished color blocks; use a separate brush per color or rinse and dry completely between colors
- Compass or circular object for center circle designs — a glass, jar lid, or coin in the appropriate diameter traced lightly with pencil before taping provides the circle template for center-circle saucer designs
- Pencil — for lightly marking diagonal and geometric division lines before applying tape; marks disappear under paint
- Clear outdoor sealer spray — two coats over fully cured paint; water and UV resistant formula; saucers receive direct water contact with every plant watering and must be sealed to prevent paint lifting at the water line (~$6–8 for a can covering all saucers)
- Drop cloth or newspaper — for protecting the work surface; outdoor acrylic stains permanently and dries quickly
How to Paint Them
- Plan the geometric variation across the full set before taping any saucer — decide which saucers will be halved, which diagonally divided into thirds, and which will carry a center circle design, so the finished collection has variety without randomness. A set of six might include two half-and-half saucers in different color combinations, two diagonal-third saucers, and two center-circle saucers — a distribution that produces visual rhythm when the finished set is arranged together rather than a collection of identical designs that reads as repetitive.
- Clean all saucers thoroughly with a damp cloth and allow to dry completely for at least two hours before applying any tape or paint — terra cotta that appears dry on the surface often retains moisture in its porous body that pushes paint off the surface from below during drying, causing visible bubbling and adhesion failure within the first wash cycle. New saucers from sealed packaging can often be painted immediately; used outdoor saucers should be scrubbed with a stiff brush and warm water and dried in the sun for a full day.
- Mark the geometric division lines lightly with pencil before applying tape — a straight half-division is marked with two pencil dots at the saucer rim on opposite sides connected by a straight line across the center; a diagonal third-division is marked at the one-third point around the rim on each side; a center circle is traced from a circular template centered on the saucer. These pencil marks are covered entirely by paint and are only visible to guide tape placement.
- Apply painter's tape along the marked division lines, pressing the tape edge firmly and continuously against the saucer surface with a fingernail or credit card edge — any section of tape edge that is not fully sealed against the terra cotta surface allows paint to wick under the tape by capillary action and produce a fuzzy rather than crisp color boundary. On curved saucer rims, apply tape in short overlapping sections that follow the curve rather than one long pull that bridges across the curve and lifts at the edges.
- Paint the first color section with a foam brush in two thin coats, allowing full drying between coats — thin coats dry to a smoother, more even finish on terra cotta than thick coats, which show brush or foam texture and dry unevenly across the porous surface. Paint from the center of each section outward toward the tape edge rather than from the tape edge inward, which pushes paint away from the potential bleed point rather than toward it and reduces the pressure that causes paint to wick under the tape.
- Allow the first color section to dry completely before removing the tape and repositioning for the second color — removing tape from wet or tacky paint tears the paint film at the tape edge and produces a ragged border rather than the crisp line that makes color-blocking so satisfying. The paint should feel firm and non-tacky to a light fingertip touch across the entire painted section before the tape is touched.
- Remove the tape by pulling slowly at a consistent 45-degree angle back over itself rather than straight up — the 45-degree angle separates the tape adhesive from the paint film cleanly at the boundary line, while straight-up removal lifts the paint film at the edge and produces a slightly rough border that is immediately visible against the crisp terra cotta or contrasting color on the other side of the line. Pull in one slow, continuous motion rather than in short jerks that cause the tape to stretch and snap back, which deposits adhesive residue on the paint surface.
- Complete the second and third color sections using the same tape-paint-dry-peel sequence, allowing each section to fully dry before taping adjacent to it — fresh paint that is taped over before full cure is lifted with the tape removal rather than remaining on the saucer surface. Once all color sections are complete and fully cured, apply two coats of clear outdoor sealer spray from 10–12 inches, allowing the first coat to dry fully before the second, and cure for 24 hours before the saucers are returned to use under watered plants.
Interior stylists and prop designers who create plant displays for editorial photography and high-end residential staging use one color assignment principle for color-block saucer sets that produces a display that reads as expertly curated rather than randomly assembled: assign colors to saucers so that no two adjacent saucers in the final arrangement share the same dominant color, and ensure every color in the palette appears at least twice across the full set. A set of six saucers in a four-color palette where each color appears one to two times and no two neighboring saucers match creates the kind of controlled color distribution that the eye reads as designed rather than accidental — similar to the principle behind a well-arranged bookshelf where color distribution is deliberate rather than chronological. Prop stylists who arrange plant displays for catalog and magazine shoots plan the saucer color sequence before the arrangement is photographed and adjust individual saucer positions until the color distribution reads as balanced from the camera angle — a practice that takes less than two minutes and produces a display that looks completely different from the same saucers arranged without this consideration.














