
Colander Hanging Planters: Thrift Find, $7
A $2 thrift store colander, three lengths of chain, and a handful of trailing petunias — and your porch has a conversation piece that never has a drainage problem.
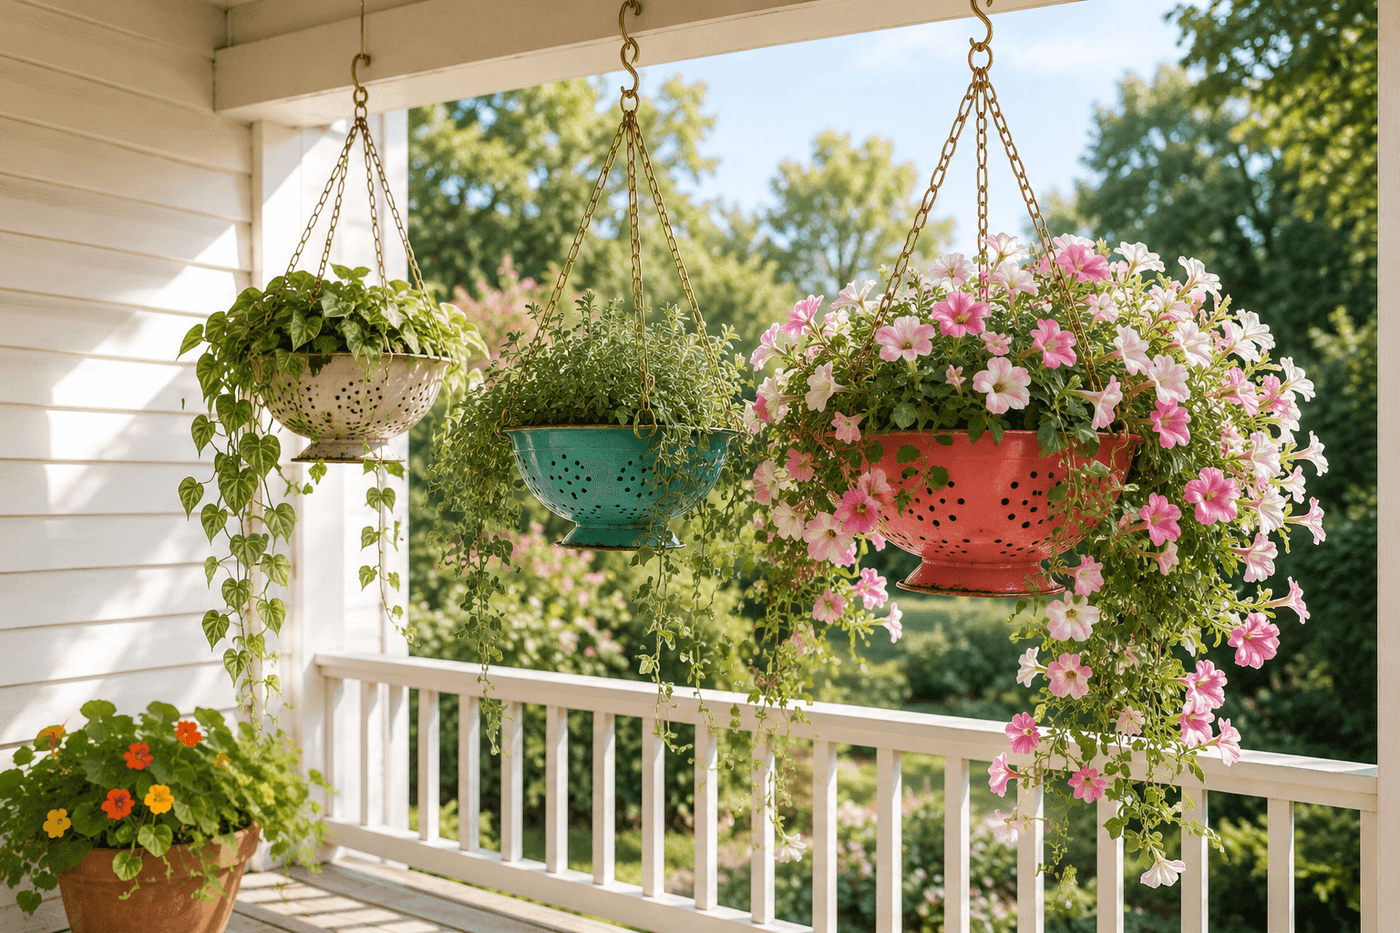
Every kitchen colander is already a perfect hanging planter — it has drainage holes distributed across the entire base and sides, it is made of materials that handle outdoor weather, it has a rim structure that accepts hanging hardware cleanly, and it comes in a shape that trailing plants cascade out of beautifully in every direction simultaneously. The only thing standing between a thrift store colander and a porch planter that stops every visitor mid-sentence is a can of spray paint, three lengths of chain or rope, and a liner of coconut coir or sphagnum moss to hold the soil while still allowing the drainage those holes were always designed to provide. Total cost runs $5–10 depending on the colander source, and the finished planters produce the specific combination of whimsy and function that makes people ask where you bought them before they realize you made them — from something that was in someone else's donate pile. Hang three in graduated sizes at different heights from a porch beam, fill each with a different trailing variety in coordinating colors, and the finished installation looks like something from a boutique garden center display that would charge $40 per planter for a fraction of the character.
What You'll Need
- Metal or enamel colanders — thrift stores, estate sales, and dollar stores; metal colanders in any condition accept spray paint and weather well; enamel colanders in vintage colors look beautiful left as-is without any painting; avoid plastic colanders which fade rapidly in outdoor sun and do not hold spray paint reliably (~$1–4 each)
- Spray paint — choose a finish:
- Bright coral or turquoise — Rust-Oleum 2X in satin finish; bold colors read well at hanging height against a porch ceiling or beam
- Metallic gold or copper — Rust-Oleum Metallic finish; warm metallics complement terracotta and natural plant colors
- Vintage finish left unpainted — aged enamel and patinated metal need only a cleaning and clear sealer coat to look intentionally vintage rather than merely old (~$5–7 per can)
- Hanging hardware — choose one:
- Chain, 3 equal lengths per colander — decorative chain from the hardware store in gold, silver, or black; cut to matching lengths and attach through existing rim holes; chain handles the weight of wet soil better than rope for larger colanders (~$4–6 for a length that does several planters)
- Jute or macramé rope — three equal lengths knotted through rim holes; softer aesthetic than chain and works well for indoor or covered porch installations where rain won't cause rot (~$3–5 for a spool)
- S-hooks or jump rings — for gathering the three chain or rope lengths at the top and connecting to the hanging hook; one per planter (~$2–3 for a pack)
- Liner material — choose one:
- Coconut coir liner sheet — cut to fit and pressed into the colander shape; most natural and long-lasting outdoor liner material
- Sphagnum moss — pressed into the colander interior in a layer; traditional hanging basket liner that looks beautiful when visible through the colander holes
- Burlap — cut and shaped; most budget-friendly option but degrades faster than coir or moss outdoors (~$3–6 per liner material)
- Quality potting mix — not garden soil; a lightweight container mix with perlite maintains drainage and aeration in a hanging container that dries faster than ground-level planters (~$6–10 for a small bag)
- Trailing plants — one per colander:
- Trailing petunias or million bells — cascade most beautifully from round hanging containers
- Trailing herbs — thyme, oregano, or trailing rosemary for a functional and fragrant display
- Sweet potato vine or ivy — for dramatic long cascades that grow quickly to cover the colander sides
How to Make Them
- Clean each colander thoroughly with dish soap, a scrub brush, and warm water to remove all grease, food residue, and any rust scale — spray paint adheres poorly to even slightly greasy metal surfaces, and rust that is not removed before painting bleeds through paint within one outdoor season. Rinse completely and allow to dry for at least two hours before touching or painting; hand oils from handling a clean colander before painting deposit enough surface contamination to cause adhesion issues in those specific spots.
- Sand any rust spots lightly with 120-grit sandpaper before painting — remove the rust scale down to bare or lightly pitted metal rather than painting over raised rust, which creates a bumpy surface under the paint that is visible in the finished piece and continues to spread beneath the paint film from the edges of the painted rust spot. Wipe sanded areas with a tack cloth before priming.
- Spray paint in two to three light coats rather than one heavy coat — hold the can 10–12 inches from the colander surface and apply each coat in smooth, overlapping passes that cover the rim, exterior walls, and handle areas. Allow each coat to dry fully before the next — typically 20–30 minutes between coats for Rust-Oleum 2X. Paint through the holes rather than trying to avoid them; any overspray on the interior is hidden by the liner and soil.
- Attach the hanging hardware before lining or planting — determine the three evenly spaced attachment points around the colander rim by dividing the circumference into thirds and marking with a paint marker. Use existing handle holes if they are at the correct spacing, or add S-hooks through existing drainage holes near the rim. Cut three lengths of chain or rope to identical length — 8–12 inches produces a finished hanger that sits the colander at a comfortable viewing and watering height when the three lengths are gathered at a single top ring or knot.
- Confirm the hanging balance before proceeding to lining — gather the three chain or rope lengths at the top, hang from a temporary hook, and check that the colander hangs level. Adjust chain or rope attachment points if the colander tilts; a planter that hangs level before planting stays level under the symmetric weight of soil and plants, while one that tilts empty tilts significantly more when filled with wet potting mix.
- Line the colander interior by pressing coconut coir, sphagnum moss, or shaped burlap against the inside walls and base, forming a continuous layer that holds soil while allowing excess water to drain freely through both the liner material and the colander holes. The liner thickness should be consistent at approximately ½ inch throughout — thin spots allow soil to wash out during watering while thick spots restrict the drainage that makes the colander superior to a conventional pot.
- Fill with potting mix to within 1 inch of the colander rim — press gently to eliminate large air pockets while maintaining the loose texture that promotes drainage and root oxygenation. A hanging container filled to the brim leaves no room for water to pool momentarily during watering before draining through, which causes overflow that runs down the outside of the colander and drips past the planting area rather than soaking into the root zone.
- Plant one to three trailing plants per colander depending on colander size, positioning them slightly toward the outer edge of the soil surface so their trailing stems begin their cascade over the rim immediately rather than initially growing upright from a center planting position. Water thoroughly immediately after planting until water runs freely from the drainage holes, then hang in the chosen position — water the planted colander before hanging rather than after, which allows you to confirm the drainage is functioning correctly and avoids the overhead watering of a just-hung planter that drips onto whatever is below.
Container garden stylists and porch display designers who create hanging planter installations for retail garden centers and editorial photography use one liner technique that produces a dramatically more finished and lush appearance from colander planters than standard moss or coir lining alone: plant directly through the colander holes on the sides as well as in the top, by pushing small seedling plugs through the holes from the outside before filling with soil. Most gardeners plant only in the open top of a hanging colander, which produces downward trailing growth over the rim but leaves the colander sides as bare metal with liner visible between the drainage holes. Pressing small trailing plant plugs through the side holes from the outside — roots inward, foliage outward — and then filling with soil locks them in position and produces a planter that is growing in every direction simultaneously: out the top, out the sides, and eventually fully covering the colander form in a sphere of cascading growth. Container designers who use this all-over planting technique describe the finished result as a "living ball" effect that is only achievable with a perforated container and that produces the most visually spectacular hanging planter possible from any container regardless of the plant variety used.














