Cinder Block Planter Bench: Modern for $25
Stack, paint, plant, sit — and a pile of leftover concrete blocks becomes the most-complimented thing on your patio.
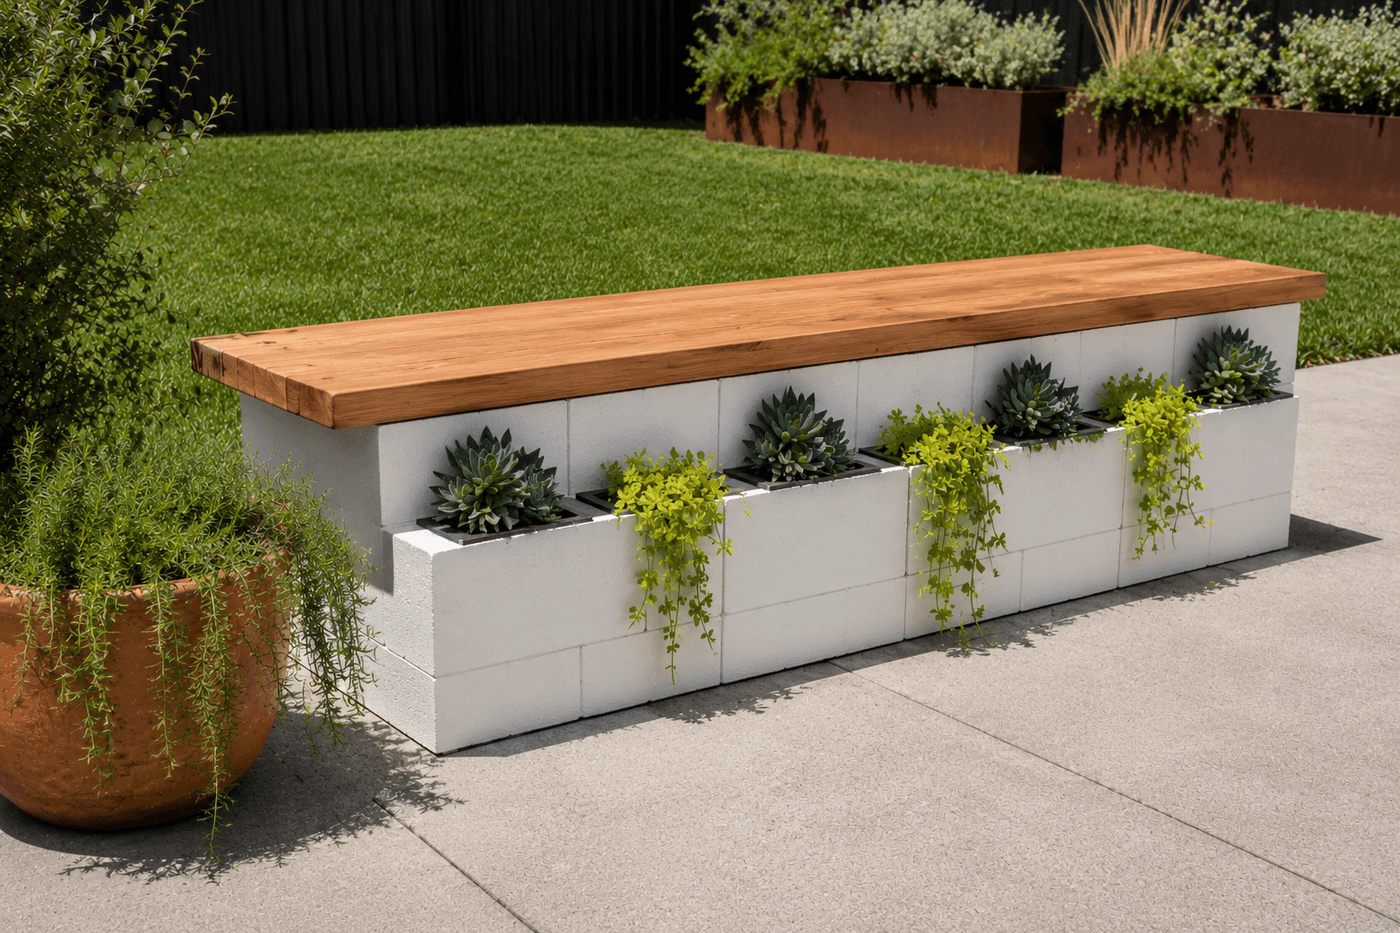
Cinder blocks have a particular reputation as the raw material of unfinished basements and utilitarian retaining walls — which makes the speed and completeness of their transformation into genuinely beautiful outdoor furniture all the more satisfying when you see it happen. Two rows of standard blocks stacked in a linear arrangement with hollow cores facing upward, a cedar plank dropped across the top for seating, two colors of exterior spray paint, and a handful of trailing succulents is the complete recipe for a planter bench that looks like it came from an expensive outdoor furniture catalog and cost a fraction of anything in that catalog. The design requires no screws, no brackets, and no tools beyond a spray can — block weight and plank mass hold the structure perfectly stable — and the hollow cores that become built-in planting cavities are the detail that elevates this from a painted concrete bench into something that has plants growing out of it, which is the specific combination of industrial material, warm wood, and living greenery that defines the modern farmhouse outdoor aesthetic right now. If you have leftover cinder blocks anywhere on your property, this is what they have been waiting to become.
What You'll Need
- Cinder blocks — standard 8"x8"x16" concrete masonry units; 8–10 blocks make a bench approximately 4 feet long; sourced free from leftover stock, or $1.50–2.50 each at any home center
- Cedar plank, 2x10 or 2x12 — cut to the length of your block arrangement plus 6" overhang on each end for a finished look; cedar resists rot and weathers beautifully without paint or treatment (~$12–18 for a 6-foot length)
- Exterior spray paint, warm white — Rust-Oleum 2X paint-and-primer in flat or satin finish for the block faces and sides; flat reads as more sophisticated on concrete than glossy (~$6–7 per can, one can covers 8–10 blocks)
- Exterior spray paint, charcoal or matte black — for the top surfaces of blocks to define the planting cavities and create the two-tone contrast; one can is more than sufficient (~$6–7)
- Potting mix — for filling the hollow block cores that become planting cavities; standard outdoor potting mix, not garden soil which compacts in contained spaces (~$5–8 for a small bag)
- Plants — choose for trailing habit and sun tolerance:
- Succulents — sedum, echeveria, or hen-and-chicks; drought-tolerant and perfect for the shallow block cavity depth
- Trailing annuals — sweet potato vine, bacopa, or trailing verbena for color and cascade effect
- Herbs — thyme, oregano, or creeping rosemary for a functional planting that also looks beautiful
- Sandpaper, 80-grit — for lightly scuffing the cedar plank surface before any optional finish is applied; bare cedar weathers to a beautiful silver-gray naturally if left unfinished
- Danish oil or exterior wood sealer — optional for the cedar plank; enhances grain and adds weather protection while maintaining a natural look (~$8–10)
- Landscape fabric or coffee filters — for lining the bottom of block cores before adding potting mix to prevent soil from washing through the open block bottom during watering
How to Build It
- Select your site before moving any blocks — cinder blocks are heavy enough that relocating a completed bench is a two-person job, so confirm your intended location works for both sunlight access for the plants and traffic flow around the bench before committing. A level surface is important for both bench stability and even planting drainage; place a level across the intended footprint and shim with sand if needed before setting the first block.
- Clean all blocks thoroughly by brushing off loose concrete dust, dirt, and any efflorescence — the white mineral deposits that form on concrete surfaces — with a stiff brush and plain water, then allow to dry completely before spray painting. Spray paint applied to dusty or damp concrete surfaces bonds poorly and begins flaking within weeks; clean, dry concrete holds exterior spray paint through seasons of outdoor exposure.
- Paint the block faces and sides with warm white exterior spray paint, holding the can 10–12 inches from the surface and applying two light coats rather than one heavy coat — heavy coats on porous concrete run and drip into the block texture in a way that light coats avoid entirely. Allow the first coat to dry 20–30 minutes before the second, and paint all blocks before assembly rather than after, which allows you to reach all faces and edges easily without the adjacent blocks blocking your spray angle.
- Paint the top surface of all blocks — the rim and the interior of the hollow cores — in charcoal or matte black once the white base coats are fully dry, masking the side faces with your hand or scrap cardboard to keep the color transition crisp at the top edge. This two-tone treatment is the specific design detail that defines the planted cavities visually, makes the bench look intentionally designed rather than just painted, and photographs dramatically well against the warm cedar plank above.
- Stack the first row of blocks in your chosen linear arrangement on the prepared surface, hollow cores facing upward, positioned with blocks running end-to-end in a single line — a 4-foot bench uses four blocks per row, a 6-foot bench uses six. Confirm the row is straight and level across its full length before stacking the second row, as any misalignment in the first row is amplified in the second and makes the bench visually unsettled from any angle.
- Stack the second row of blocks directly on top of the first, offsetting each block by half a block length — the same running bond pattern used in brick construction — which interlocks the rows and creates a structurally stable two-tier arrangement that resists lateral shifting without any fasteners. Check plumb on the front face and level across the top of the second row before proceeding; a bench that leans slightly front-to-back is uncomfortable to sit on regardless of how good it looks.
- Line each hollow core cavity with a coffee filter or small square of landscape fabric pressed into the bottom before adding soil — this allows water to drain freely through the block bottom while keeping potting mix from washing out during watering, which would otherwise puddle on the patio surface below the bench and slowly stain the painted block faces with brown soil runoff.
- Fill cavities with potting mix to within one inch of the top rim and plant your chosen trailing varieties, firming the soil gently around root balls and watering thoroughly immediately after planting. Position trailing plants at the outer edge of each cavity angled slightly outward so they cascade down the block face naturally from the first week rather than growing straight up before eventually trailing — the cascade effect from day one is what produces the catalog-worthy look immediately rather than after a full growing season.
- Set the cedar plank across the top of the block arrangement, centered with equal overhang on each end, and sit on it firmly to confirm stability before inviting anyone else to do the same — the plank should feel completely solid with no rocking or lateral movement under body weight. If the plank rocks, check that the top block row is fully level across both ends and shim as needed with a thin cedar shim between the plank and the highest block corner until the surface is stable.
Landscape designers and outdoor living stylists who work with industrial materials in residential garden settings use one planting composition principle for cinder block cavities that produces a dramatically more finished result than filling every core with the same plant variety: alternate cavity plantings between a thriller specimen and a trailing spiller in a repeating pattern along the bench length. A compact upright succulent or small ornamental grass in every other cavity as the "thriller," with trailing sedum, sweet potato vine, or creeping thyme in the intervening cavities as the "spiller," creates vertical rhythm and textural contrast along the bench face that reads as a considered planting design rather than a repeated single element. Landscape stylists who design for outdoor furniture photography use this alternating pattern specifically because it photographs as intentional composition from both close range and across a patio — the interplay of upright and trailing forms catches the eye and holds it in a way that uniform planting never does, regardless of how beautiful the individual plant variety might be.