
Cast Concrete Leaf Stepping Stones for $8
One hosta leaf, a bag of quick-set concrete, and an hour — the garden path detail that stops every single visitor in their tracks
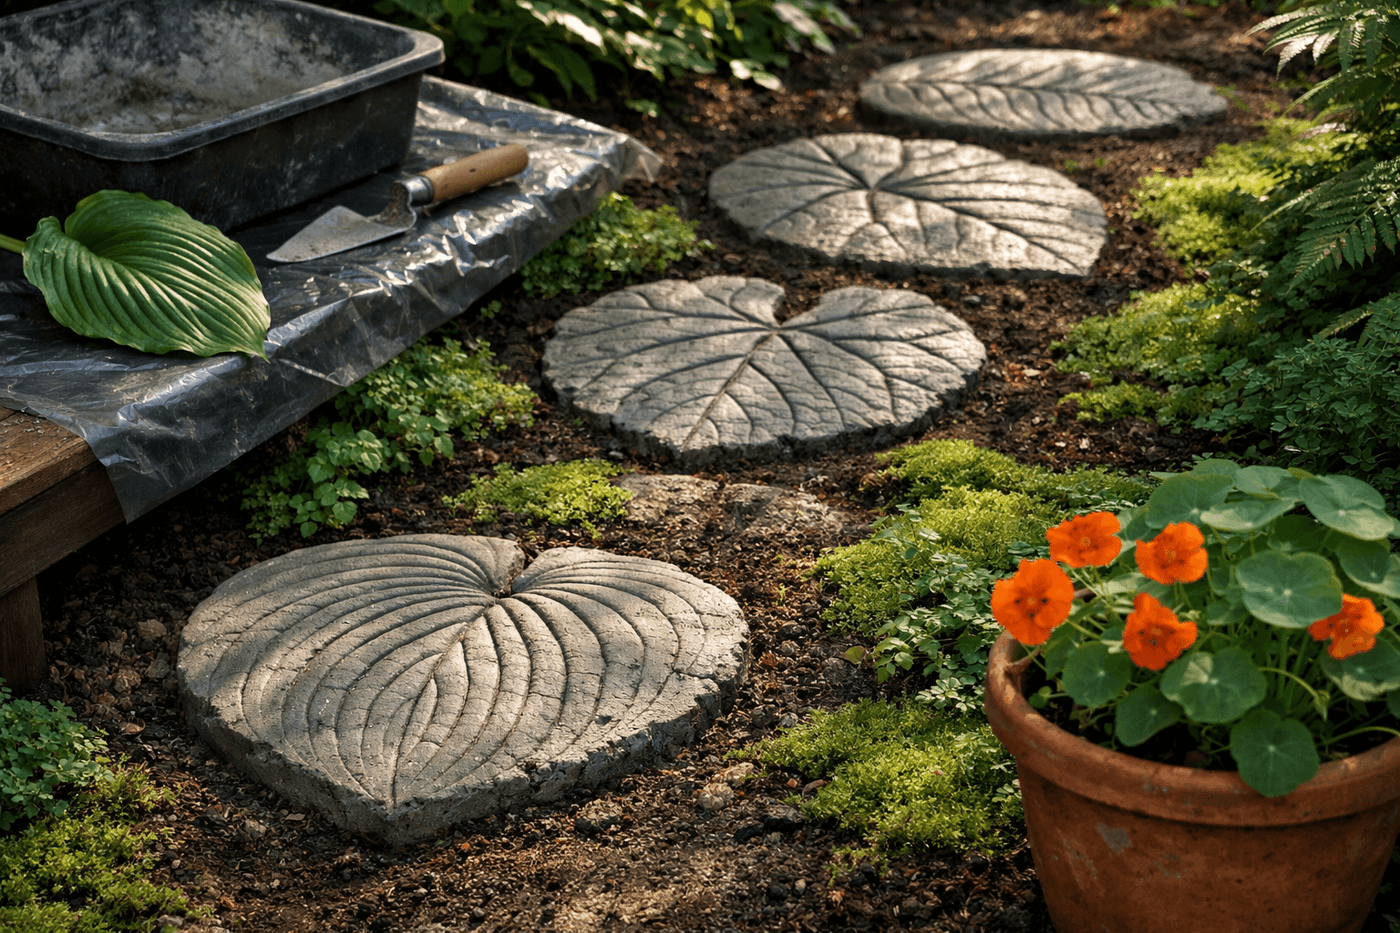
There is a specific kind of garden magic that happens when you peel a large leaf away from wet concrete and find every vein, every texture, and every subtle botanical detail transferred perfectly into the surface below — and it happens reliably, every single time, with an eight dollar bag of quick-set concrete and whatever large-leafed plant is growing in your garden right now. Hosta, rhubarb, elephant ear, and large ferns all produce impressions so detailed and so genuinely beautiful that the finished stepping stones look like something from a botanical garden gift shop rather than something made on a plastic-lined work surface on a Saturday afternoon. The technique requires no molds, no special equipment, and no artistic skill beyond the willingness to press a leaf firmly into wet concrete and wait an hour to see what comes out. Four stones cast from a single bag of mix, laid in a winding shade garden path, transform an ordinary garden walk into the kind of detailed, personal, site-specific feature that makes every visitor slow down and look more carefully at everything around them.
What You Need
- Quick-setting concrete mix, 50 lb bag — standard quick-set concrete from any hardware store; the fast set time gives you a workable window of about thirty minutes per stone while still allowing leaf impression before the surface skins over (~$8–10)
- Large leaves with prominent vein structure — hosta, rhubarb, elephant ear, gunnera, and large ferns all produce dramatic impressions; the larger and more deeply veined the leaf, the more spectacular the finished stone. Harvest leaves the morning of your project so they're still fully turgid and flexible
- Plastic sheeting or a heavy garbage bag — for lining the work surface; concrete does not bond to plastic, which makes stone removal clean and easy without any mold release agent
- Old plastic tub or bucket — for mixing concrete; designate this permanently for concrete work as it cannot be cleaned for other uses afterward
- Margin trowel or old kitchen spatula — for mounding, smoothing, and shaping the concrete around the leaf
- Rubber gloves and safety glasses — concrete is strongly alkaline and causes skin burns with extended contact; gloves are non-negotiable for a project involving direct hand contact with wet mix
- Penetrating concrete sealer — applied after full curing to protect the detailed surface through freeze-thaw cycles; unsealed concrete stepping stones in cold climates spall and lose surface detail within two to three winters (~$8–12 for a bottle that treats many stones)
- Wire mesh or fiber reinforcement — optional but recommended for larger stones; a small piece of hardware cloth pressed into the back of the concrete while still wet prevents cracking in stones that will bear regular foot traffic (~$3–4 for a small piece)
How to Make Them
- Harvest your leaves in the morning on the day of your project, cutting stems close to the leaf base and placing them immediately in water if you won't be casting within the hour. A fully hydrated, turgid leaf presses into concrete with far more definition than a wilted one — the firm cellular structure of a fresh leaf is what transfers vein detail so precisely, and a leaf that has begun to wilt produces a softer, less defined impression that loses the fine secondary vein network that makes these stones so extraordinary.
- Prepare your work surface by laying plastic sheeting flat on a stable table or the ground, smoothing out any wrinkles that would transfer creases into the back of the finished stone. Cut a separate piece of plastic slightly larger than each leaf to lay under the concrete mound — working on individual plastic sheets means you can move each stone to a sheltered curing spot without disturbing it.
- Mix concrete in your tub following package directions, adding water gradually and mixing thoroughly until the consistency resembles thick oatmeal — stiff enough to hold a mounded shape without slumping but wet enough to press into leaf vein detail under moderate hand pressure. Concrete mixed too dry won't capture fine surface detail; mixed too wet it slumps flat and loses the depth of impression in the thinner vein areas.
- Mound the mixed concrete into a rough circle on the plastic work surface, sized about two inches larger than your leaf in all directions to allow for the slight spreading that occurs when the leaf is pressed in. Build the mound to approximately two inches of thickness at the center, tapering slightly toward the edges — a stepping stone thinner than one and a half inches at any point will crack under foot traffic regardless of how well the concrete cured.
- Press the leaf face-down onto the concrete mound — vein side down, stem end positioned naturally — and smooth the back of the leaf firmly with your gloved palm and then with the flat of the trowel, working from the center outward to press the leaf surface into full contact with the concrete without trapping air pockets beneath it. Incomplete contact between leaf and concrete produces areas where the impression is shallow or missing entirely, which interrupts the botanical detail across the finished stone surface.
- Press a piece of wire mesh into the concrete visible at the back of the stone around the leaf perimeter if adding reinforcement, working it into the concrete without pressing it all the way through to the leaf face. Smooth the concrete back surface with the trowel to an even thickness, then allow the stone to rest undisturbed for forty-five minutes to one hour until the concrete has set enough to hold its shape without slumping.
- Peel the leaf away from the set concrete surface slowly and carefully, starting at the stem end and working toward the leaf tip — this is the reveal moment, and it is as satisfying every time as it was the first. Work slowly enough that the leaf peels cleanly rather than tearing, which can pull small fragments of partially set concrete away from the impression surface. If any leaf material remains embedded in the concrete, allow it to cure fully and brush away the dried plant tissue with a stiff brush.
- Cure the finished stones undisturbed for a minimum of twenty-four hours before moving them, and a full seven days before placing them in the garden as stepping stones under foot traffic — concrete that appears hard on the surface continues gaining structural strength for the full cure period, and stones placed under foot traffic before full cure develop surface cracking that compromises both the structural integrity and the botanical detail you just spent an afternoon creating. Seal each fully cured stone with two coats of penetrating concrete sealer before installation.
Botanical concrete artists who sell leaf castings professionally always enhance the finished stone with a light application of concrete stain or iron oxide pigment washed into the impression after full curing — a diluted brown or green oxide stain brushed across the stone surface and immediately wiped from the raised areas settles into the recessed vein channels and leaf texture, creating a depth of shadow and color variation that makes the botanical detail dramatically more visible and three-dimensional than raw gray concrete alone. The technique, called an antiquing wash, costs about $5 in concrete pigment and transforms a beautiful stone into something that genuinely looks like it was cast by a professional sculptor. Apply the wash in thin layers, wiping back immediately, and seal over the dried pigment to lock it permanently into the surface.














