Build a Three-Bin Compost System for $55
One Saturday, cedar lumber, and removable front slats — the composting system that finally produces finished compost when you actually need it
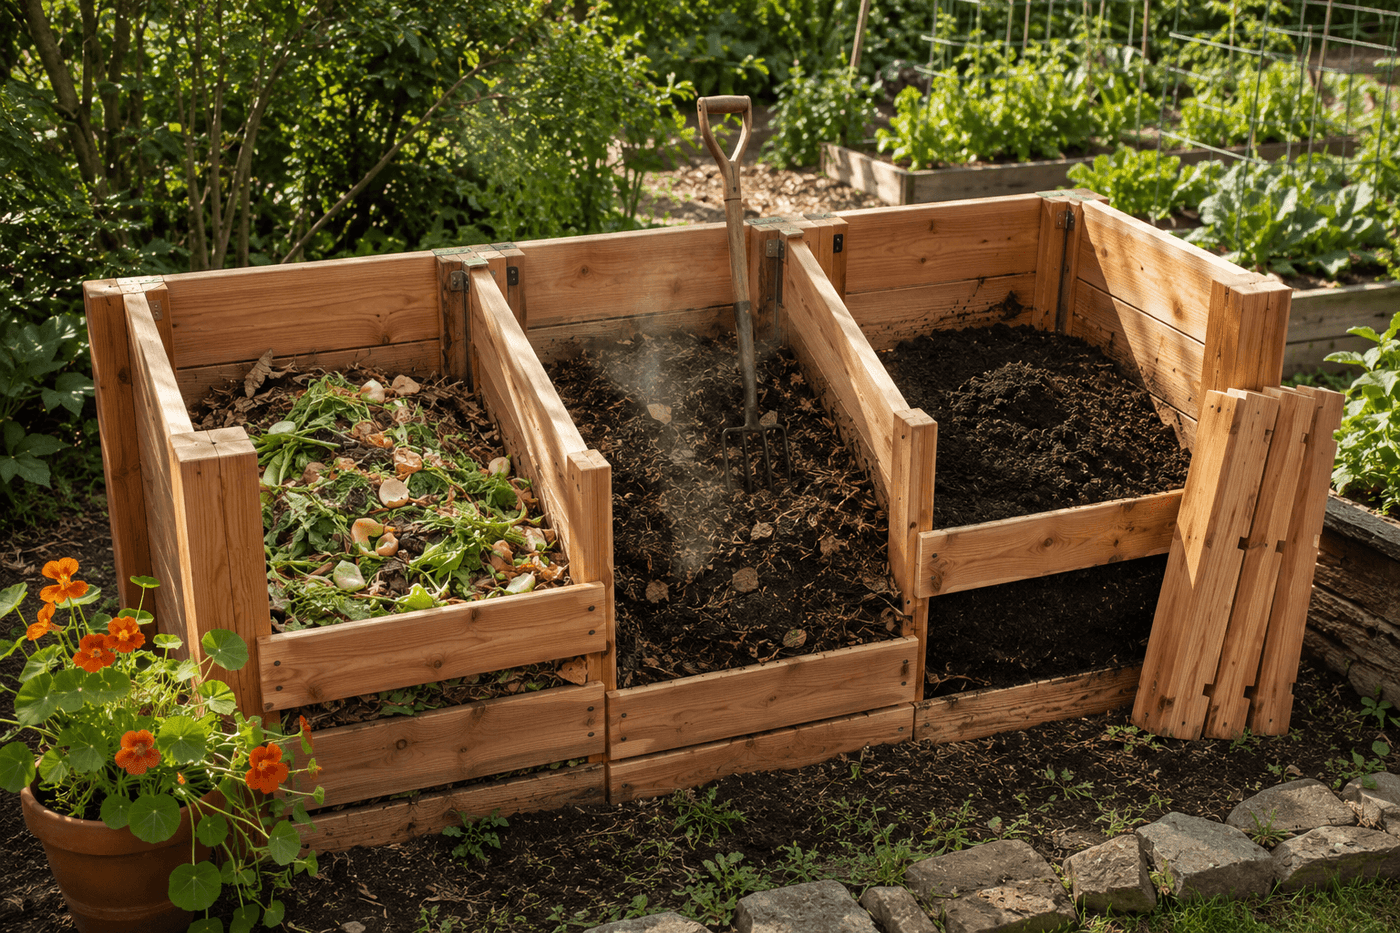
A single compost bin produces compost eventually — eventually being the operative word, because without the ability to separate material by stage and rotate it progressively forward, everything from last week's coffee grounds to the leaves you added six months ago sits in the same pile at whatever stage of breakdown it happens to be in when you need finished material. A three-bin system solves this with elegant simplicity: fresh material goes into bin one, partially broken-down material lives in bin two, and nearly finished compost cures in bin three — and when you need compost, it is always waiting in bin three regardless of what stage bins one and two are at. The removable front slat design is the feature that makes turning and harvesting genuinely easy rather than genuinely miserable, and the total cost of $55 in cedar lumber and hardware builds a system that will serve the garden reliably for fifteen to twenty years of continuous composting — a return on investment that no plastic barrel can come close to matching.
What You Need
- Cedar 4×4 posts, 4-foot lengths, qty 8 — the vertical structural uprights for all three bins; cedar resists soil contact rot naturally without treatment, making it the correct material choice for posts that will sit directly on the ground through decades of outdoor use (~$6–8 each, ~$48–64 total)
- Cedar 1×6 boards, 8-foot lengths, qty 6 — for the fixed side and back walls of each bin; one board cut in half provides two 4-foot wall sections, and three boards per bin wall height gives approximately 18 inches of enclosed bin depth (~$4–5 each, ~$24–30 total)
- Cedar 1×4 boards, 8-foot lengths, qty 4 — for the removable front slats that allow easy access for turning and harvesting; cut into 36-inch lengths that slide into channels between paired front posts (~$3–4 each)
- Exterior screws, 2½" and 1⅝" — for all board-to-post connections; stainless or exterior-coated screws resist the rust staining that standard screws leave on cedar in contact with the organic acids in decomposing compost (~$6–8 for a combination pack)
- Metal post anchors or pressure-treated 2×4 skids — for keeping the post bases off direct soil contact while maintaining stability; post anchors set in concrete or surface-mount post bases keep cedar posts dry and extend their service life significantly (~$5–8 per anchor, or use PT lumber skids for a simpler approach)
- Wire mesh or hardware cloth, optional — stapled to the interior face of the bin walls to prevent compost material from working through the gaps between boards while still allowing airflow through the bin sides (~$8–12 for a roll)
- Drill, miter saw, measuring tape, speed square, and level — standard build tools
How to Build It
- Choose the location before cutting any lumber — the three-bin system needs a footprint of approximately 9 feet wide by 3 feet deep, reasonable access from all three front openings for turning and harvesting, some shade to reduce moisture evaporation from active bins, and proximity to the garden beds that will receive the finished compost. Locating the system near a water source is worth prioritizing; compost piles need regular moisture to decompose efficiently, and a system positioned far from a hose gets watered less consistently than one within easy reach.
- Cut all lumber to length before beginning assembly — eight 4×4 posts at 48 inches each for the vertical uprights, twenty-four 1×6 wall boards at 36 inches each for the fixed sides and backs (eight per bin for three wall faces per bin at three boards high), and twelve 1×4 front slats at 36 inches each for the removable front access panels at four slats per bin opening. Cutting everything before assembly allows the build to flow without interruption and confirms sufficient material before any fasteners are driven.
- Set the four corner posts for the first bin in their anchors or on their skids, confirming each post is plumb in both directions before attaching any wall boards. The post positions determine the interior bin dimensions — 36 inches between post faces on all sides produces a bin large enough to heat properly during active decomposition; bins significantly smaller than 3 cubic feet don't generate the internal heat that accelerates breakdown and kills weed seeds.
- Attach the fixed back and side wall boards to the posts in three horizontal courses, spacing the boards approximately ½ inch apart to allow airflow through the bin walls — good airflow through all bin sides is what maintains aerobic decomposition and prevents the anaerobic conditions that produce the unpleasant odors associated with poorly managed compost. Drive two pre-drilled screws through each board end into the post face, working from the bottom course upward to keep spacing consistent across the full wall height.
- Build the removable front slat system by pairing front posts close enough together that 1×4 boards slide freely between them in a channel — the posts need to be spaced so the 1×4 width plus approximately ¼ inch of clearance fits between them. Attach a vertical 1×2 guide strip to the inner face of each front post to create the channel sides that keep the slats from tipping forward; the guide strips are the construction detail that makes the removable slat system work smoothly rather than requiring the boards to be wrestled out one at a time.
- Complete bins two and three by sharing posts between adjacent bins — the right-side posts of bin one become the left-side posts of bin two, and the right-side posts of bin two become the left-side posts of bin three. This shared-post construction produces a connected three-bin structure that is more rigid than three separate bins placed side by side and requires four fewer posts than building three independent structures — which is where a significant portion of the material cost savings comes from.
- Slide the front slat boards into each bin's front channel to confirm they fit freely and can be removed and replaced with one hand without tools — the ease of the front slat system is the feature that will determine whether turning and harvesting actually happens on a regular schedule or gets avoided because it's too difficult. A slat that requires two hands and significant force to remove will be left in place rather than removed for turning; a slat that slides out with one finger gets removed every time turning is due.
- Begin loading the system immediately — fresh kitchen scraps and yard waste into bin one, alternating green nitrogen-rich materials with brown carbon-rich materials in roughly equal volumes for the carbon-to-nitrogen ratio that produces active decomposition. Turn bin one contents weekly during active composting, move partially decomposed material to bin two after four to six weeks, and allow bin two material to complete its breakdown over another four to six weeks before moving to bin three to cure. The first finished compost from bin three typically appears eight to twelve weeks after the system is loaded and running.
Master gardeners who maintain high-output compost systems always keep a dedicated carbon source pile — a collection of dry autumn leaves, straw, or wood chips — immediately adjacent to the active bin rather than having to search for brown material every time kitchen scraps are added. The carbon-to-nitrogen ratio that produces hot, fast-decomposing compost requires roughly equal volumes of green nitrogen-rich material and brown carbon-rich material with each addition, and a system where brown material is always immediately at hand produces a pile that heats properly and breaks down in weeks rather than one where kitchen scraps are added without brown material and the pile becomes a wet, cold, slow-decomposing mass that discourages the regular additions and management that make a three-bin system work. A simple wire enclosure or wooden pallet corral beside the first active bin holds a full season's supply of carbon material and costs almost nothing to construct.