
Bookshelf Potting Station: Garden-Ready for $25
Sand, exterior paint, waterproof sealant, a row of S-hooks, and a galvanized tray on the bottom shelf — and a displaced bookshelf becomes the most functional thing in the garden for $25.
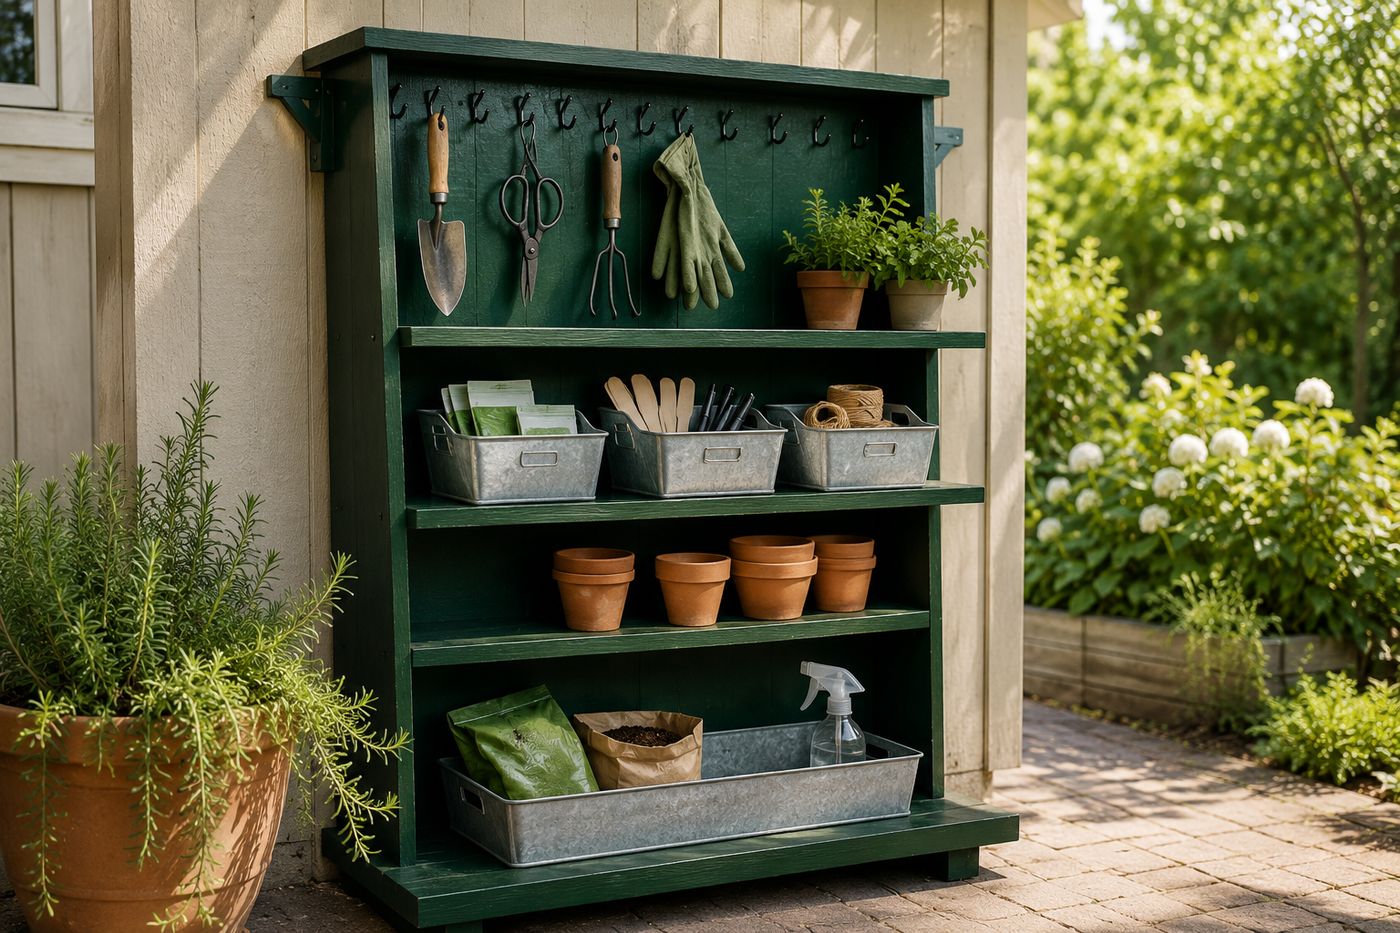
Every gardener eventually reaches the moment of frustration that a dedicated potting station would resolve — the mid-project trip back to the garage for the tool that was not brought outside, the seeds and labels scattered across every available flat surface, the soil bag dragged across the lawn because there is nowhere near the garden to open it properly. A solid wood bookshelf displaced by an interior furniture refresh already has everything a potting station needs: multiple shelf levels for supply organization, a vertical frame that accepts S-hooks for tool hanging, and structural integrity that outdoor weatherproofing converts from indoor-only to genuinely functional for years of garden use. The weatherproofing sequence — light sanding to open the wood grain, two coats of exterior paint, two coats of waterproof sealant on every surface including the back panel and shelf undersides — is the essential foundation that determines whether the finished station lasts one season or a decade. The organization layer on top of that foundation — S-hooks along the top frame, a galvanized tray on the bottom shelf for soil bags, bins sorted by task on the upper shelves — is what converts a painted bookshelf into a potting station that makes every garden session more efficient and more enjoyable than the scattered, trip-intensive alternative it replaces.
What You'll Need
- Solid wood bookshelf — the displaced piece already in the garage, or a thrift store or curbside find; solid wood construction rather than particle board or MDF, which absorbs moisture and swells irreparably regardless of how thoroughly it is sealed; confirm the bookshelf is structurally sound with no loose joints, delaminating surfaces, or soft spots that indicate existing moisture damage before investing in weatherproofing supplies
- Exterior paint in a bold garden color — deep forest green, cobalt blue, warm terracotta, or matte black are the most visually compelling choices for a garden potting station; chalk paint in an outdoor formula adheres to most wood surfaces without primer and produces the matte, intentional finish that reads most beautifully in a garden context; exterior latex in a semi-gloss or satin finish produces a more durable, wipe-clean surface that handles direct soil contact better than matte finishes (~$10–14 for a quart covering a standard 5-shelf bookshelf in two coats)
- Waterproof sealant or exterior polyurethane — two coats over the fully cured paint on every surface including the back panel, shelf undersides, and the base bottom; water-based exterior polyurethane dries clear over any paint color without yellowing and is the most practical sealer for a painted potting station; oil-based polyurethane provides slightly more durable surface hardness but yellows light colors and requires mineral spirits cleanup (~$8–12 for a small can)
- Sandpaper, 120-grit — for a light sanding pass over all surfaces before painting to open the wood grain and any existing finish layer, which allows the exterior paint to bond mechanically rather than sitting on top of the existing finish and eventually peeling; light sanding rather than aggressive stripping — the goal is surface preparation, not bare wood
- S-hooks, 8–12 — for hanging tools along the top frame of the bookshelf; stainless or coated S-hooks resist rust in an outdoor garden environment; confirm the hook opening is sized for the tool handles being hung — most garden trowel and pruner handles fit a standard 2-inch S-hook opening (~$4–6 for a pack)
- Galvanized metal tray or boot tray — sized to fit the bottom shelf; provides a waterproof, wipe-clean surface that contains soil spills and water runoff from soil bags opened on the shelf above; a standard boot tray from the hardware store in a 14x28-inch size fits most bookshelf bottom shelves with minor trimming if needed (~$8–12)
- Small bins or containers for shelf organization — one bin per task category: seeds and seed packets, plant labels and markers, small hand tools, twine and ties, fertilizer and soil amendments; open-top bins rather than lidded containers allow single-handed access during planting sessions when both hands are usually occupied (~$5–8 for a set of small bins if not already owned)
- L-brackets and exterior screws — for securing the bookshelf to the shed wall or fence behind it; an unsecured freestanding bookshelf outdoors tips in strong wind and is a safety hazard when loaded with heavy soil bags and tools on lower shelves; two L-brackets at the top shelf level secured to a structural wall element behind the bookshelf are sufficient to stabilize the full loaded weight (~$4–6 for a two-pack)
How to Transform It
- Assess the bookshelf structurally before purchasing any supplies — press firmly on each shelf to confirm it holds without flexing, push laterally on the frame to confirm the corner joints are rigid rather than racking, and inspect the back panel for any soft spots or delamination that indicate moisture damage in previous storage. A bookshelf that racks or flexes under hand pressure needs corner bracket reinforcement before weatherproofing; one with soft spots or delaminating panels has existing moisture damage that weatherproofing cannot reverse and that will continue to expand under outdoor conditions.
- Sand all surfaces lightly with 120-grit in the direction of the wood grain — the sanding pass removes any existing wax, polish, or topcoat residue that would prevent exterior paint from bonding, and opens the wood grain slightly to provide the mechanical adhesion surface that paint applied to an unsanded piece cannot achieve. Sand every surface that will receive paint including the back panel, the shelf undersides, and the base bottom; these surfaces are the most moisture-vulnerable in an outdoor installation and benefit equally from the paint and sealant protection that the visible surfaces receive.
- Wipe all sanding dust from every surface with a tack cloth or damp microfiber cloth before applying any paint — sanding dust between the wood surface and the paint layer reduces adhesion and produces a slightly gritty paint surface texture that catches and holds soil during use. Allow any moisture from a damp wipe to evaporate fully — at least 30 minutes in warm outdoor conditions — before paint application begins.
- Apply the first coat of exterior paint to all surfaces in a consistent sequence — back panel first, then shelf undersides working from top to bottom, then shelf top faces, then the outer frame surfaces. Following the same surface sequence on every coat ensures no surface is missed and allows the first-applied surfaces to begin drying while the later surfaces are being coated. Apply in thin, even coats using a foam roller on flat shelf surfaces and a chip brush for the frame details and back panel edges.
- Allow the first paint coat to dry fully before the second — chalk paint dries in 30–60 minutes in warm conditions; exterior latex typically requires 2 hours between coats. A second coat applied before the first is fully dry lifts and drags the partially cured first coat rather than bonding over it, producing a streaked, uneven finish that requires additional coats to correct. Confirm dryness by touching an inconspicuous area firmly — the paint should feel completely firm with no tack before the second coat begins.
- Apply two coats of waterproof sealant over the fully cured paint using the same surface sequence as the paint application — back panel, shelf undersides, shelf tops, outer frame. The sealant is the moisture barrier that protects both the paint and the wood from the rain, condensation, and direct water contact that an outdoor potting station experiences continuously; a missed surface is an unprotected surface where moisture begins working into the wood from the first rain. Allow full cure between sealant coats per the product label — typically 2–4 hours for water-based exterior polyurethane.
- Install S-hooks along the top frame after the sealant is fully cured — space them approximately 3 inches apart to allow tool handles to hang without overlapping; hang the largest, heaviest tools at the center of the frame where the structural load is distributed most evenly and the lighter tools toward the ends. Confirm each hook is oriented so the open end faces toward the bookshelf interior rather than outward, which prevents tools from sliding off the hook when bumped from the front during the natural movement of a planting session.
- Secure the loaded bookshelf to the shed wall or fence with L-brackets at the top shelf level before placing any heavy items on the shelves — drill through the L-bracket into a structural element behind the shed wall or fence board, not just the siding surface, which provides the anchoring strength to hold the full loaded weight of a potting station with soil bags, tools, and bins across multiple shelf levels. Place the galvanized tray on the bottom shelf, load the organization bins onto the upper shelves, and assess the arrangement from one step back — tools hanging on the S-hooks should be the items reached most frequently from the primary working position in front of the station, and the bins should be arranged so the most-used categories are at the most accessible shelf height.
Garden designers and outdoor living stylists who create potting station installations for residential and editorial projects consistently recommend one organizational addition that makes a bookshelf potting station significantly more functional than a standard shelf-and-hook arrangement: attach a 6-inch wide cedar or pine board horizontally across the front edges of two adjacent shelf levels to create a built-in work ledge at a comfortable standing working height. The work ledge — essentially a narrow shelf extension that projects 4–6 inches beyond the shelf front edge — provides a small dedicated surface for the immediate task materials (the seed packet being opened, the label being written, the trowel being cleaned) without requiring the main shelf surface to be cleared for working space. Garden designers who add this ledge to converted bookshelf potting stations describe it as the single modification that most increases the station's daily usability — because a potting station without a dedicated work surface still requires a separate table or the ground for active task work, while one with a built-in ledge contains the full planting workflow in a single standing position. The ledge is cut from a 1x6 board, sanded, painted, and sealed to match the bookshelf, and attached with two screws per shelf front edge in under 20 minutes of additional build time.














