
Wooden Lantern Box: Farmhouse Build for $10
Four corner posts, a base, a top, a drawer pull handle, and a coat of distressed white paint — and a $10 woodworking build becomes the most photographed centerpiece on the porch.
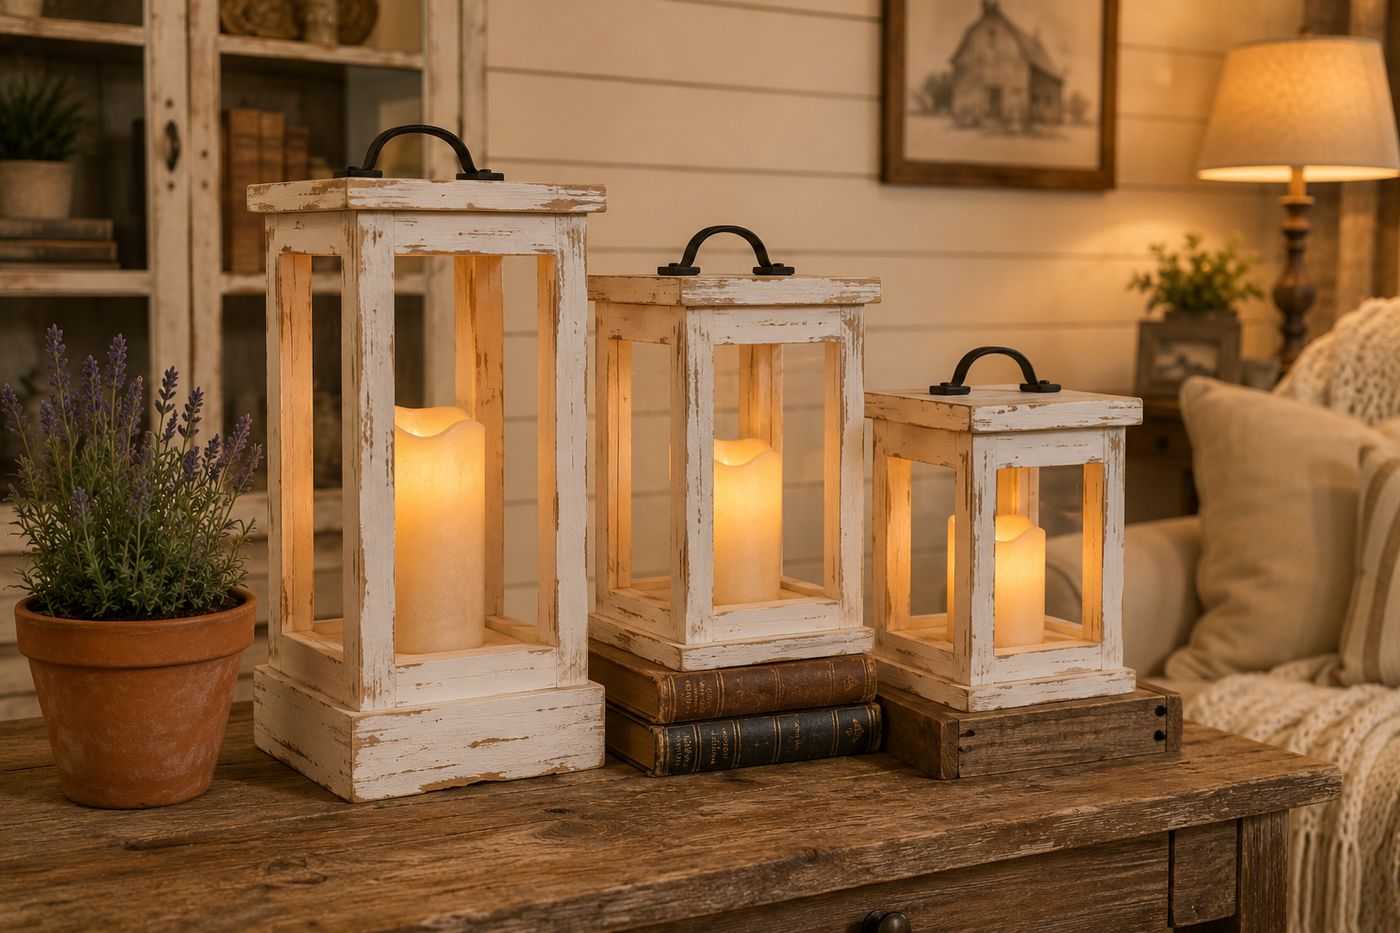
The wooden lantern box looks like something purchased from a farmhouse décor shop for $35–50 and is actually one of the most accessible woodworking builds available — four corner posts, a base, a top, and the finish work that makes the whole piece read as either rustic or refined depending on the stain or paint chosen. The open-sided frame design is what makes it both beautiful and versatile: an LED pillar candle placed inside glows through all four sides simultaneously, a mason jar filled with fairy lights produces a different quality of diffused light through the same frame, and the absence of sides makes the object read as architecturally interesting from any angle rather than only from the front. Building three in graduated heights — a short 10-inch, a medium 14-inch, and a tall 18-inch — and grouping them at different elevations on a porch table, a mantel, or a garden side table produces a display that looks like a considered styling decision from a person who has a very good eye. The total material cost for all three is approximately $25–30, the build time for the full set is about three hours, and the grouped display photograph will be the most liked thing on any social media account it appears in.
What You'll Need
- 1x1 square dowels or 1x1 lumber, 8 feet — for the four corner posts of each lantern; one 8-foot length yields the four corner posts for one lantern at any height from 10 to 20 inches; square dowels from the lumber aisle produce cleaner, more consistent corners than ripped lumber; the 1x1 actual dimension (¾ x ¾ inch) produces proportionally correct corner posts for a 6-inch square base and top (~$3–4 per 8-foot length)
- 1x6 pine or poplar board, 2 feet — for the base and top squares of each lantern; a 2-foot section of 1x6 yields both a 6x6-inch base and a 6x6-inch top with minimal waste; poplar produces a cleaner painted surface than pine due to its more uniform grain and fewer knots; pine is more economical and entirely adequate for a distressed painted finish where small grain variations are an aesthetic asset (~$3–5 for a short length)
- Exterior or interior finish — choose based on placement:
- Distressed white chalk paint — the most classic farmhouse lantern finish; apply in two coats, allow to dry, then sand lightly at all edges and corners with 220-grit to reveal the wood beneath; seal with clear wax or matte polyurethane
- Dark walnut stain — the most sophisticated and modern interpretation of the same form; produces a lantern that reads as a high-end design object rather than a farmhouse accent
- Exterior semi-gloss paint for outdoor use — any color; follow with exterior polyurethane if the lantern will be in a rain-exposed location
- Drawer pull handle — a single centered drawer pull screwed into the top square; the handle is the detail that elevates the lantern from a box frame to a designed object and makes it immediately portable; an arched black iron drawer pull is the most widely used and most proportionally correct hardware choice for a farmhouse lantern at this scale (~$3–6 each at hardware stores)
- Wood glue and 1-inch finish nails or brad nails — for post-to-base and post-to-top connections; wood glue carries the structural load and the nails maintain alignment during curing; a brad nailer makes this assembly faster but a hammer and finish nails works equally well for the light joints that connect ¾-inch square posts to ¾-inch board
- Sandpaper, 80- and 220-grit — 80-grit for initial surface smoothing; 220-grit for the final pass before finishing and for the distressing pass on chalk-painted surfaces after the paint is fully cured
- LED pillar candle, mason jar with fairy lights, or battery-operated candle — for the interior light source; never use real candles in a wooden lantern; LED pillar candles in warm white produce the most convincing candlelight effect through the open frame (~$5–10 for a quality flickering LED pillar candle)
- Miter saw or hand saw with miter box — for the square cuts on the post tops and bottoms that determine whether the lantern sits level; posts cut at even a slight angle produce a lantern that rocks rather than sitting flat, which no amount of finishing conceals
How to Build It
- Determine the lantern height and cut the four corner posts to that dimension — all four posts must be identical in length for the top square to sit level across all four; cut all four from the same position on the same dowel board when possible to ensure identical grain orientation and consistent appearance. The finished lantern height equals the post length plus the combined thickness of the base and top boards (approximately 1½ inches total for two ¾-inch boards), which means a 14-inch finished lantern needs 12½-inch posts.
- Cut the base and top squares from the 1x6 board — both squares at 6x6 inches for a proportionally balanced lantern at any height from 10 to 20 inches; a wider base and top at 7x7 or 8x8 inches produces a more substantial lantern with wider light-shine openings that suits larger LED candles and more dramatic display applications. Confirm both squares are true squares rather than slightly rectangular by measuring diagonals — equal diagonal measurements confirm square corners.
- Sand all pieces through 80- and 220-grit before assembly — individual flat pieces sand quickly and completely on all faces and edges; the same surfaces after assembly have inaccessible interior corners where the posts meet the base and top that sandpaper cannot reach without disassembling the lantern. Pay particular attention to the post bottom faces that will rest on the base square and the post top faces that will contact the top square; flat, smooth contact faces at these joints produce the tight, gap-free assembly that reads as crafted.
- Mark the post positions on the base square before any glue is applied — place each post at the corner of the base square with the outer post faces flush with the outer base edges, and mark the post footprint with a pencil. The post placement determines whether the finished lantern has posts that align cleanly with the base corners or posts that are set in from the edge; flush-with-the-edge placement produces a more refined, architectural look while inset placement produces a slightly more rustic appearance.
- Assemble the base and posts — apply wood glue to the marked post footprints on the base square and to the bottom face of each post, position each post in its marked location, confirm all four posts are vertical using a small speed square held against each post face, and drive one 1-inch finish nail through the base into each post bottom to secure the glue joint while curing. Allow the base-and-post assembly to cure fully — at least 30 minutes — before attaching the top square; a top attached before the base assembly is cured produces a lantern where all joints are under stress simultaneously, which causes the uncured glue joints to shift and the finished lantern to be slightly racked rather than true.
- Attach the top square across the tops of all four posts — apply glue to the top face of each post and to the corresponding contact points on the underside of the top square, lower the top square onto the posts with the outer top edges flush with the outer post faces, confirm the top is level in both directions by placing a level across it before the glue sets, and drive one finish nail through the top into each post to secure the joint. A top that is not level in both axes produces a lantern that looks as though it is leaning in its display position regardless of how level the surface it rests on actually is.
- Install the drawer pull handle centered on the top square after the full assembly is cured — mark the center of the top square by drawing two diagonal lines corner to corner and drilling the hardware mounting holes at the center point and at the spacing dimension of the specific pull being used. Pre-drill both mounting holes to prevent splitting the top square when the hardware screws are driven; the top square is the thinnest structural element in the lantern and the most likely to split without pilot holes. Drive the hardware screws from below the top square upward into the pull base.
- Finish the lantern with the chosen paint or stain — for distressed white chalk paint, apply two full coats and allow to cure completely, then sand lightly at all edges, corners, and any area where natural wear would occur using 220-grit; the sanding reveals the wood beneath the paint in exactly the pattern that years of handling would produce, which is the specific quality that makes a distressed finish read as authentic rather than artificially aged. Seal with clear furniture wax or matte polyurethane after distressing; the sealant protects the distressed surface from further unintentional wear and locks in the finish at exactly the level of distressing achieved during the sanding step.
Interior stylists and home décor photographers who style wooden lantern displays for editorial shoots and retail catalog photography consistently use one grouping principle that produces a display that reads as a professional décor installation rather than objects set on a surface: when grouping lanterns of graduated heights, never place them at the same elevation — vary the surface height of each lantern by using books, wooden crates, or stacked boards beneath the shorter lanterns so that the top of the shortest lantern is at approximately the same height as the mid-point of the tallest lantern. This elevated-base technique produces a cascading silhouette where the eye travels upward from the shortest to the tallest lantern in a continuous diagonal line rather than reading the group as a staircase — the diagonal quality is what makes the grouping feel dynamic and designed rather than simply graduated. Home stylists who use this technique for lantern and candle groupings describe the before-and-after as the difference between three lanterns on a table and a lantern vignette — the elevated bases adding the specific dimensional quality that makes the group read as a single composed object rather than a collection of individual pieces at different heights.














