
Turn Thrift Store Crates into Stacked Storage Shelves for $30
Six crates, chalk paint, and a drill — the editorial open shelving look that home décor stores charge a fortune for, built in two hours for $30
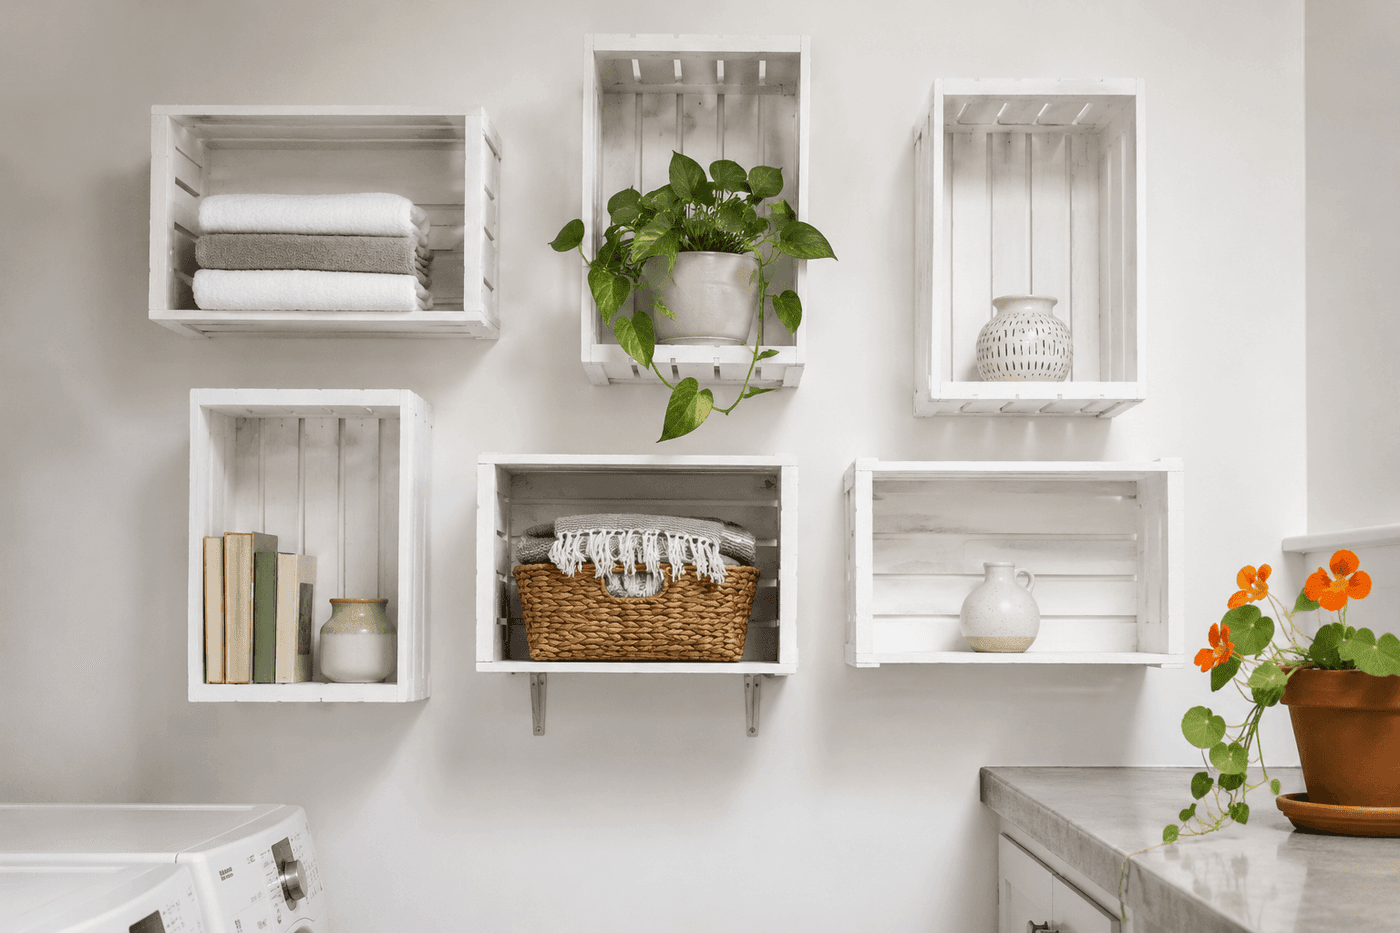
The open shelving look that fills every home décor magazine and costs $200 to $400 in purpose-built wall units is, at its core, a collection of small open boxes mounted to a wall in an arrangement that looks deliberately styled. Wooden crates from a thrift store are those boxes — already built, already textured, already possessing the imperfect, handmade quality that gives them more visual character than any mass-produced shelf unit — and chalk paint plus two hours of mounting work is the distance between a $3-each thrift store find and a wall installation that makes guests ask which store you found it in. The staggered arrangement of some crates horizontal and some vertical accommodates items of different heights, creates the asymmetrical visual rhythm that makes the wall look editorial rather than grid-like, and costs nothing beyond the decision to alternate orientations before the first bracket goes into the wall. This is one of those projects where thrift store patience produces a disproportionate design result.
What You Need
- Wooden crates, qty 4–6 — look for crates with solid back panels rather than slatted backs, which provide a better surface for wall screw attachment; consistent depth across all crates produces the most polished wall installation, while slight size variation adds character without looking mismatched (~$3–5 each at thrift stores, ~$15–20 total)
- Chalk paint in white or your chosen color — chalk paint adheres to raw wood without primer and dries to the matte finish that gives mounted crates their editorial, styled appearance; one small can covers four to six standard crates (~$8–12)
- Heavy-duty L-brackets, qty 1–2 per crate — sized to fit under the crate base; rated for at least 20 lbs per bracket for a loaded crate; L-brackets mounted into wall studs provide the secure attachment that supports daily loading and unloading without the crate shifting (~$2–3 per bracket)
- Stud finder — for locating the wall studs before any bracket installation; crates loaded with books, towels, or kitchen items carry significant weight and must be mounted into studs rather than drywall anchors for a permanent, safe installation (~$10–15 if not already owned)
- Drill with driver bit and pilot bit — for driving bracket mounting screws into studs and for the through-back screw that locks each crate flush against the wall
- Exterior screws, 2½" and 1⅝" — 2½-inch screws for L-bracket mounting into studs; 1⅝-inch screws through each crate back panel into the stud for flush wall contact
- Sandpaper, 120-grit — for smoothing rough edges and any splinter-prone surfaces on thrift store crates before painting
- Level — for confirming each crate is mounted level before tightening all fasteners; a single crate mounted slightly off-level reads as a mistake rather than as an intentional staggered arrangement
How to Build It
- Sand all crates lightly with 120-grit paper before painting — thrift store crates often have rough edges, raised grain, and occasional splinter-prone surfaces from storage and handling that sand smooth in minutes. Pay particular attention to the top edges and interior corners that hands will contact during loading and unloading; smooth surfaces are the preparation detail that makes a thrift store crate feel like a finished shelf rather than a repurposed box.
- Paint all crates with two thin coats of chalk paint, allowing full drying time between coats — chalk paint on raw wood dries to the touch in about twenty minutes but benefits from a full hour between coats for maximum adhesion. Paint the interior and exterior of each crate, including the back panel surface that will face the wall, as unfinished interior surfaces visible through the open front face are immediately noticeable against painted exteriors and undermine the polished appearance of the finished installation.
- Plan the wall arrangement by cutting paper pieces to the same dimensions as each crate face and taping them to the wall in your intended configuration — stand back and assess the arrangement from the viewing distance of the room before drilling any holes. The staggered arrangement that reads best typically places crates at two to three different heights with some horizontal and some vertical orientation, creates an overall shape that is roughly rectangular rather than perfectly symmetrical, and leaves one to two inches of space between adjacent crates for visual breathing room.
- Mark stud locations along the full wall section where crates will be mounted using the stud finder before removing the paper templates — mark each stud position lightly in pencil at the heights where L-brackets will be installed. Stud locations dictate final crate positioning more than aesthetic preference does; a crate whose bracket falls between studs requires wall anchors rated for the expected load, which are reliable for lighter loads but should not be the primary fastening method for crates that will carry books, kitchen items, or anything above a few pounds.
- Mount the first L-bracket for the lowest crate in the arrangement — drive 2½-inch screws through the bracket mounting holes into the stud at the correct height for the crate base to sit level. Hold the crate in position on the bracket before tightening all screws to confirm the bracket height places the crate exactly where the paper template indicated it should be; repositioning a partially mounted bracket is straightforward, while repositioning after all screws are fully driven requires filling and repainting the original holes before remounting.
- Set each crate onto its bracket and drive a 1⅝-inch screw through the crate back panel into the wall stud behind it — this back screw pulls the crate flush against the wall and prevents the forward tipping that occurs when a crate mounted only on an L-bracket is loaded with weight toward the front of the crate interior. Pre-drill the pilot hole through the back panel before driving the screw to prevent splitting the panel wood; a split back panel on a mounted crate is both structurally weakened and visually prominent from any angle.
- Check each crate for level with a spirit level placed across the top edge before considering any crate fully installed — a crate that reads level on the bracket before the back screw is driven sometimes pulls slightly off-level when the back screw is tightened if the stud face behind it isn't perfectly plumb. Catching this off-level condition before moving to the next crate allows a simple shim adjustment; discovering it after the full arrangement is mounted requires removing the crate and remounting from scratch.
- Style the completed crate wall by filling each crate with its intended contents — folded towels stacked neatly, a small potted plant, a basket containing smaller items, or a curated collection of objects that belongs to the room's function. The styling is where the editorial quality of the installation fully emerges; a crate wall filled with randomly placed items looks like storage, while the same wall with intentionally grouped, carefully placed contents looks like a designed installation that earns every compliment it receives.
Interior designers who work with open shelving always style to the rule of odd numbers and varying heights — grouping items in threes rather than pairs, mixing one tall item with two shorter ones rather than three items of identical height, and leaving at least one section of each crate with visible empty space rather than filling every available inch. The empty space is the element that most consistently distinguishes styled shelving from packed storage, because it gives the eye a place to rest between the grouped objects and creates the visual breathing room that makes the whole installation read as curated rather than crammed. A single trailing plant allowed to spill over one crate edge and a small ceramic object placed alone in a second crate creates more visual interest across the full arrangement than filling every crate to capacity with useful items, and it costs nothing beyond the decision to leave some space intentionally empty.














