
Turn Old Shutters into an Outdoor Serving Station for $28
Two salvage yard shutters, a board for the top, and an afternoon — the outdoor bar that looks like a boutique furniture find
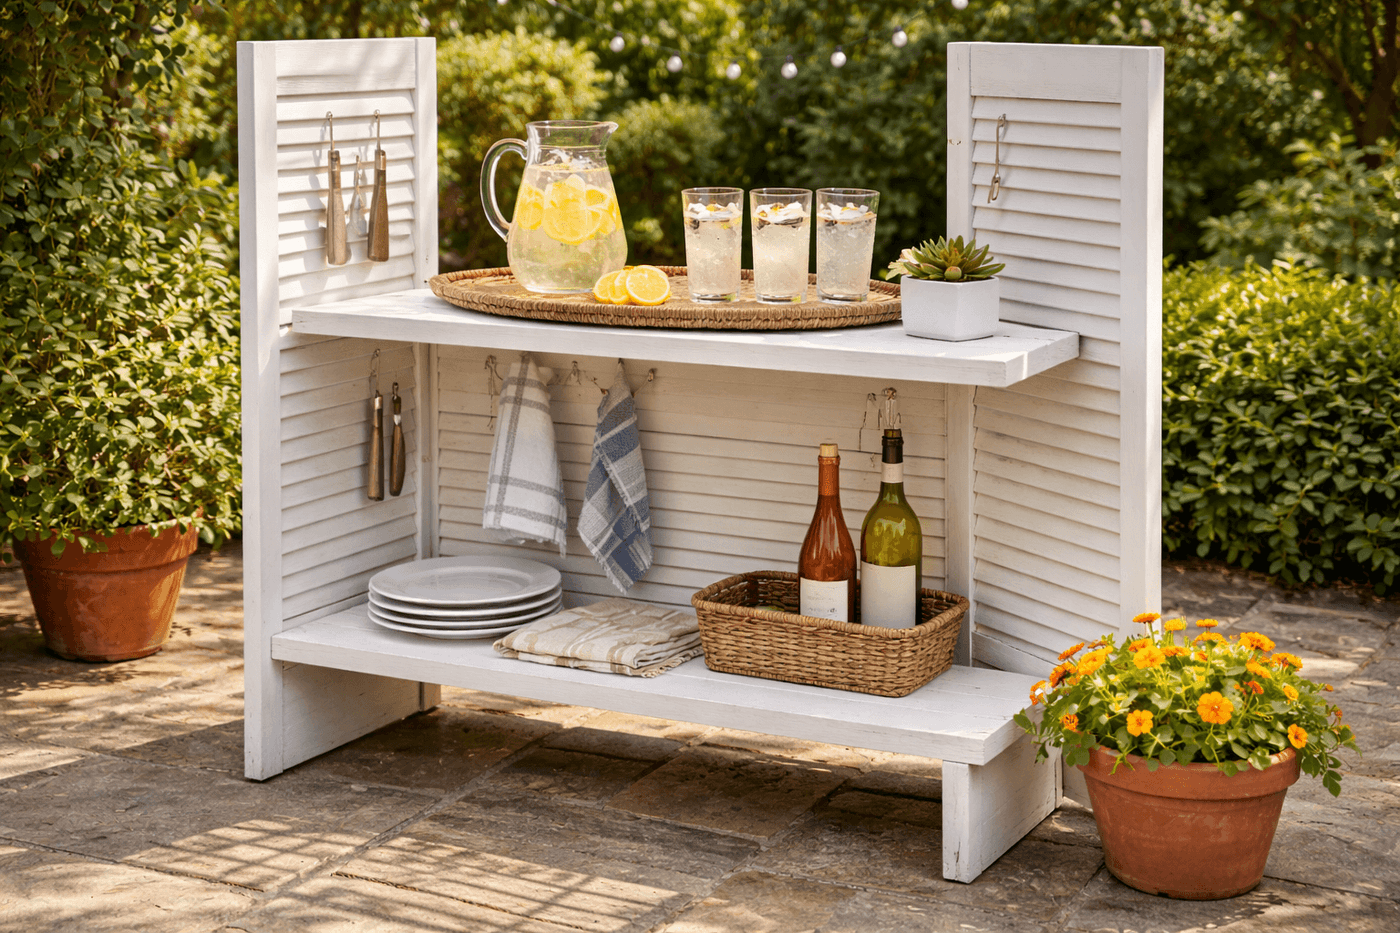
Outdoor serving stations and bar carts are one of those patio accessories that cost far more than their function justifies — a simple surface to hold drinks and glasses while guests help themselves, transformed by retail markup into something that requires a significant purchasing decision. Two vintage shutters from an architectural salvage yard or a Habitat for Humanity ReStore, connected with a 1×12 board across the top and another as a lower shelf, build into a serving station with far more visual character than anything in the same price range from a furniture retailer — and the louvered or paneled shutter sides give it that specific combination of structure and visual interest that makes people assume you found rather than built it. The total investment runs $20 to $35 depending on shutter size and paint choices, the build takes an afternoon, and the finished piece works as an outdoor bar for entertaining, a potting station for garden work, and a display surface for everything in between. Functional outdoor furniture with genuine personality, built from salvage for the cost of a few plants.
What You Need
- Matching or complementary shutters, qty 2 — louvered shutters give the most visual interest and ventilation; panel shutters give a cleaner, more modern look; aim for shutters at least 48 inches tall so the finished serving surface sits at a comfortable standing height (architectural salvage yards, Habitat ReStores, or estate sales, ~$5–15 per shutter)
- 1×12 lumber, cut to serving station width — for the top serving surface; width is determined by the distance between the outer faces of the two standing shutters plus any desired overhang (~$8–12 for a length that yields both top and bottom shelf)
- L-brackets, heavy duty, qty 4 — two per shelf, mounted from underneath to secure both the top serving board and the lower storage shelf to the shutter sides without visible fasteners on the top surfaces (~$4–6 for a pack)
- Exterior screws, 1¼" and 2" — for L-bracket mounting and any additional structural reinforcement at the shutter-to-shelf connections
- Exterior primer and paint — all-over white gives a coastal look; shutters in one color and shelves in a contrasting tone gives a more graphic, designed result; chalk paint adheres to wood without primer and produces a matte finish that photographs beautifully (~$8–12 for sample pots)
- Exterior clear sealer — for the top serving surface specifically; a sealed top handles drink condensation, spills, and outdoor moisture without staining or warping (~$8–10)
- S-hooks or utility hooks, qty 6–8 — for hanging utensils, bottle openers, dish towels, and small tools from the interior louvered slats or panel edges of the shutter sides (~$3–5 for a pack)
- Sandpaper, 120-grit — for smoothing any rough shutter surfaces, edges, and the cut lumber ends before painting
- Drill with bit set — for mounting L-brackets and driving all fasteners
How to Build It
- Assess your shutters before purchasing lumber — stand both shutters upright at the spacing you want for the finished station and measure the distance between their inner faces at both the top and bottom to confirm they are parallel and that the distance is consistent throughout the height. Warped shutters that are wider at the top than the bottom produce a serving station that is structurally unstable and requires shimming or bracing to correct after assembly; confirming parallel faces before cutting lumber saves significant frustration.
- Sand all shutter surfaces and edges with 120-grit paper, paying particular attention to any peeling paint, rough louver edges, or splintered frame corners. Salvage shutters often have multiple layers of old paint that sand smooth quickly but reveal texture variations that show through new paint if the surface isn't uniformly smooth before priming — take an extra five minutes on any area that feels rough under the sandpaper before moving on.
- Paint the shutters before assembly while they can be laid flat and rotated for full coverage — painting louvered shutters in the assembled serving station position means reaching between the shutter sides to access the interior faces, which is awkward and produces incomplete coverage on the slat undersides that are visible when the station is in use. Two coats of exterior paint or chalk paint on flat shutters takes thirty minutes and produces dramatically more complete coverage than the same effort on an assembled structure.
- Cut the top serving board and bottom shelf board to your determined width while the shutter paint dries — cut both pieces from the same 1×12 board if possible for consistent grain and color matching, and sand all cut edges smooth before painting. Paint the top and bottom shelf boards to match or contrast with the shutters, applying two coats and sealing the top serving board with two additional coats of clear exterior sealer once the paint is fully dry.
- Stand both shutters upright in their final position and brace them temporarily with clamps or have a helper hold them while you determine the exact shelf heights — the top serving surface should sit at a comfortable bar height for your household (typically 36 to 42 inches from the ground), and the bottom shelf should clear the ground by at least four inches to allow airflow and prevent moisture accumulation beneath stored items.
- Mount L-brackets to the inner face of each shutter at both shelf height positions before placing the boards — drilling into the shutter frame rather than the louvers themselves, positioning each bracket so the horizontal arm extends inward to support the shelf board edge. Mount all four brackets before placing either board so you can confirm all four are at the same height on their respective sides, which is the alignment step that determines whether the finished shelves sit level or visibly slope toward one side.
- Set the top serving board across the L-brackets at the top position and drive screws up through the bracket horizontal arms into the board underside — two screws per bracket, pre-drilled to prevent splitting in the shelf board edge. Repeat for the bottom shelf board. The L-bracket mounting from underneath leaves a completely clean top surface on both shelves with no visible fastener heads, which is the detail that gives the finished station its furniture-quality rather than constructed appearance.
- Install S-hooks or utility hooks on the interior shutter faces at varying heights to create hanging storage for utensils, bottle openers, a corkscrew, small towels, and any other serving accessories — louvered shutters accept S-hooks directly through the louver slats without any drilling, while panel shutters require small screw-in hooks driven into the frame members. Style the finished station with drinks, glassware, and a small potted plant on the top surface to assess the finished composition before the first gathering it serves.
Furniture upcyclers who work with salvage architectural elements always add a pair of heavy-duty locking caster wheels to the bottom of each shutter before assembly rather than leaving the station stationary — a serving station on locking casters rolls easily from garage storage to patio position for each gathering and locks in place during use, which means it can be stored protected from weather between events rather than left outdoors through rain and temperature cycling that degrades even well-painted wood over time. Four outdoor locking casters rated for the weight of a stocked serving station cost about $12 at any hardware store, and the mobility they add transforms a stationary outdoor fixture into a genuinely versatile piece that serves different spaces for different occasions without any lifting or disassembly.














